
So, you’ve heard of this new craze called “Pokemon Go.” Notice that wasn’t a question. If you’re a living, breathing human being, you have heard about Pokemon Go. It’s a worldwide phenomenon. You can literally walk out your front door and find people playing it. Starting the game as a beginner can be a bit daunting. We’ll explain the basics and get you started on your way toward a Pokemon Master.
Getting Started

- Download Pokemon Go from the Google Play Store (also available on iOS)
- Open Pokemon Go
- On the sign-up page, tap Google and sign in
It’s possible to create a “Pokemon Trainer Club” account, but it’s much easier and more reliable to use your Google account.
Next, you’ll be able to customize your digital character. You can choose gender, skin color, hair color, eye color, and clothing. IMPORTANT: At this time it’s not possible to change your character after this step. Don’t rush through the process.
Once you’re happy with your character, you’ll enter the map. This is where 99% of gameplay occurs. It’s basically a cartoon version of Google Maps. The first thing you’ll be asked to do is choose a “Starter Pokemon” from three choices: Bulbasaur, Charmander, or Squirtle. The starter Pokemon are pretty rare, so choose wisely. More on catching Pokemon below.
Catching Pokémon
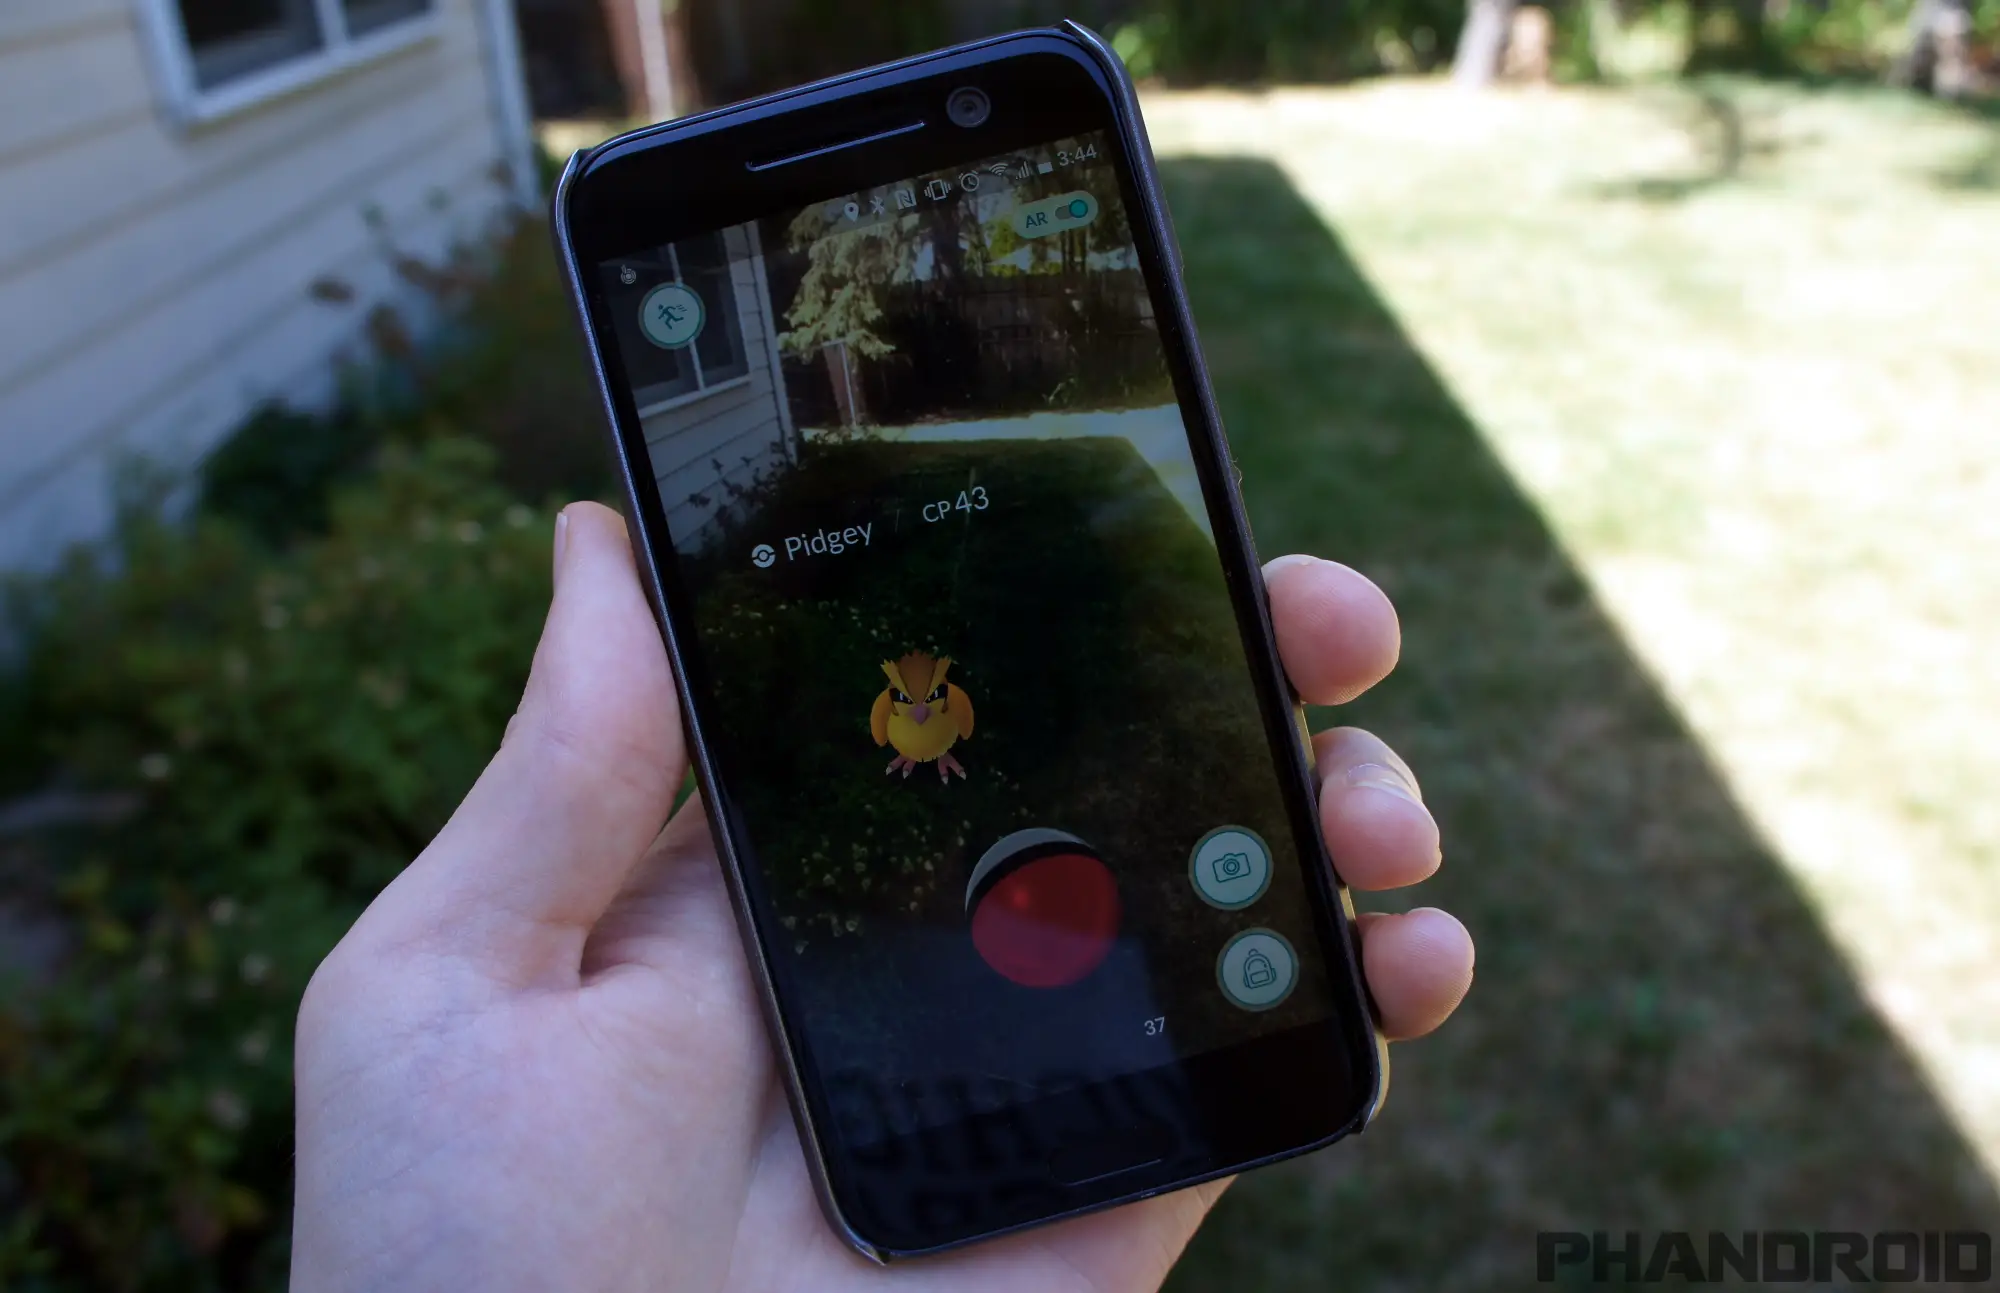
Catching Pokemon is the main thing you’ll be doing in this game. Tap the tab in the bottom right of the map to see all the nearby Pokemon. The number of footprints under each Pokemon signifies how far away it is. 0 footprints means you’re practically on top of it. 3 means it’s far away. The idea is to walk around and use the footprints to track down the Pokemon.
Once a Pokemon is close enough to catch, your phone will vibrate and you’ll see the Pokemon on the map. Let’s catch it.
- Tap on a Pokemon on the map
- The Pokemon will appear on your screen in augmented reality. Move your phone around to get the Pokemon in front of you
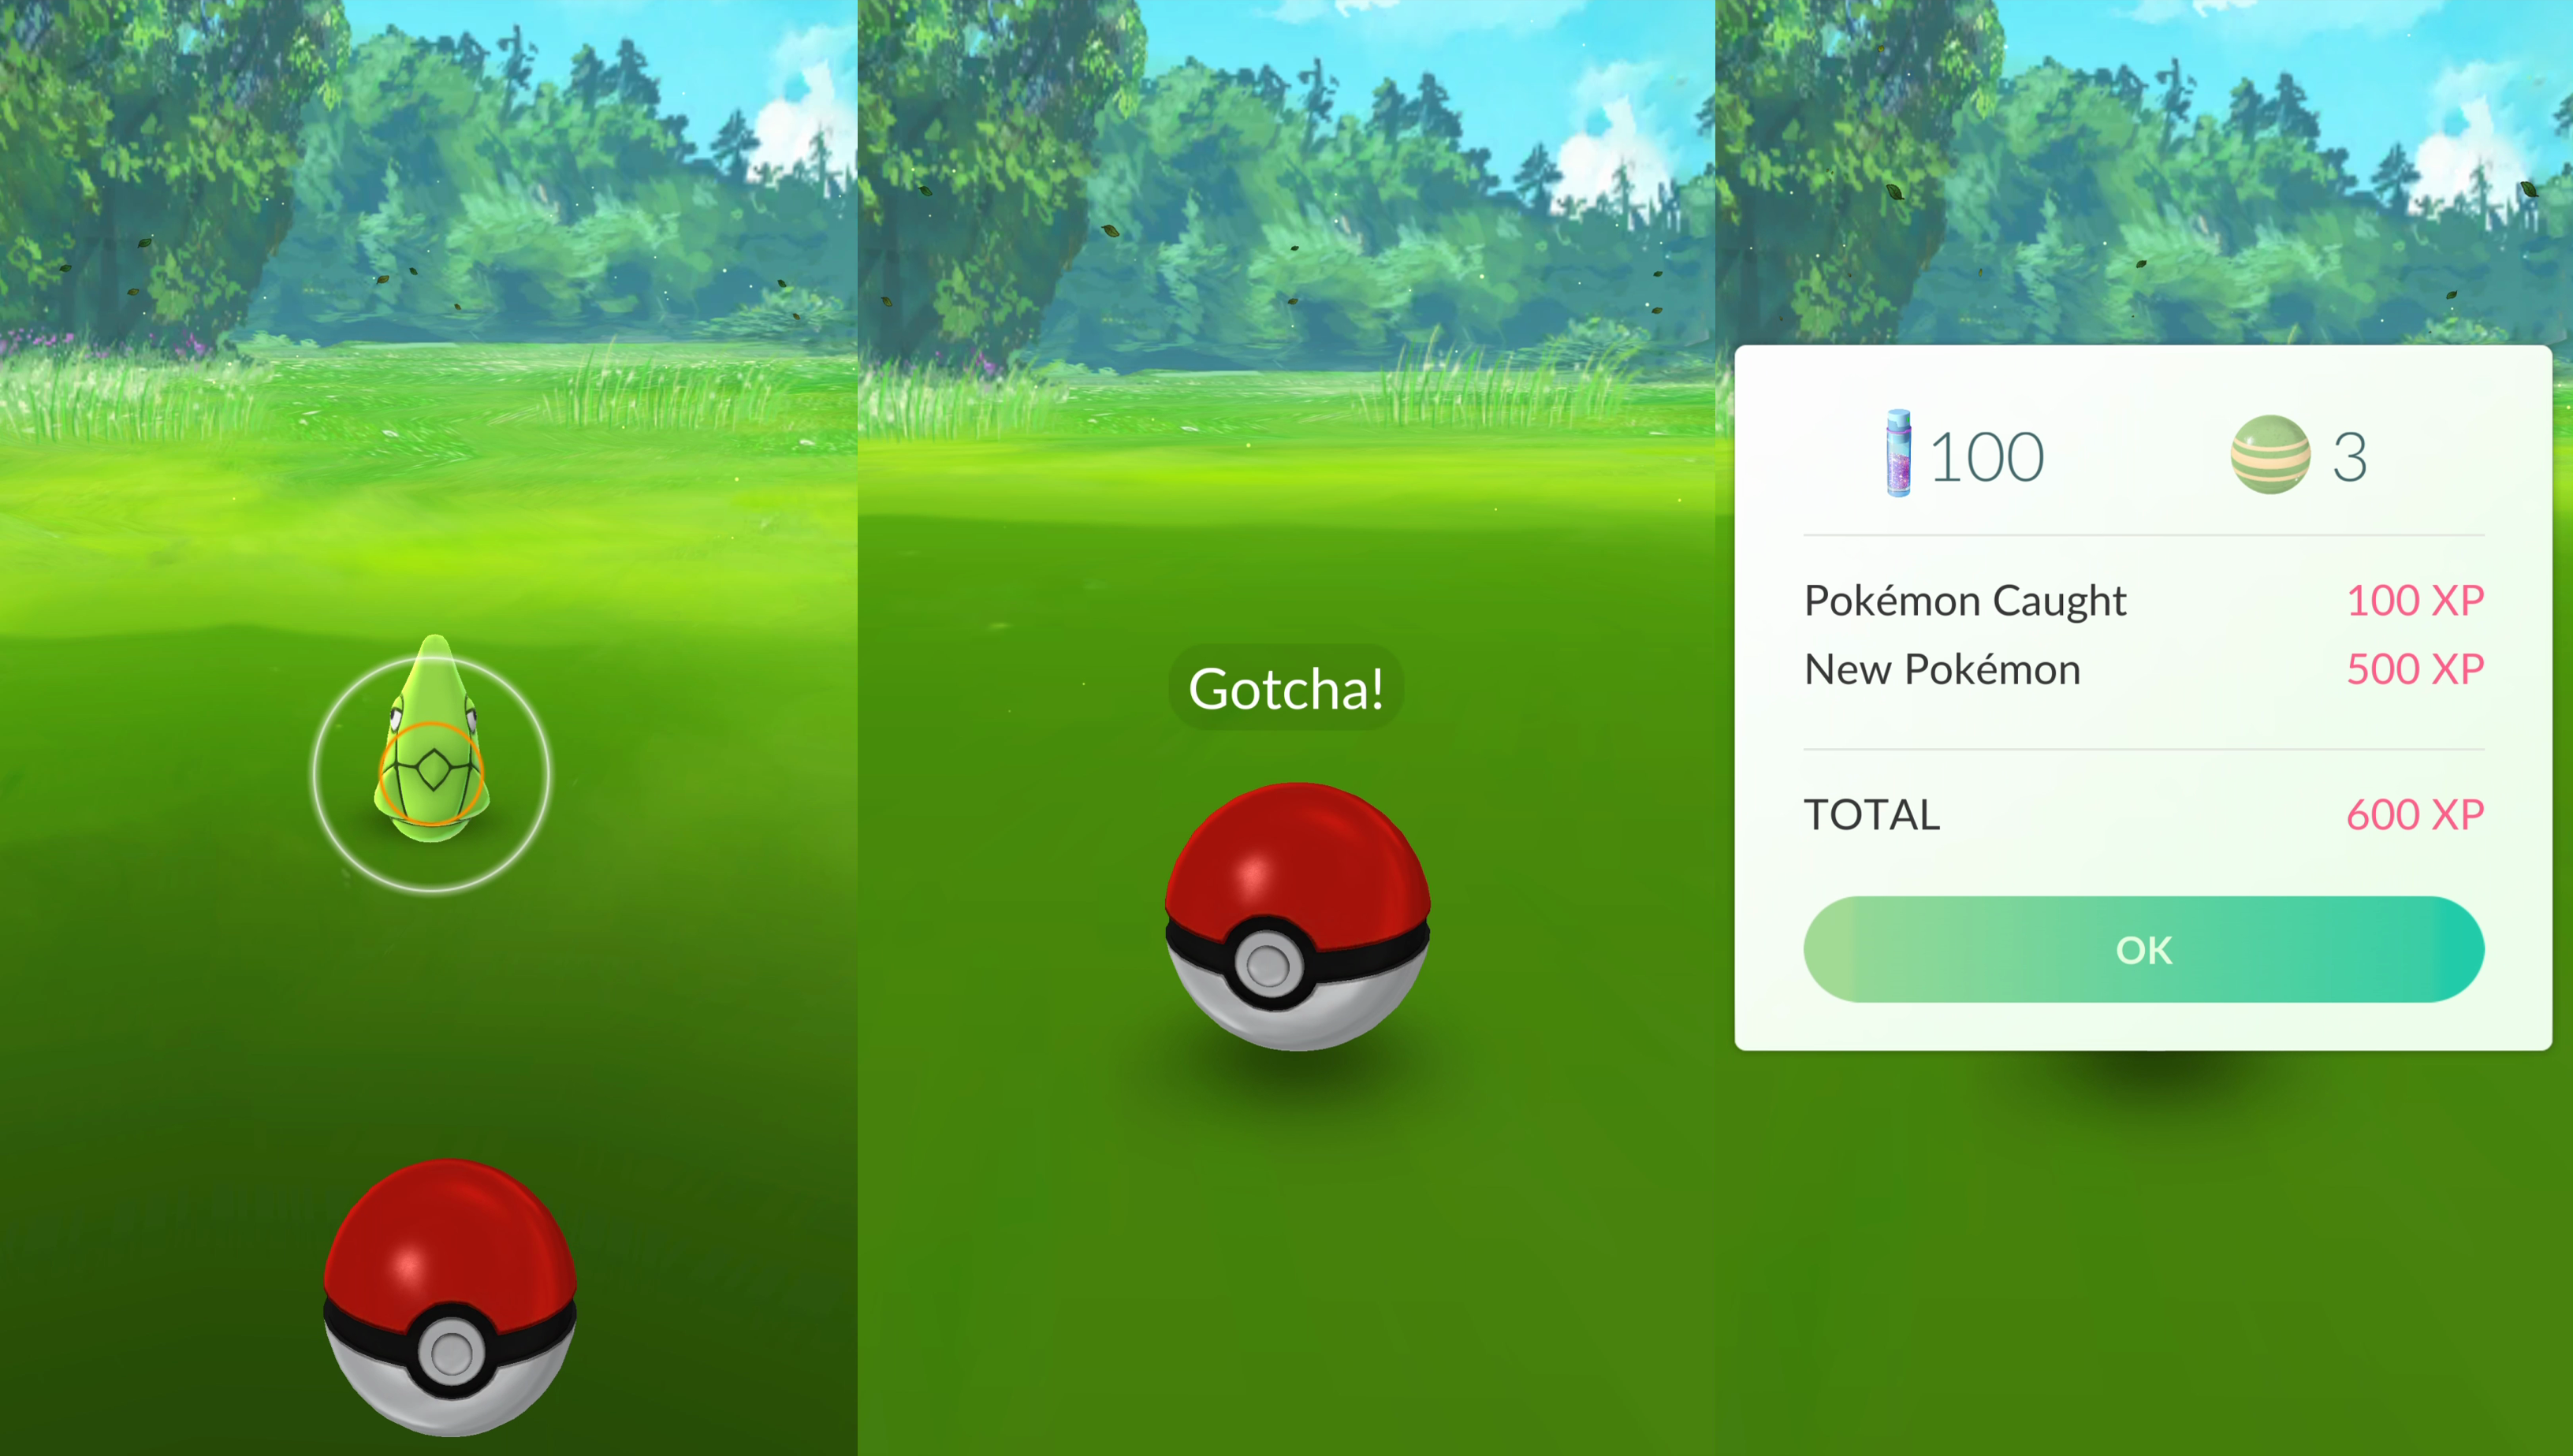
- Use your finger to fling the Pokeball from the bottom of the screen at the Pokemon
- With a little practice, you’ll hit the Pokemon and it will be sucked into the Pokeball
- The Pokeball will flash red until the Pokemon is secured
- Tap OK on the info card
- The Pokemon will be added to your Pokedex
- Tap the checkmark on the bio card
Tip: Some Pokemon are more difficult to catch than others. Hold your finger on the Pokeball before throwing and you’ll see a colored ring around the Pokemon. Green is easy, orange is moderate, and red is difficult. The circle will pulse in and out. Throw the Pokeball when the circle is the smallest for your best chance to catch the Pokemon.
“I caught a Pokemon, now what?”
So what exactly is the point of catching Pokemon? Well, that’s like asking what’s the point of scoring goals in soccer. Catching Pokemon is what the game is all about. Your Pokemon will be used to fight battles and conquer enemies in your name. Every time you catch a Pokemon you earn stardust, candy, and XP points. We’ll explain all that later on. All you need to know is catching Pokemon = good.
Visiting Pokéstops
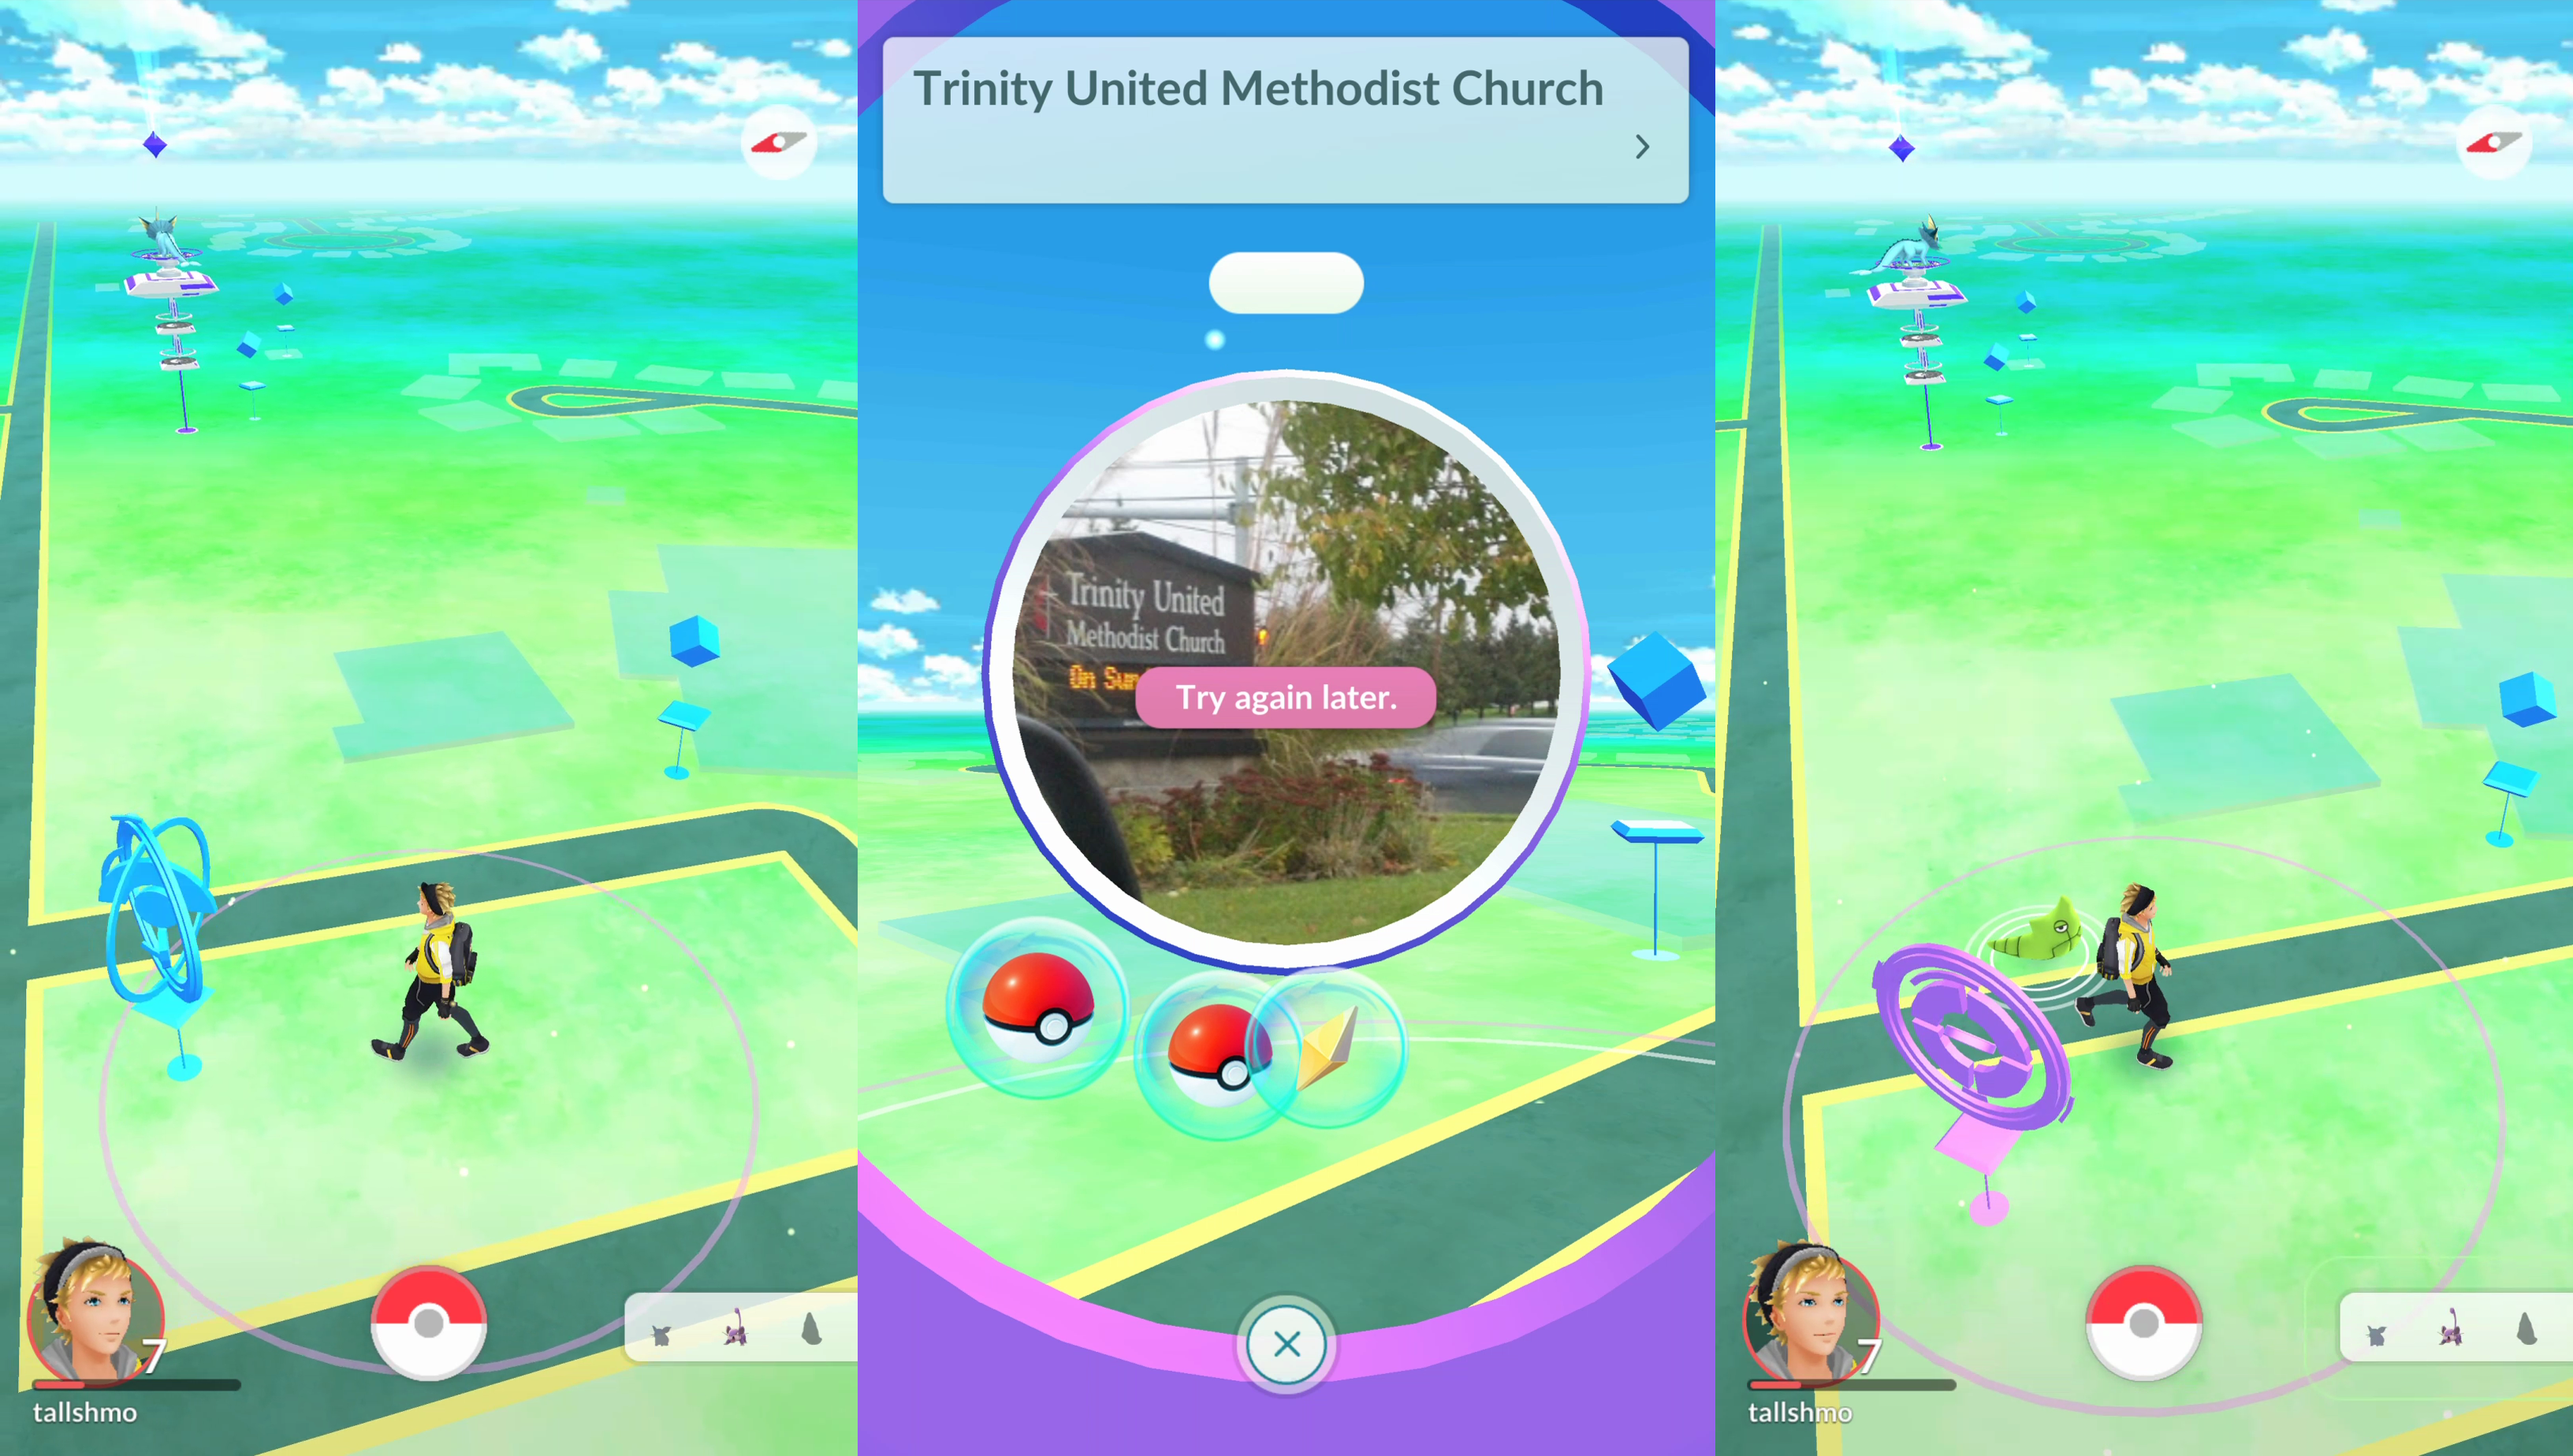
Now that you’ve caught a Pokemon, you’ll need some items. Pokestops are where you can collect things like Pokeballs and other important items for advancing in the game. Pokestops are labeled on the map by floating blue cubes. You can tap on them from wherever you are to see the location name and a disc with a streetview photo from Google Maps. When you get close enough to a Pokestop it will transform into spinning blue disc. Now you can use it.
- Tap the Pokestop when it transforms
- Swipe your finger quickly across the disc in the middle
- Various items will fly out of the disc
- Tap the items to collect them
When you’re done with a Pokestop, it will change from blue to purple. Pokestops reset every 5-10 minutes. When it changes back to blue, you can use it again. See all of your items by tapping the Pokeball on the map and selecting “Items.”
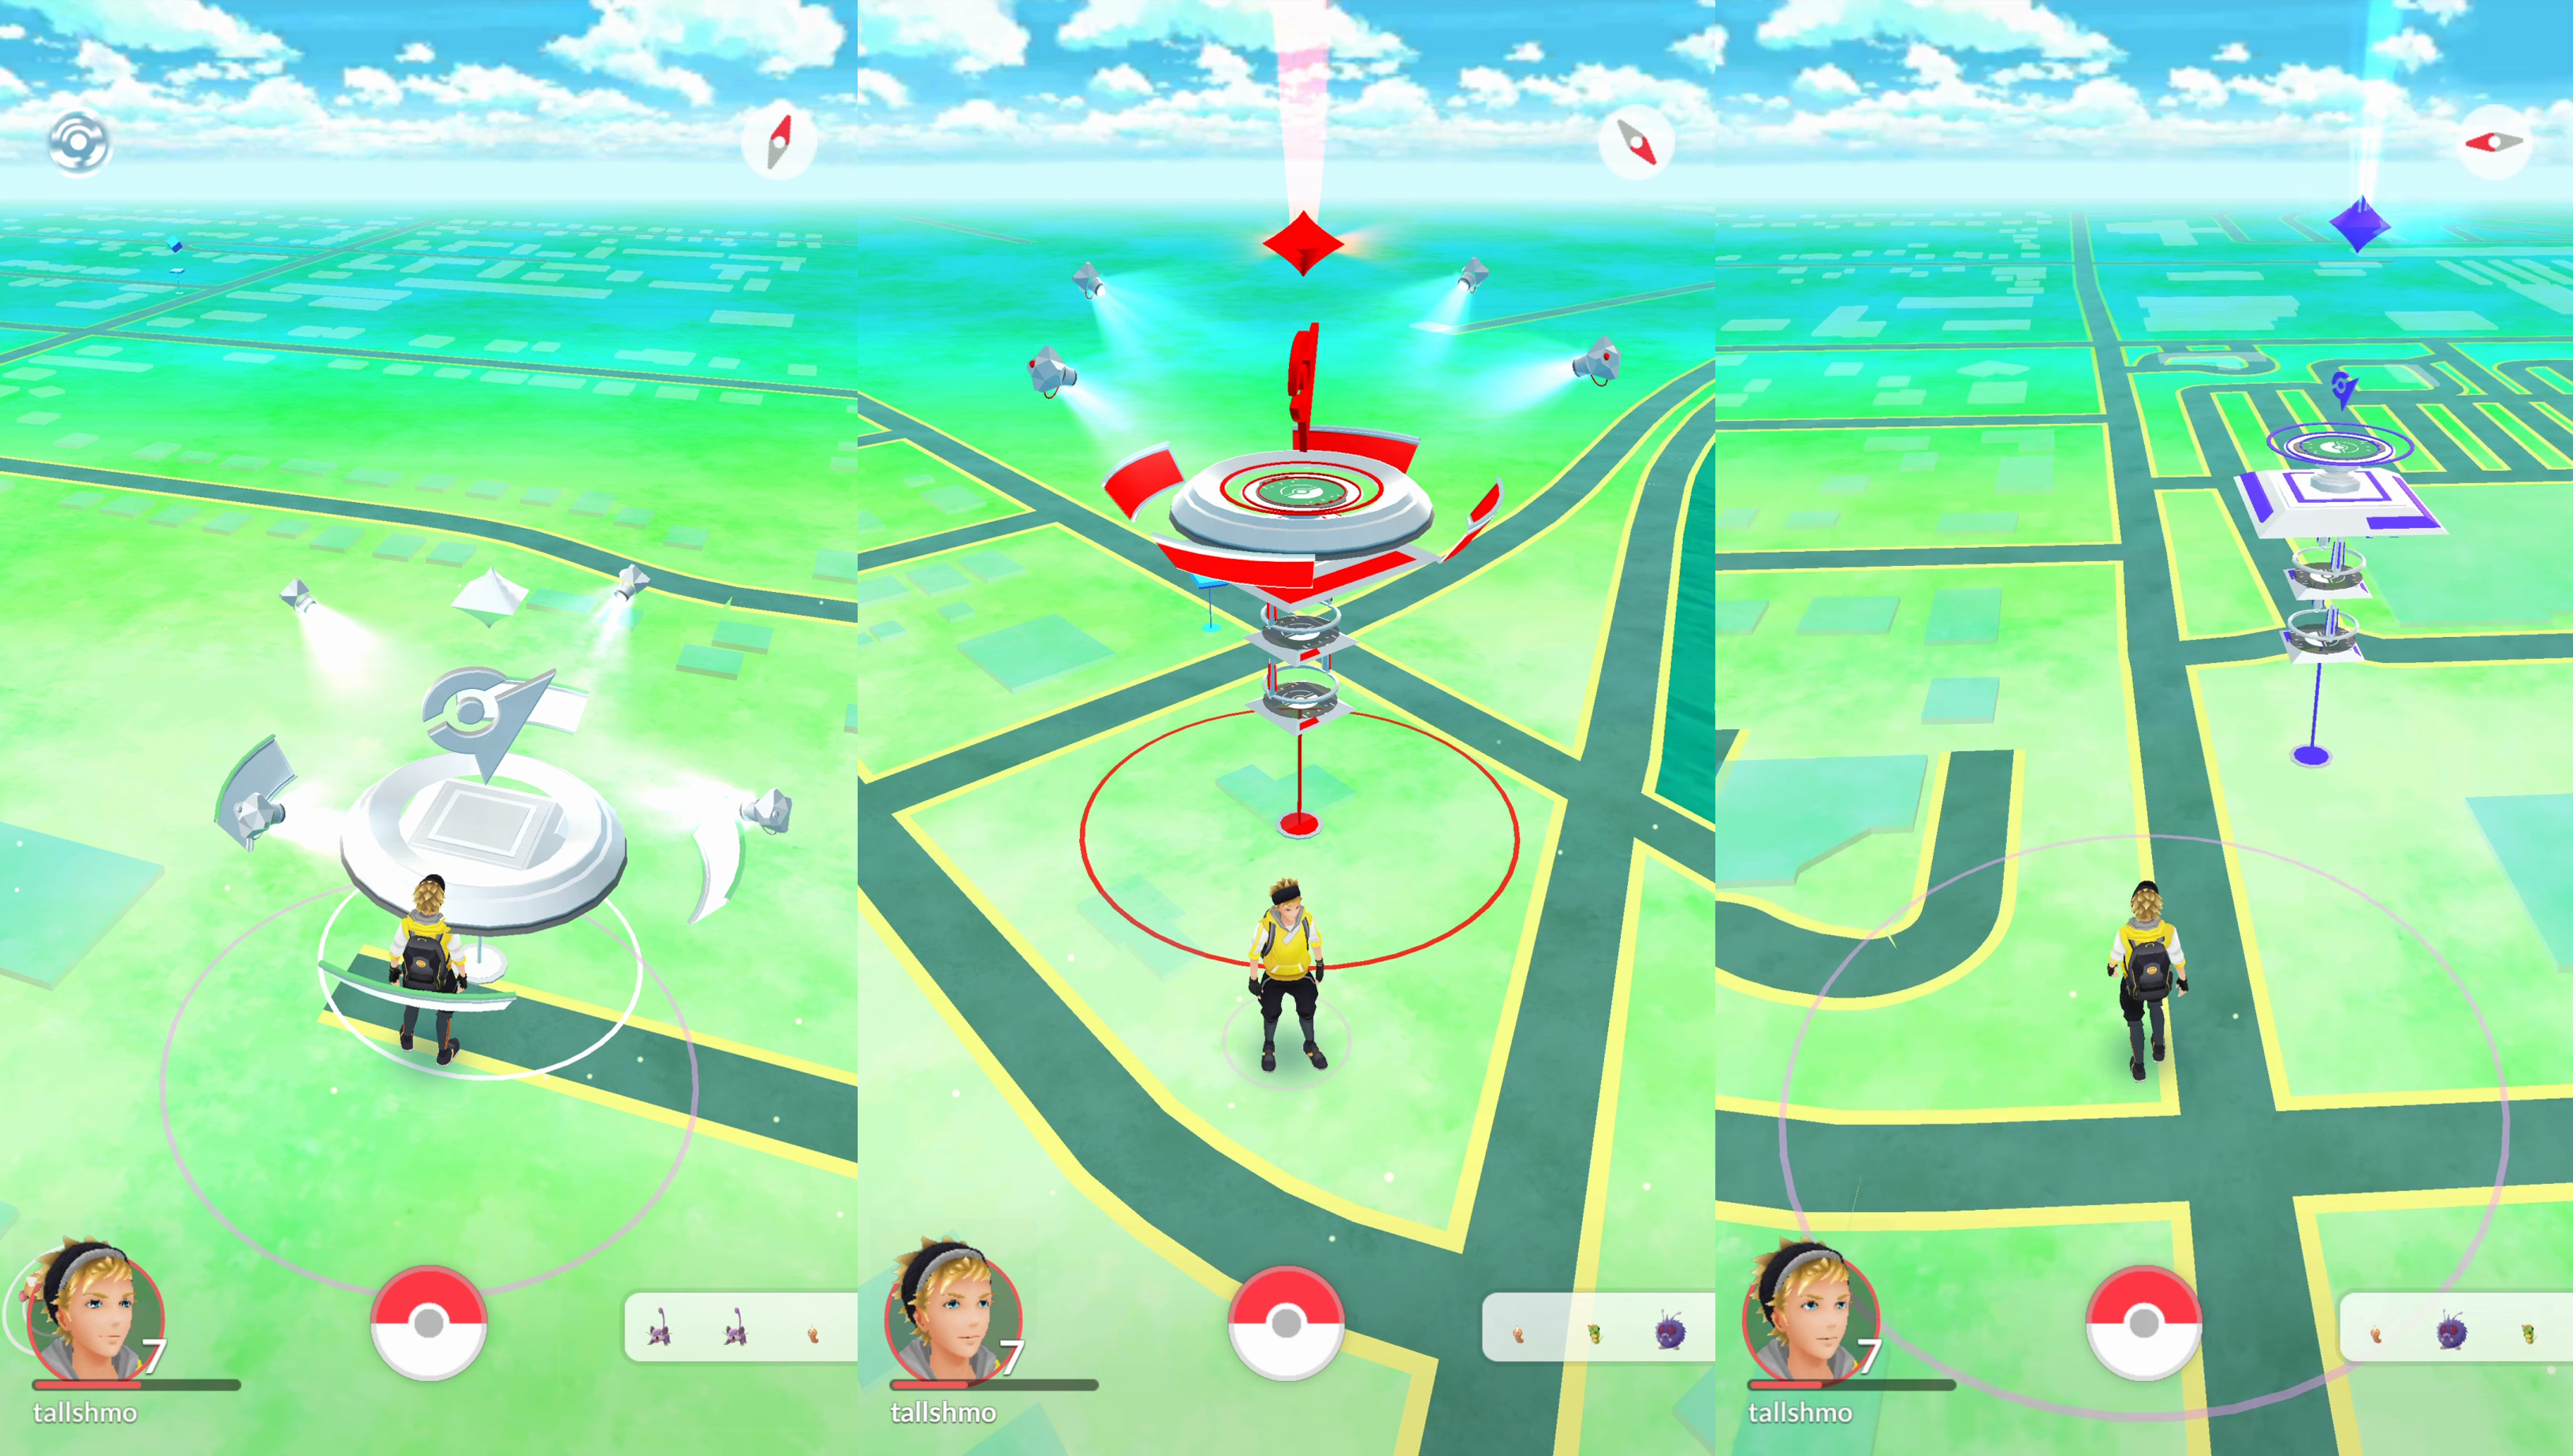
Gym Battles

It’s time to get serious. Everything we’ve covered so far has been leading up to gym battles. Gyms are labeled on the map with tall towers and spinning Pokeball icons. They’ll probably be blue, red, or yellow, which signifies the team that controls the gym. There will also be a Pokemon on top of the tower, which is the top Pokemon defending the gym.
Joining a team
Once you reach level 5 you’ll be able to select a gym on the map and join one of the three Pokemon Go teams. The Professor will describe the three teams and ask you to pick one.
- Team Instinct (yellow)
- Team Mystic (blue)
- Team Valor (red)
The team you join will have no effect on your Pokemon. Other than the names, there are no differences between the teams. You may want to join the team that is popular in your area or join up with your friends. We’ll talk more about that below. You’ll encounter three types of gyms: neutral, friendly, and enemy.
How to battle
Battling can be a little confusing. The game doesn’t offer a lot of instruction. Basically, it requires a lot of tapping and swiping. Gym battles in Pokemon Go are not turn based like you find in other Pokemon games. It happens in real time.
- Enter a gym
- Tap the button in the right bottom corner
- Select the Pokemon you want to use
- Tap GO
- Tap the screen to attack, swipe left or right to dodge
- When the blue bar under your Pokemon’s name is full, tap and hold to use the Special Power
- The battle goes on until you or your enemy’s HP bar is depleted
All battles work the same way, but the results can be different depending on the type of gym you’re at. There are three types of gyms.
Neutral Gym
A neutral gym is not controlled by any team. It will be gray on the map. Anyone can claim it by simply tapping the gym and assigning one of your Pokemon to defend it. You probably won’t find too many neutral gyms in the wild.
Friendly Gym
A friendly gym is any gym controlled by your team. At these gyms, you can practice battle amongst teammates to raise the gym’s level. You choose one Pokemon to go up against the Pokemon defending the gym. Win or lose, practicing is good for your team and it can level-up the gym. Leveling up a gym makes it more difficult to overtake. Practicing is also a good way to earn more XP for your character.
Enemy Gym
As you may have guessed, an enemy gym is controlled by other teams. In these battles, you can use up to six Pokemon to go up against the other team. Every time you defeat the enemies it knocks the gym down one level. To conquer the gym, you’ll have to defeat the enemies until it becomes neutral. You can then claim it for your team.
Defending a Gym
If you’re lucky enough to defeat an enemy and claim a gym as your own, there are a few things to know. The Pokemon you choose to defend the gym will be unavailable to you until it’s defeated. You’ll know when your Pokemon has been defeated when it’s back in your list of Pokemon and has only 1 HP.
Extras

Catching Pokemon, visiting Pokestops, and Gym Battles are the three main things you’ll be doing in this game. To advance in the game there are some extra things you’ll want to do. These techniques will help you improve your Pokemon and earn more XP for your character.
Power Up
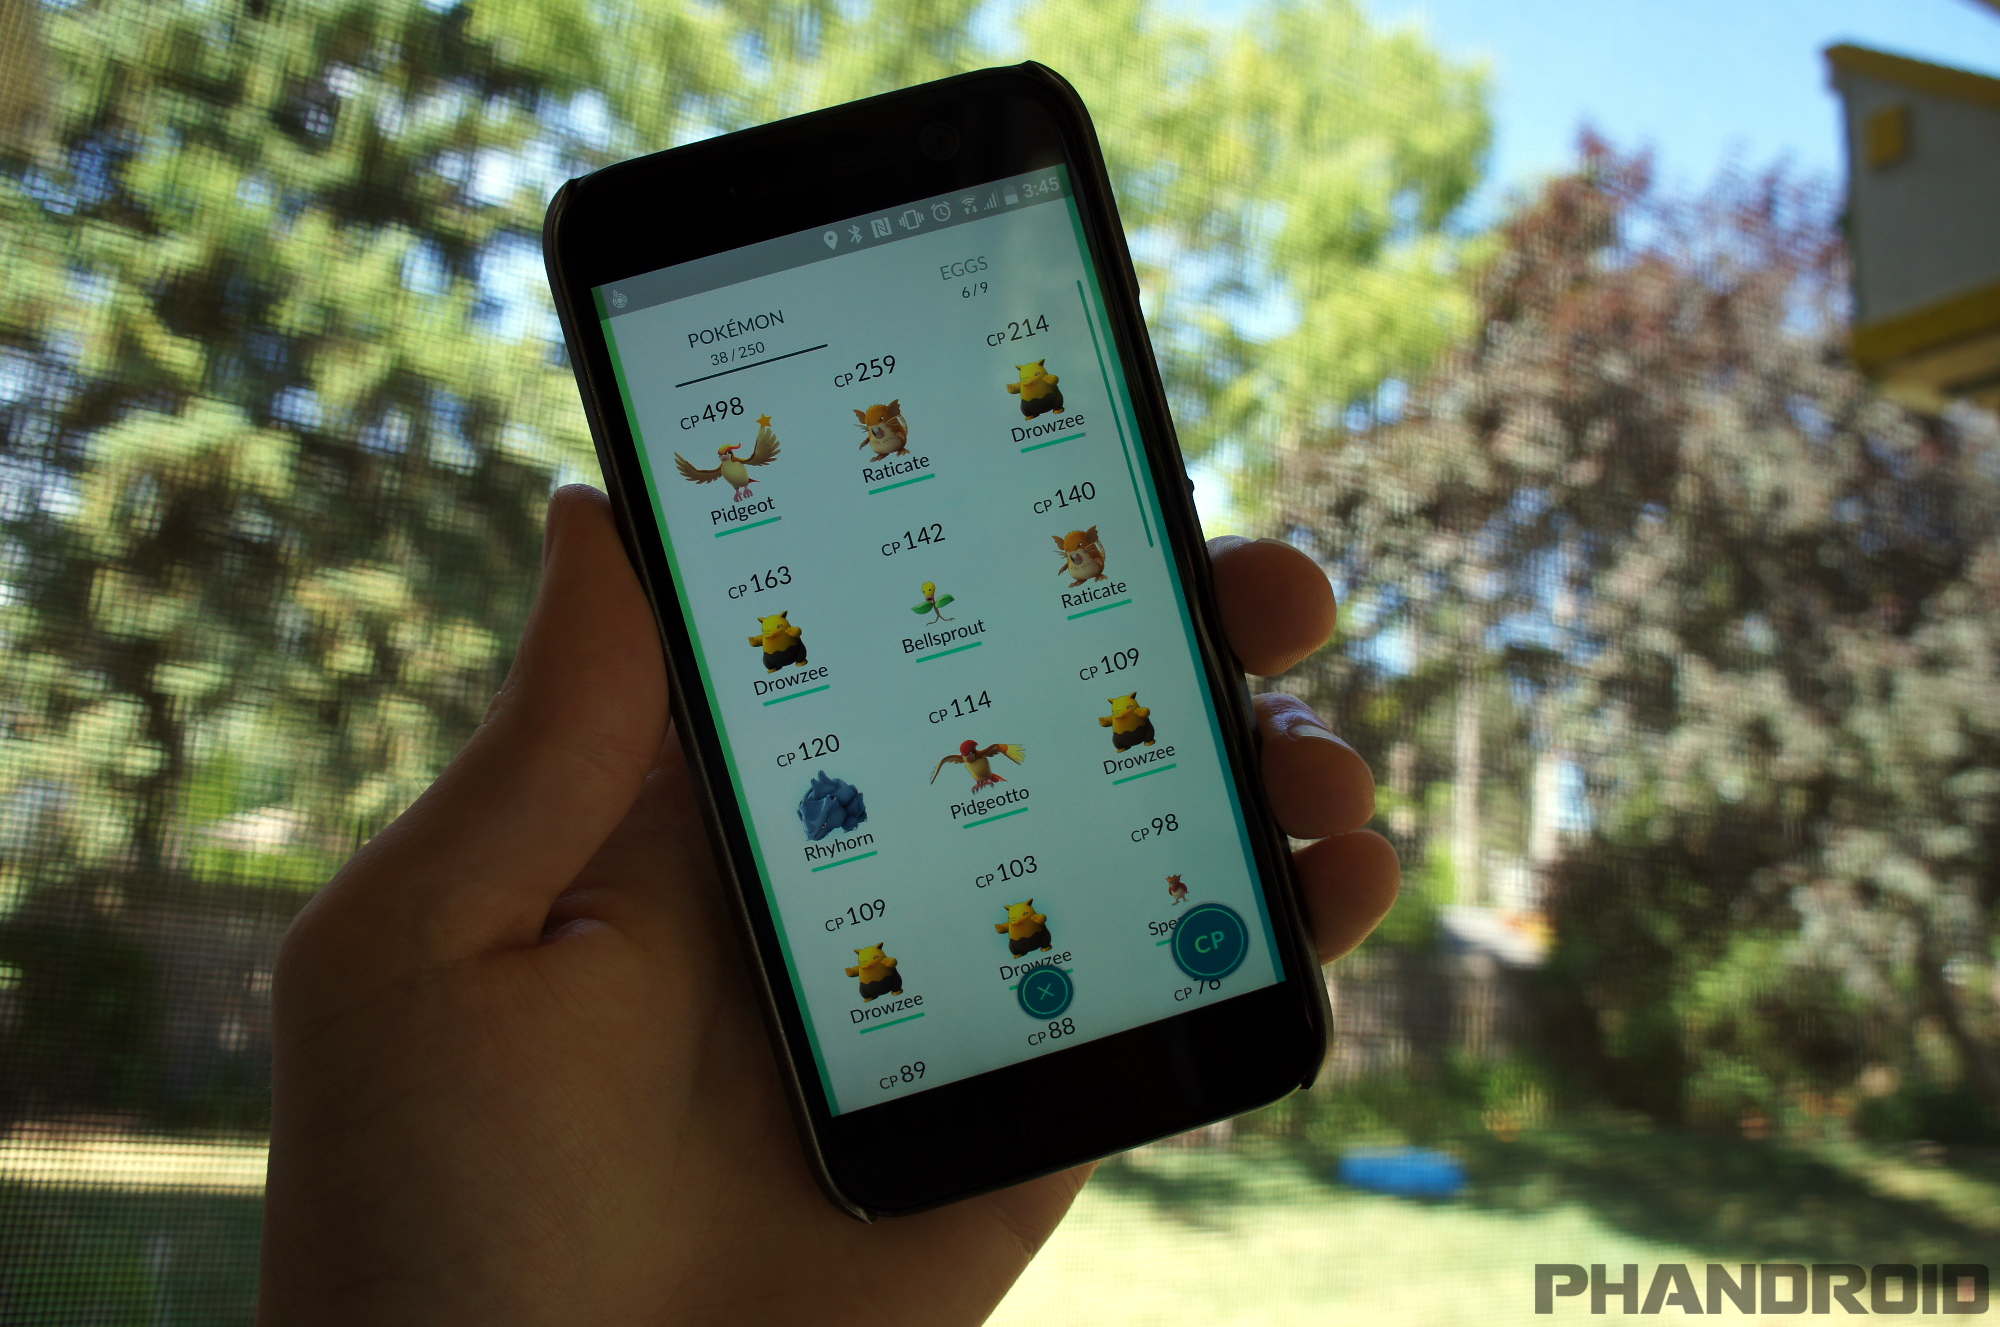
Every Pokemon has a Combat Power (CP) number. Some will be very low, others will be high. It all depends on your XP level and the abilities of the Pokemon. You’ll need a high CP number if you want to have a chance to win gym battles.
You can “Power Up” your Pokemon’s CP with stardust and candy, which is earned every time you catch a Pokemon. Here’s how to Power Up your Pokemon.
- From the map, tap the Pokeball
- Tap Pokemon
- Find the Pokemon you’d like to Power Up
- If you have enough stardust and candy you can tap the POWER UP button
- Points will be added to the CP
Evolving
Another important tactic for getting powerful Pokemon is Evolving them. Evolving a Pokemon changes it to a more powerful form. Most Pokemon can be evolved two times. For example, Squirtle evolves to Wartortle, Wartortle then evolves to Blastoise. You’ll need candy to Evolve a Pokemon.
- From the map, tap the Pokeball
- Tap Pokemon
- Find the Pokemon you’d like to Evolve
- If you have enough candy you can tap the EVOLVE button
- Watch as your Pokemon is transformed
Eggs
Besides Pokeballs, eggs are a common thing that you’ll find at Pokestops. Eggs are unhatched Pokemon. You can use the incubator to hatch the eggs and receive the Pokemon inside. Hatching eggs is done by walking. Most eggs require you to walk between 2-5K before they hatch. Steps are only counted when the screen is on.
- From the map, tap the Pokeball
- Tap Pokemon
- Swipe over to the EGGS page
- Tap on an egg and select START INCUBATION
- This page will show your progress on incubation
- When incubation is complete, the egg will pop up on your screen and hatch
Go explore!
One of the great things about Pokemon Go is that there’s a lot to discover on your own. Some people think that’s a bad thing, but it’s also part of the fun. In this guide, we touched on everything you need to know to get started. You can be very successful with the information on this page, but if you’re really hardcore there is more to learn.
A great place to find more information and fellow players is the Pokemon Go forum. The forum is filling up quickly with players like you. Here are some threads to get you started.


Comments