
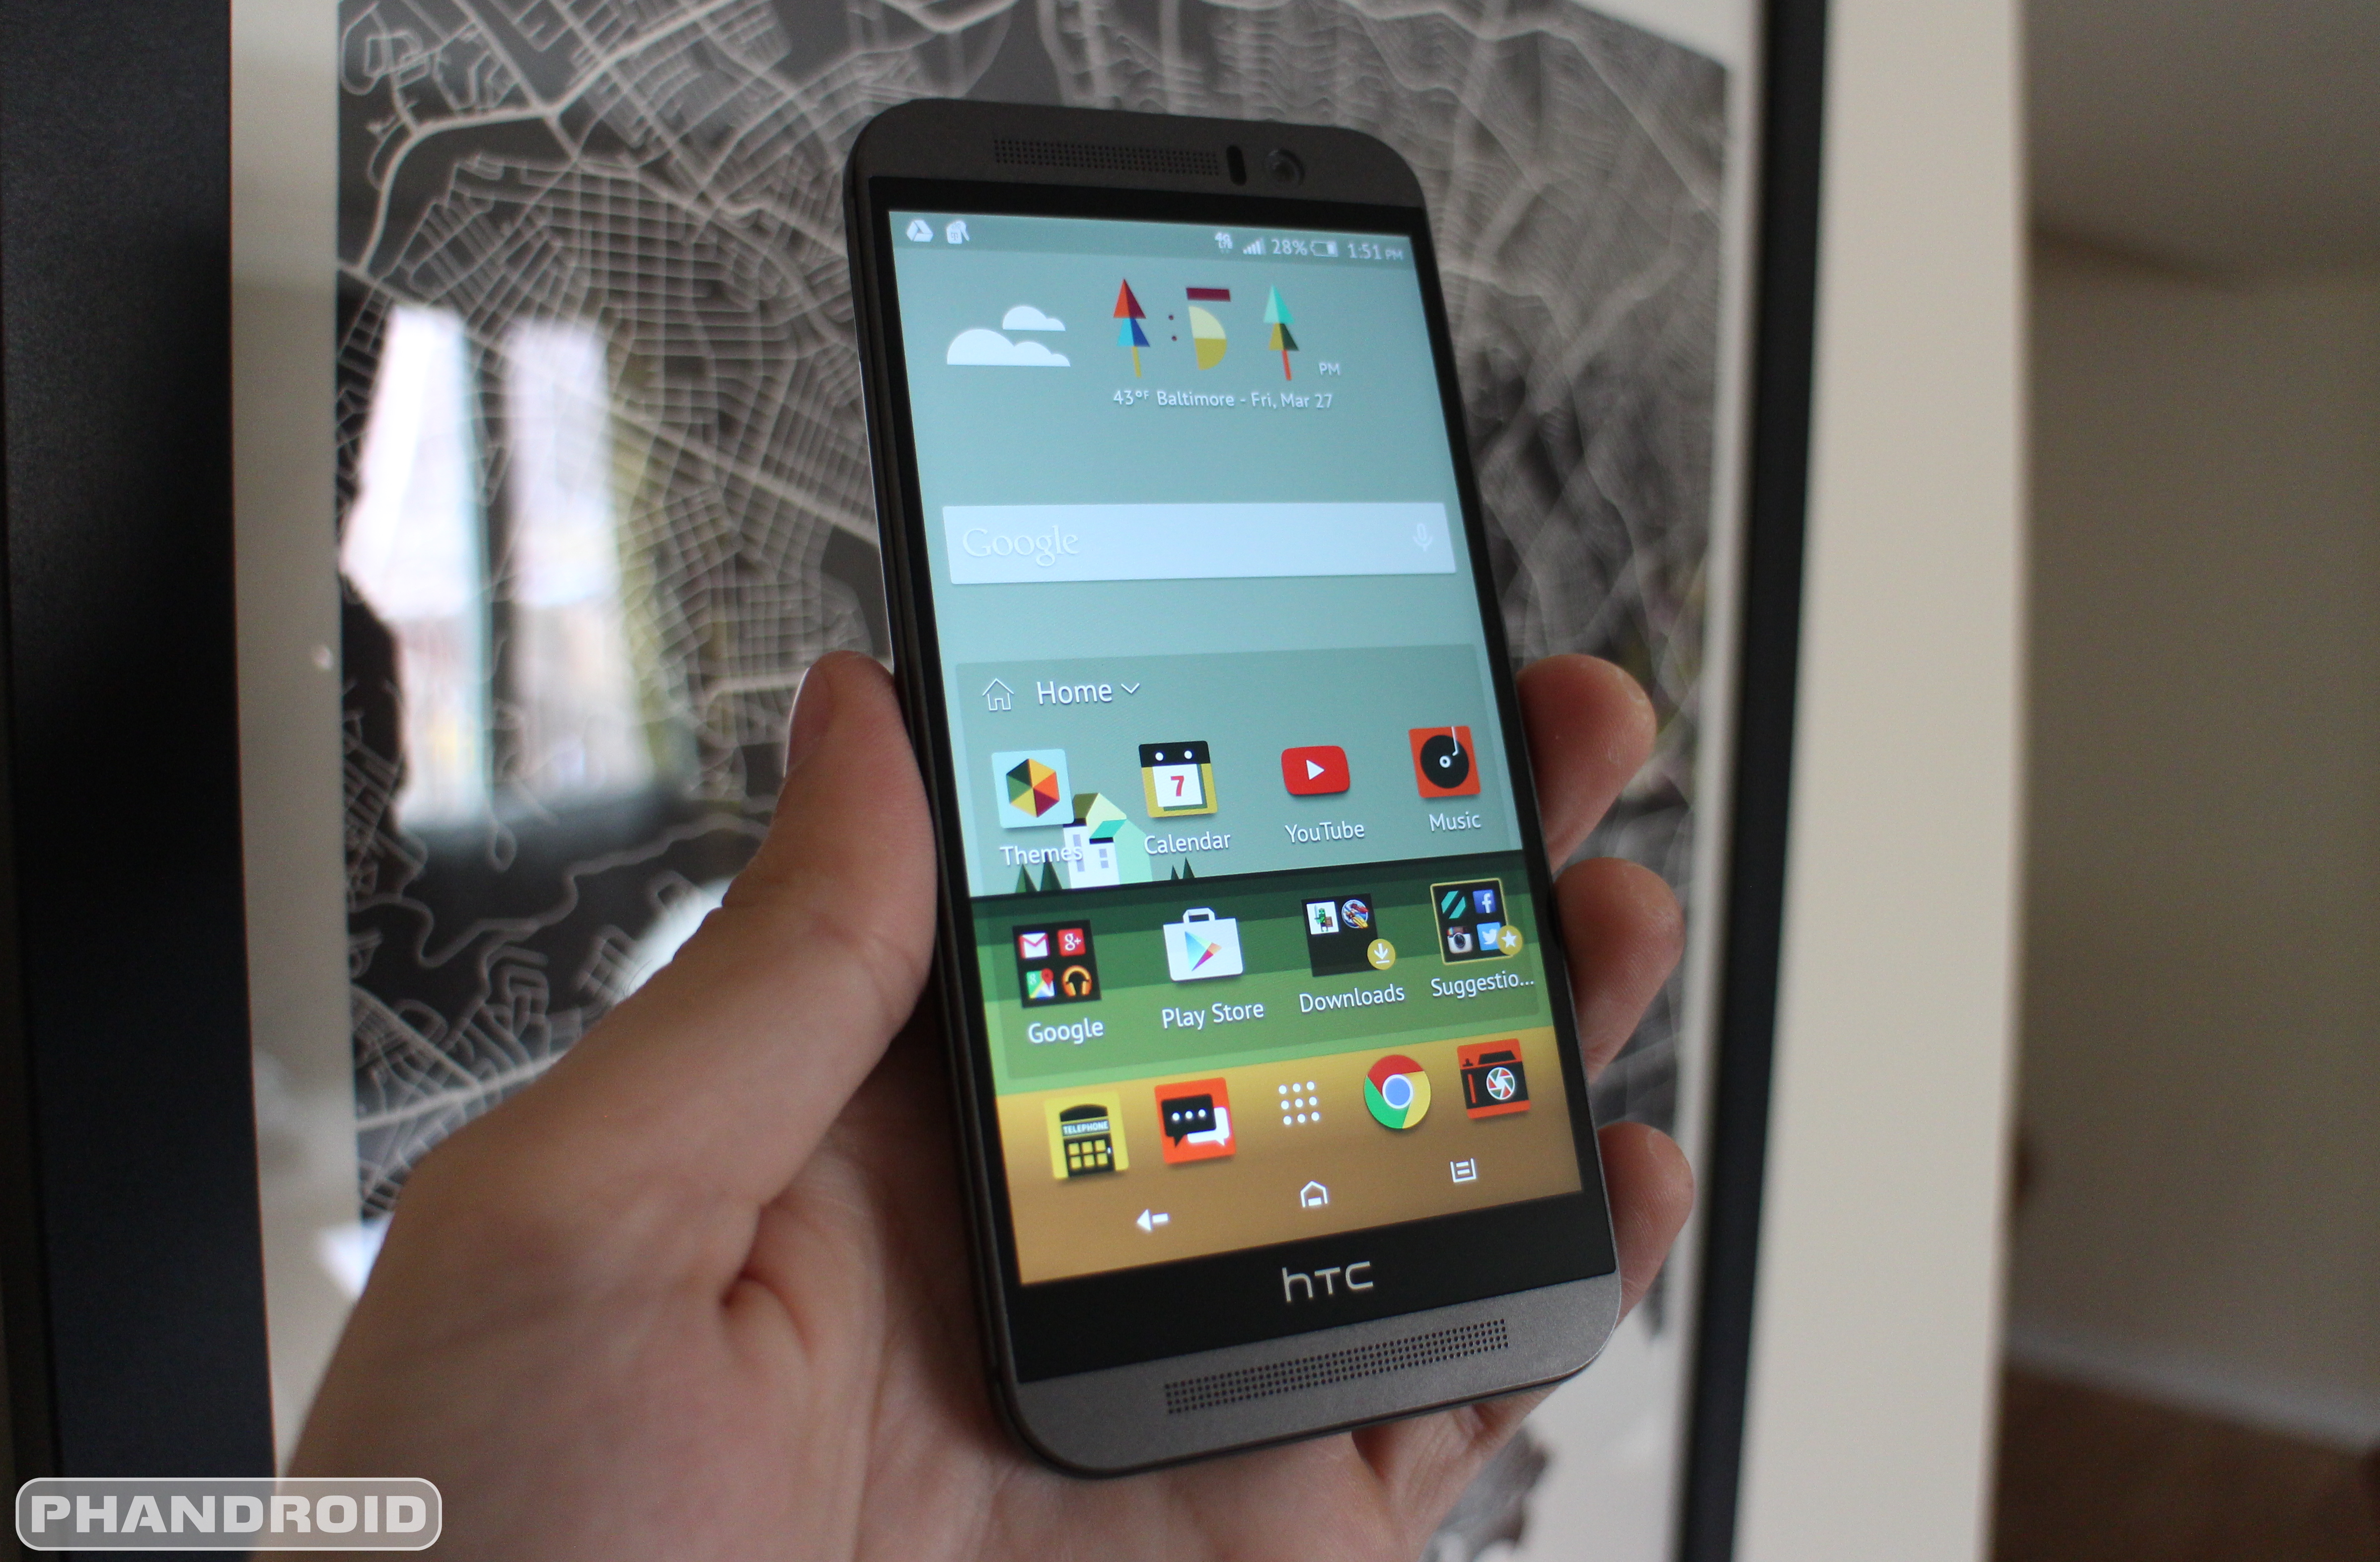

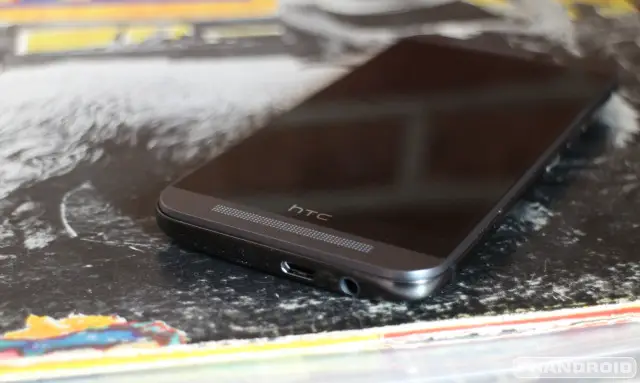
You read our review and bit the bullet, bought yourself a brand new HTC One M9. You’ve read up on the 11 things every new One M9 owner must do and you’re ready to take the next step. Now it’s time to go from newb to master with over 40 tips and tricks for the HTC One M9.
HTC One M9 gestures
Your HTC One M9 features gesture support to help you jump directly from your lock screen to the services you use most. To enable any of these gestures, navigate to Settings > Display & gestures > Motion gestures.
To use a gesture, start with the screen off. Power on to the lockscreen and then swipe or use the associated button to launch everything from BlinkFeed and widgets to the camera and dialer.
Here are the available lockscreen gestures:
- Double tap to wake up & sleep – Double tap the display to wake from sleep; double tap again to put the phone to sleep
- Swipe down to turn on voice dialing – With the phone in portrait orientation and the screen off, swipe down from the top of the display to launch the voice dialer
- Swipe up to unlock – With the phone in portrait orientation and the screen off, swipe up from the bottom of the display to unlock your One M9
- Swipe left to launch widget panel – With the phone in portrait orientation and the screen off, swipe left on the display to launch the widget panel
- Swipe right to launch BlinkFeed – With the phone in portrait orientation and the screen off, swipe right on the display to launch BlinkFeed
- Volume button to launch camera – With the phone in landscape orientation and the screen off, press the volume button to launch the camera app
Auto answer calls
Another useful gesture allows you to automatically answer incoming calls simply by picking up the phone and placing it to your ear. To enable, go to Settings > Call and check the box next to Auto answer calls.
How to take a screenshot
Taking a screenshot is one of the most basic functions of the HTC One M9. It’s also one of the most asked questions when a new device like the One M9 launches. Here’s how to do it:
- Visit the screen you want to capture
- Hold down the power button and volume down button
- You’ll hear a shutter sound and the screenshot will be added to your notification bar
You can also add a “Screenshot” to the quick settings:
- Swipe down from the top of the screen with two fingers to show the quick settings
- Tap the paper and pencil icon in the top right to edit the quick settings options
- Scroll down until you see the “Screenshot” option
- Long press and drag the “Screenshot” option to the top panel of icons
- You’ll now see a “Screenshot” button inside the quick settings
New Dot View 2 cases
One of the coolest things HTC has done with the One M8 and now the M9 is the Dot View cases. These cases are so unique and practical that you’ll actually want to use one. A Dot View case allows you to show information in a retro 8-style through your case while still protecting the screen. Simply tap on the case to reveal the information. It’s really cool, here’s how to do it.
You’ll need the HTC Dot View app, which comes pre-installed on the One M9. This is where you can configure how Dot View looks, and even play a cool game. New in Dot View 2 is live backgrounds, the ability to convert images to 8-bit backgrounds, and draw your own. They also added a really cool block-breaker game that you can play with the case closed. Many phones have ways to check notifications without unlocking the device, but Dot View is by far the most elegant.
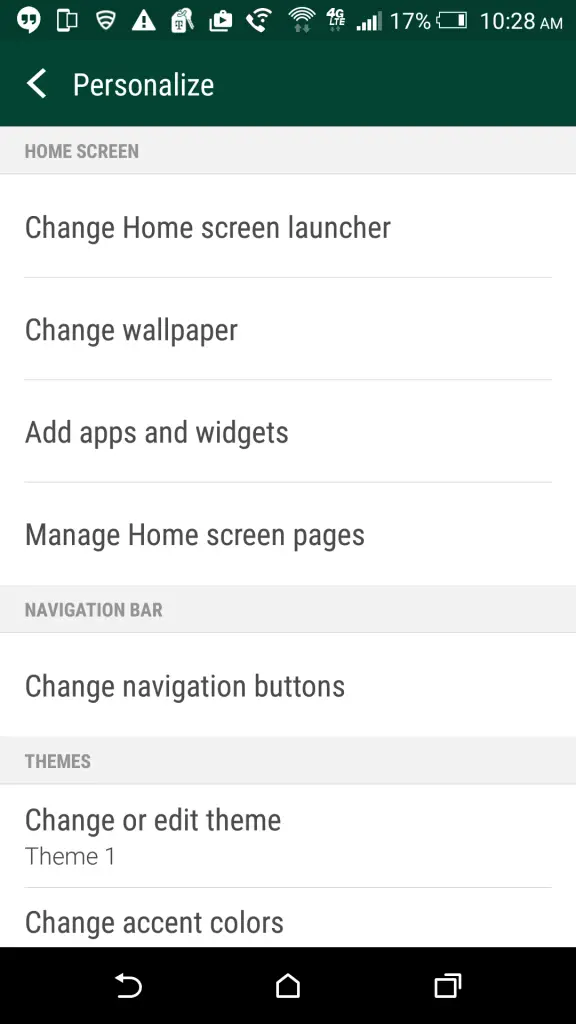
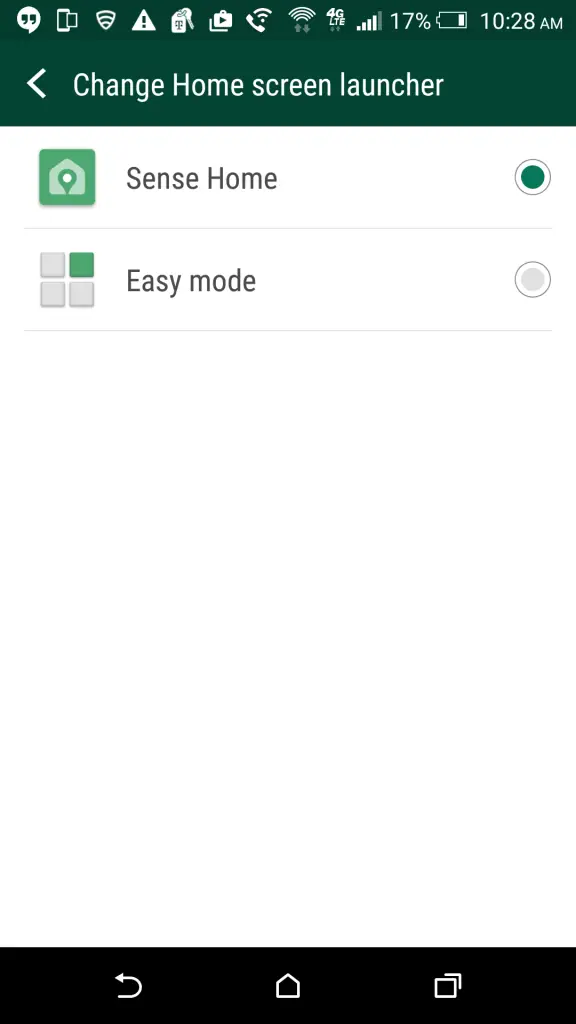
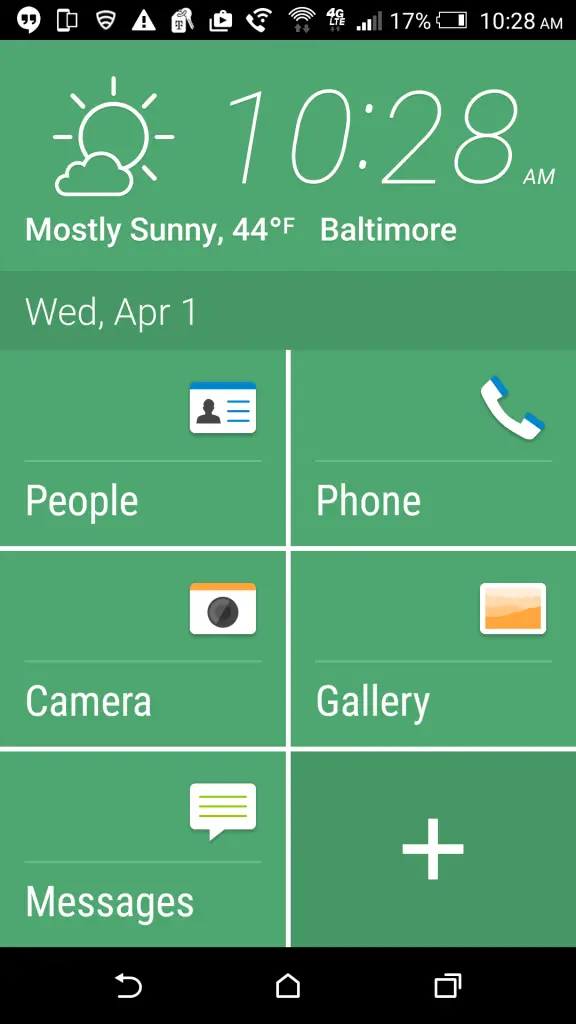
How to use Easy Mode on the One M9
For folks new to the whole smartphone thing, or if you are picking up the One M9 for an older user who is hard of sight, HTC has included and Easy Mode launcher in addition to the One M9’s standard Sense 7 interface.
 |
 |
 |
To access Easy Mode:
- From the Settings menu navigate to Personalize
- Tap Change Home screen launcher
- Select Easy Mode
Easy Mode features a simplified home screen interface with big icons and text for easy navigation and access to frequently used services. If at any time you wish to return to the Sense 7 launcher, follow the above process and choose Sense 7 in step 3.
How to create custom themes
The HTC One M9 comes with a bunch of pre-installed themes out of the box, but if you’re not a fan of those you can create your own. In fact, Sense 7 can create a personalized theme for you. All you have to do is take a photo. Sense will then identify colors from that photo and change accent colors, icons, and even system sounds.
When you take a photo and view it in the gallery there is a new option to create a theme with that photo. It will ask you to crop the photo, and then it will scan the photo and identify different colors. After that it will present you with several different themes to choose from, all of which are based on the photo you took. It’s a really easy and quick way to get a unique look.
How to set up custom nav bar buttons
Here’s one feature you won’t be able to live without after you’ve had the One M9: custom nav bar buttons. The nav bar is the bar across the bottom of the screen that displays the Back, Home, and Recents buttons. In Sense 7 HTC has added the ability to put an extra user-defined button in the nav bar.
Go into Settings > Personalize > Change navigation buttons to configure from a list of options. You can only add one extra button to the nav bar. Some of the things you can do include turn off screen, toggle auto rotate, open notifications, hide the nav bar (swipe up from bottom of the screen to un-hide), and quick settings. This feature is especially useful for people with small hands because it puts more buttons in an easy to reach location.
Further personalize your One M9
While custom navigation buttons and a slick theme go a long way to make your HTC One M9 truly unique, you can further customize the look and feel of your device’s interface through the Personalize menu found under Settings.
Add or delete home screen panels
You can add or delete home screen panels from your One M9 by navigating to Settings > Personalize > Manage Home screen panels. Here you can add a new panel by swiping all the way to the right and tapping + PANEL. Remove a home screen by highlighting it and tapping Remove. You can also set any panel as your Home landing.
Change wallpapers, system sounds, fonts, and colors
The Personalize menu has further items for a variety of customizations. You may have already changed some of these through HTC’s Themes app, but you can further tweak individual options here. These include:
- Change wallpaper – Change your main homescreen wallpaper
- Change accent colors – Change the color scheme of your theme
- Change wallpaper (lockscreen) – Change the lockscreen wallpaper to display a different image than your homescreens
- Ringtone – Change your ringtone
- Notification sound – Change the sound played for incoming notifications and alerts
- Alarm – Change the alarm clock sound
- Font style – Change the system font
- Font size – Change the size of the system font
- Keyboard color – Change the keyboard background color
- Dialer color – Change the dialer background color
How to set a screen lock on the One M9
By default, the One M9 features a basic lockscreen without password protection. You can add an extra layer of security by navigating to Settings > Security > Screen lock. From the following menu you have several choices:
- Lock screen – The default setting. Screen locks but is not password protected
- No lock screen – Most insecure. Waking the device opens directly to an unprotected homescreen
- Pattern – Draw a pattern on a grid of dots to unlock your device
- PIN – A numeric PIN unlocks your phone
- Password – A text-based password provides access to your homescreen
Protect yourself should your device be lost or stolen
Should your phone be misplaced or even stolen, you will want to log into Google’s Android Device Manager, where you can track it, ring it, lock it (and change to a new password) or erase its contents from afar. Visit the Android Device Manager web portal to make sure your current device is set up. You can also download the Android Device Manager app.
Hide contact names and photos on lockscreen
You can choose to hide the names, photos, and other info of certain contacts from appearing on your lockscreen when they call. First navigate to Settings > Security and check the box next to Incoming phone calls.
Next, you will need to go into the People app and set chosen contacts to private. From your contacts list, select the contact, scroll down, and tap Add to private contacts. Their info will not appear on your lockscreen, but remember, this means you will not see incoming caller info for this contact either.
How to use the HTC Help app
Chances are if you’re the type of person to read an Android blog you’re also the type of person who is always asked about phones. Your grandma can’t figure out how to log into the Facebook app, or your sister can’t figure out how to use emoji. There are a million questions you or someone you know can have about a new phone like the One M9, and sometimes things simply don’t work. What do you do?
HTC has included a new app called “Help” that will help users troubleshoot problems and get help remotely. The app is designed to be very easy to use. There are different sections for different parts of the phone so you can narrow down your problems. The really cool feature of the app is when you can’t find a solution on your own, and this is where you can get out of helping someone else.
In the app you can contact HTC for remote assistance. It uses LogMeIn to allow a HTC representative to remotely control your phone for you. All you have to do is sit back and watch the person perform the action. For example, if you couldn’t figure out how to turn off Bluetooth the rep could remote access your phone and toggle it off for you.
Use the HTC adaptive home screen widget
 |
 |
HTC is all about adding features to the Android home screen. Last year they introduced us to BlinkFeed, a stream of information that lives just a swipe away. Now, with the latest version of Sense, HTC has added “Sense Home Widget.” The widget tries to predict which apps you’ll want to use at a particular time or place.
If Sense determines that you are at work the widget might display productivity apps. When you come home from work the widget might show entertainment apps. The idea of changing the home screen for different situations is not new. In the past manufacturers have made it possible to set up different profiles for different places, but Sense Home Widget does all of that for you. If you don’t want to use it you can simply remove the widget.
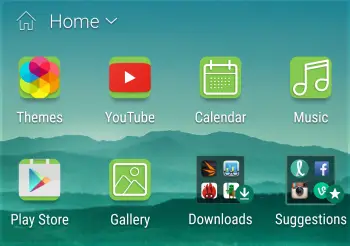
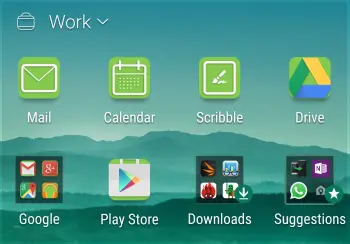
Remove the Suggestions folder
HTC has also added “Smart Folders” to Sense 7. By default the One M9 comes with a “Downloads” and “Suggestions” folder. The Downloads folder automatically fills up with newly downloaded apps, which can be handy. The Suggestions folder, on the other hand, should be removed as soon as possible.
The Suggestions folder is basically HTC using space on your home screen for advertisement. In the folder you will find suggested apps such as Clash of Clans and Candy Crush. HTC says that the suggestions change, but we’re not sure how it decides which apps to suggest. At the end of the day it’s just apps that have paid HTC to be promoted. Remove it.
Add content to BlinkFeed (or remove it completely)
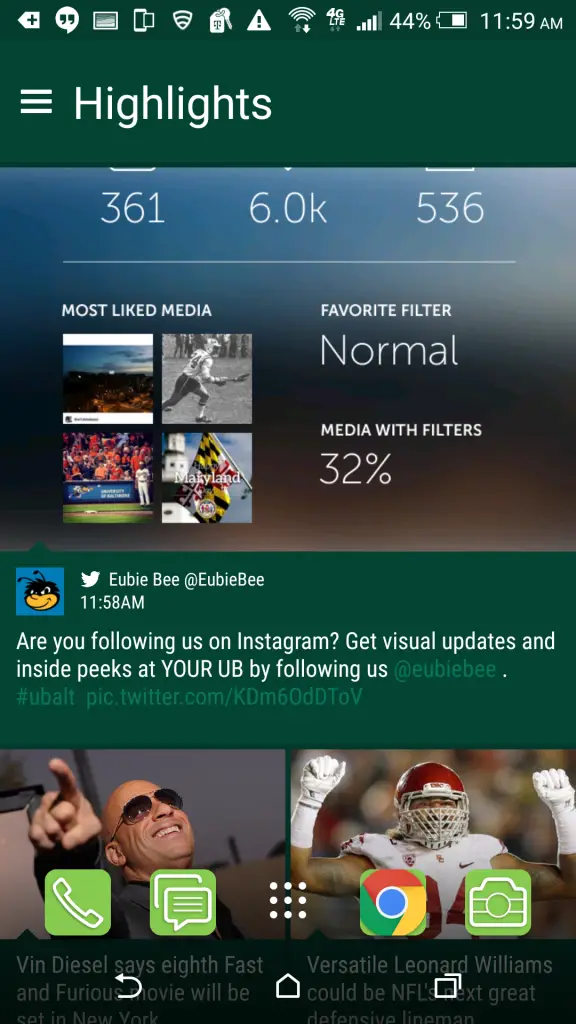 |
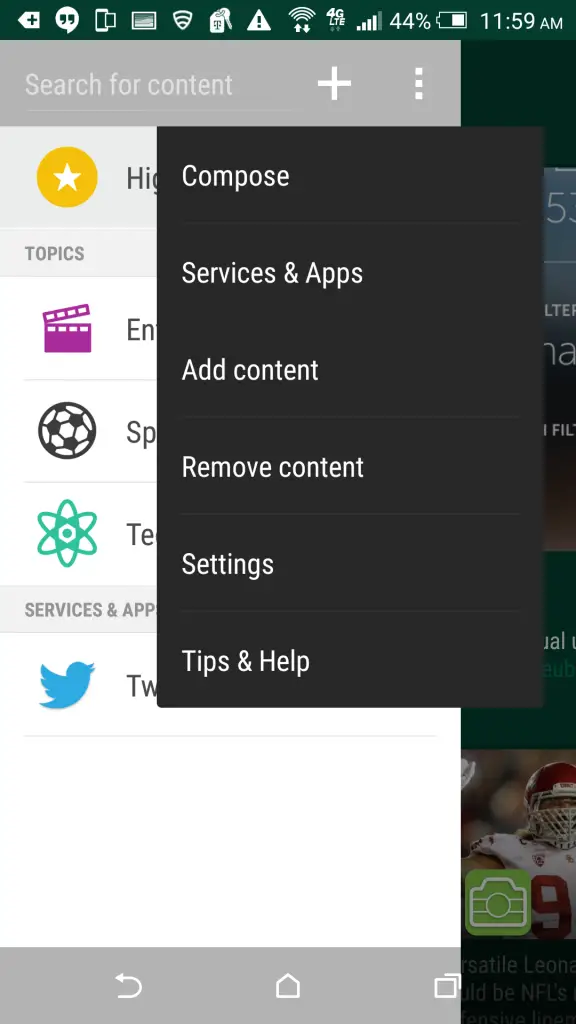 |
BlinkFeed is HTC’s all-in-one landing for your news feeds, social updates, and new location-based suggestions, all easily accessed with a simple swipe to the left from your homescreen. Configuring BlinkFeed to work the way you want is easy.
To add or remove items from BlinkFeed:
- From your homescreen, swipe all the way to the left to access BlinkFeed
- Tap the menu icon in the upper lefthand corner
- Tap the three vertical dots to access the expanded menu
- From the menu tap Add content or Remove content
You will now be able to choose the content you wish to view in your BlinkFeed by choosing from a selection of news sites and blogs (or alternatively unselecting the sources you no longer wish to receive updates from).
To link a social network like Twitter or Facebook:
- From your homescreen, swipe all the way to the left to access BlinkFeed
- Tap the menu icon in the upper lefthand corner
- Tap the three vertical dots to access the expanded menu
- Tap Services & Apps
- Select the desired service from the menu and follow the prompts to log in
To enable to disable location-based suggestions
- From your homescreen, swipe all the way to the left to access BlinkFeed
- Tap the menu icon in the upper lefthand corner
- Tap the three vertical dots to access the expanded menu
- Tap Settings
- Select Notification on lockscreen
- Check or uncheck Meal time bundle
Remove BlinkFeed from your homescreens
If you wish to remove BlinkFeed from your homescreen rotation altogether, you can do that as well. Simply navigate to the BlinkFeed settings menu as described above, select Manage home screen panels, select your BlinkFeed panel, and tap Remove. You can restore BlinkFeed at any time by navigating to Settings > Personalize > Manage Home screen panels.
Enable HTC Connect to stream media to other devices
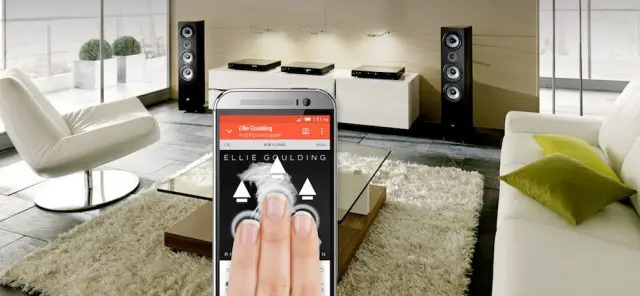
With HTC Connect, you can easily stream media files to supported devices. First, enable HTC Connect for your devices by navigating the Settings > HTC Connect. From this menu, select the default device for HTC Connect. If no devices appear, tap the three dots in the upper righthand corner, accessing the expanded menu, and tap Scan.
Pro tip: From the expanded menu, tap Scan options to choose which types of devices to include in your scan. HTC Connect supports AllPlay, Blackfire, Bluetooth, DLNA, and Miracast.
Once you have enabled a default HTC Connect device, a three-finger upward swipe on your One M9’s display will send audio and video to your connected equipment. Make sure this gesture is enabled by navigating to Settings > Display & gesture and checking the box next to Media gesture.
Connect your One M9 to the HTC Mini+
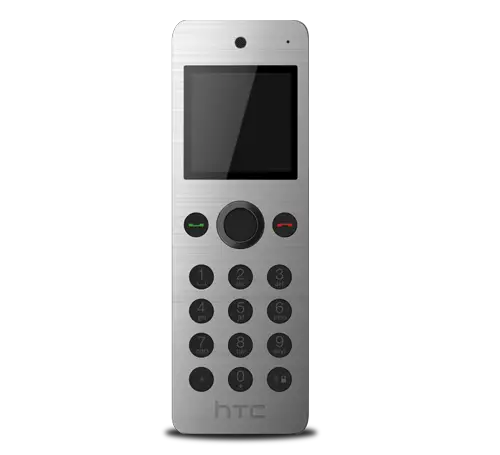
The One M9 can effortlessly pair with HTC’s Mini+, a quirky little device that acts as an extension of your smartphone for making and receiving calls. It might be thought of as a phone for your phone.
To connect the Mini+, navigate to Settings > More > HTC Mini+, then choose whether to pair via Bluetooth or NFC. Follow the onscreen instructions to pair the two devices.
Change the default messaging app
If you prefer to use Google’s Hangouts over the default messaging app provided by HTC, you can change your preferences by navigating to Settings > More > Default messaging app. Choose your preferred app from the list. Now, any apps or system options that launch your messaging application will default to your chosen service.
Lock device access to a single app with screen pinning
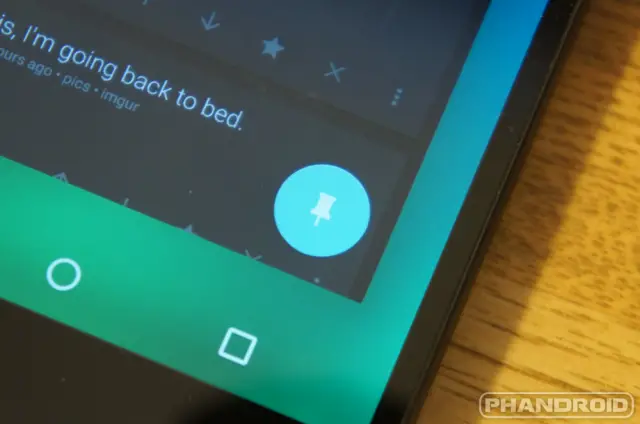
If you let a friend borrow your One M9 to read an article, or if you are the type that has small children around who enjoy watching videos or playing games on any smartphone within reach, Android Lollipop has the feature for you. Screen pinning locks you phone to one app, and that app can only be exited with a special button combination combined with your security code (if you so choose).
To pin an app:
- Enable screen pinning by navigating to Settings > Security > Screen pinning
- Tap the overview (formerly multitasking) button to open your recent apps
- Tap the pin icon on the app you wish to pin (note: you will only be able to pin your most recently opened app, so you might need to open the app again and then return to the overview view to pin)
- Choose if a lock code will be required to exit the app
To exit a pinned app, simply press the overview and back buttons simultaneously and hold for a second or two.
Enable NFC for use with mobile payments
To enable NFC, head to Settings > More and tap NFC. With NFC enabled, your phone is capable of a number of useful functions, not the least of which is tap-to-pay mobile payments. HTC does not include any built-in mobile payment functionality, however, so you will need to download a service like Google Wallet (where compatible).
With NFC enabled, you can also take advantage of tap-to-pair functionality with accessories like Bluetooth speakers (provided they support NFC) and also apps and services that rely on NFC to transfer data between smartphones.
Use the HTC One M9 even if you are wearing gloves
For when the chilly winds of winter blow, you won’t have to worry about removing your warm gloves in order to use your One M9. HTC has included a handy glove mode that increases touchscreen sensitivity to read input even through a layer of fabric.
To enable glove mode, navigate to Settings > Display & gestures and tap the check box next to Glove mode.
How to improve One M9 battery life
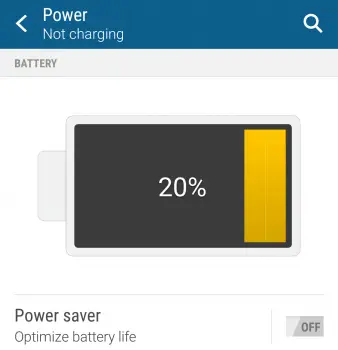
The HTC One M9 has a big enough battery to get you through the typical day, but should you find yourself in that precarious situation where no outlet is nearby and your power is dwindling, you have some options.
As with all Android Lollipop devices, the One M9 comes with a built-in battery saver mode. It will trigger automatically when your phone drops down to 15%, but it can be manually enabled by navigating to Settings > Power and flipping Power saver to the On position. An Ultra power saving mode can be enabled using the same process.
Show battery level percentage in the notification bar
If you wish to see your battery level percentage always displayed in your notification bar, go to Settings > Power and check the box next to Show battery level.
Enable the Daydream screensaver and use Sleep Mode to conserve power
To save your phone’s display from burn-in (or to simply offer a pretty backdrop while docked or charging) enable Daydream, found under Settings > Display & gestures. You can choose to display Colors, your Google Photos, or News & Weather. Tap the three dots in the upper righthand corner to choose when to Daydream (while docked, while charging, or both). You can also launch Daydream directly from this menu.
To conserve power while not using your device, enable Sleep mode under Settings > Power. Sleep mode will disable your phone’s data connection during long periods of inactivity.
Choose which apps use the notification LED and when
The notification LED is a dying breed on Android devices. Luckily for One M9 owners, not only do we get a flashing light to inform us of things like missed calls and messages waiting to be read, but we can also choose which apps take advantage of the light and when.
To setup the notification LED, navigate to Settings > Sound & notification. From here tap Flash notifications to choose whether to always flash the LED light or only when the display is turned off.
To set flash notifications for individual services, tap App light notifications. From here you can choose to use the LED notification light for missed calls, voice mail, messages, calendar events, mail, and alarms.
Set application notification priority levels
As with all devices running Android Lollipop 5.0, you can set notification priority levels on an application-by-application basis. To do so, navigate to Settings > Sound & notification > App notifications.
From the list, choose the app you wish to modify the notification settings for. You can choose to Block all notifications or set a Priority notification level, which will surface notifications from the app in question above others of a normal priority level.
You can alternatively change an application’s notification priority by long pressing a recent item in your notifications pane and tapping the (i) icon to access the app’s settings directly.
Quiet the ringer when you pick up your One M9 (or make it louder when its in your pocket)
The HTC One M9 can be set to automatically alter ringer volume level based on gesture input. To alter these settings, go to Settings > Sound & notification.
Check the box next to Quiet in on pickup to automatically lower ringer volume when you move the phone before answering an incoming call.
Check the box next to Pocket mode to increase ringer volume when the One M9 detects it is inside a pocket or bag.
Get perfect audio from your BoomSound speakers
HTC’s BoomSound speakers in the One M9 provide some of the loudest, full-stereo audio you will find on a smartphone. The phone also features two Dolby audio profiles to get you perfect sound no matter what your listening environment. To change BoomSound audio profiles, go to Settings > HTC BoomSound with Dolby Audio.
For a cinematic experience to go along with video playback, select Theater mode. If you are listening to music, opt for Music mode instead.
HTC One M9 camera tips & tricks
HTC’s camera software is clean and straightforward on the One M9, but it’s hiding a lot of power under the surface. Here are a few helpful hints for making the most of the One M9’s 20.7MP camera.
Change and add camera modes
To switch between camera modes, simply swipe up or down on the display from within the camera app. Default modes include Selfie, Panorama, and Camera. Alternatively, tap the four dots at lower righthand corner of the display to choose your camera mode. From this screen you can also add camera modes including Bokeh, Photo Booth, and Split Capture.
Dial in shooting parameters and save custom camera modes
Tap the three dots in the lower lefthand corner to dial in camera settings including ISO, Exposure, and White Balance. Tap the gear icon to adjust settings like aspect ratio and image resolution as well as access further settings like Contrast, Saturation, and Sharpness, all found under Image adjustments.
Once you have dialed in the perfect camera settings, you can save as a new camera mode for quick recall. After tapping the gear icon, tap Save custom camera. Access your camera preset by swiping up and down on the display or tapping the four dots in the lower righthand corner.
Enable touch capture and auto shutter
Tap the three dots in the lower lefthand corner then the gear icon and navigate to Camera options. From here you can enable Touch to capture (photo is snapped when you touch to focus on a specific area of the display) Voice capture (say “Cheese” or “Capture” to take a photo, “action” or “rolling” for video), or Auto smile capture (focus on a smiling face and photo is taken automatically).
Use volume buttons as shutter or zoom
By default, the One M9’s volume buttons have no special functionality, but you can assign them to control zoom or shutter when in the camera app. Tap the three dots in the lower lefthand corner, the gear icon, and scroll to General Settings. Tap Volume button options to assign a new function.
Visit Android Forums for more!
Did you know Android Forums, the premier destination for Android discussion on the internet, has a dedicated HTC One M9 forum? Of course you did, so why not use it to your advantage? It’s the perfect place for newbs and seasoned vets alike to come together to share their experiences with the One M9, unearth even more tips and tricks, and ask and answer any lingering questions about HTC’s latest.
Before signing off, check out just a few of the threads you will find:
- HTC One M9 camera discussion: show off your pictures!
- General tips & tricks for the One M9
- How to take a screenshot with the One M9
- M9 cases and accessories
- Customizable nav bar and related topics


Awesome article, Kevin!
oops.. wrong phone
thanks for the tips. i just got my htc one m9 and love it.
Tips 1: buy the galaxy S6.
Even though I enjoy my M7 Id advise not getting the M9. Whats even the point?
At first try the phone and then advise people to do something and if you do this then not groundless!
I have M9 since one week and I can confirm, definitely the best phone on the market
By your logic you’d need to try every phone on the market before you can advise people that its the best. But yea, Ive played with the M8 and based off the reviews….its the same thing with sense 7. Which isnt much different than sense 6 with lollipop…which the m7 has.
That’s right, but one critic point, not MY logic, but a logic itself. Reviewers can’t be objective, because they must something eat, don’t be naive. Nowadays you can trust only your own experience
Unless your a die hard HTC fan, why even spend the $$ on a M9? Makes no sense at all. You really have to hate Samsung/touchwiz to buy a M9 over a S6. Or really not like a Z3 or G3 to pass them up to get a M9. The M9 doesn’t compare to any phone I just announced. I’m just saying……
That’s right, M9, is a lot better, not comparable with all mentioned phones above.
G3 – Lol, Z3 o my god, meh)))
S6 – maybe, but, no stereo no go, touchwiz – terrible, glass panel instead of metal – never. Exinos instead of Snapdragon Lol. Knox – no custom rom. Samsung out of the box is laggy, need custom rom
Again, your an HTC fan.
I’m not an fan of any brands, because not from USA. I know it’s difficult to understand, but we pay here for quality, not for the brand. I also drive Mercedes CLS W218 500. Call me an Mercedes fan )))
Good for you.
Nope… Gotta skip the M9 this year. Not worthy at all.