

We’ve all accidentally deleted a file that we did not mean to. Thankfully, there is the trash can in Windows where you can more often than not, recover that file and restore it to its previous location before you deleted it. Unfortunately, sometimes we empty the trash without thinking about it and the file is gone.
Or sometimes, a file is too big for the trash can and is deleted immediately. The good news is that Microsoft has recently announced a new file recovery tool called the Windows File Recovery. This is an application for Windows 10 that basically helps you recover your deleted files.
The best part is that because this is a native app, you can rest assured that its functionality won’t be hidden behind additional fees and that third-party companies aren’t harvesting your information.
How to use Windows File Recovery
It should be noted that right now, the Windows File Recovery tool exists as a command prompt, meaning there’s no GUI for you to click and recover your files. We expect that maybe in the future Microsoft may update it to be more user-friendly, but if you follow these instructions, you shouldn’t have any issues with it.
- Download and install the Windows File Recovery application
- Launch the app and select “Yes” when prompted if you want to allow the app to make changes to your device
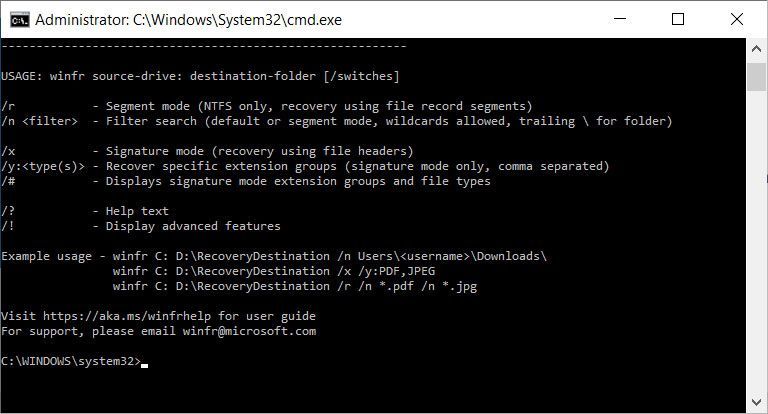
- Enter winfr source-drive: destination-drive: [/switches], where “source-drive” is the drive you want to recover the files from, and “destination-drive” is the drive you want the recovered files to be stored. The [/switches] are “/n <filter>” and “/y: <type(s)>” to indicate the users files and folders
Some examples include:
To recover a specific file from your C: drive to a recovery folder on your E: drive.
winfr C: E: /n \Users\<username>\Documents\QuarterlyStatement.docx
To recover JPEG or PNG files in general.
winfr C: E: /n \Users\<username>\Pictures\*.JPEG /n \Users\<username>\Pictures\*.PNG
To recover folders.
winfr C: E: /n \Users\<username>\Documents\
For the most part, the Windows File Recovery tool is aimed at NTFS file systems, but Microsoft has also introduced a “Signature” mode that can work with FAT, exFAT, or ReFS file systems. The other two modes are “Default” and “Segment”, with Microsoft recommending that users try “Default” mode first (the command lines we mentioned above use the Default mode) before moving onto “Segment” or “Signature”.
To use the other modes, the syntax remains largely the same, with some slight changes. For example, when using “Segment” mode, there will be the addition of the “/r” command before “/n”:
winfr C: E: /r /n *.pdf /n *.docx
When using “Signature” mode, it uses “/x”. For example when trying to recover JPEG and PNG files:
winfr C: E: /x /y:JPEG,PNG
You can find more examples on Microsoft’s Support page.


Comments