
11 things every Nexus 6 owner should do

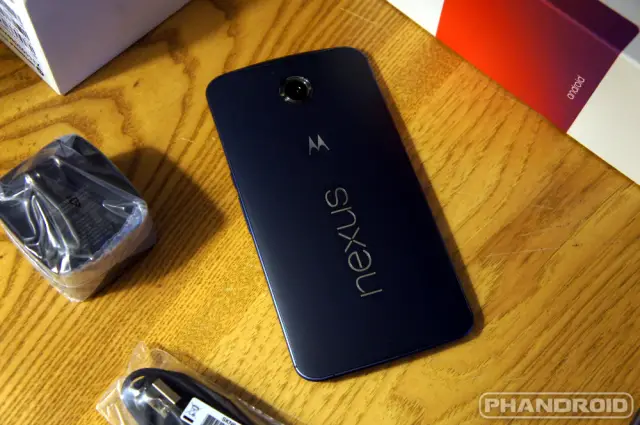

The Nexus 6 is still a tough phone to get, especially if you’re looking for the 64GB version. It turns out a lot of people are interested in a phablet with stock Android from Google. Most people who get the Nexus 6 will be experiencing Android 5.0 Lollipop for the first time. There is a lot of new stuff to discover with Lollipop on the Nexus 6. Here are the first things you should do with your new Nexus phablet.


1. Import Apps & Data from Previous Device
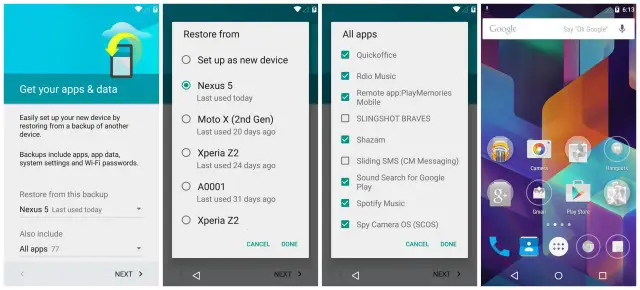

One of the biggest new features of Android Lollipop is one of the very first things you will see. After setting up your WiFi and signing into your Google account, you’ll be taken to the “Get your apps & data” page of the Setup Wizard. Select the “Restore from this backup” option and you’ll be presented with a list of every previously owned Android device that has been backed up to your account.
You’ll be able to see all the apps that were backed up to that device and choose the ones you wish to install on the Nexus 6. All the apps you selected, along with your settings, will be restored to the Nexus 6. If you use the Google Now Launcher it will even restore apps to their proper place on the home screen. This tool makes setting up the Nexus 6 a breeze.
2. Use Smart Lock
After you’re done setting up the phone you’ll want to secure the device with some sort of security. Some people choose not to use lock screen security because it’s a hassle to enter a password every time you unlock the device. Android Lollipop solves this problem with a new feature called “Smart Lock.”
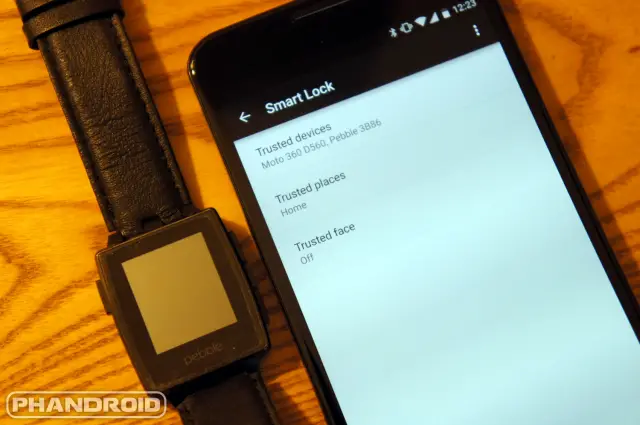
Smart Lock enables you to create trusted places, faces, and devices. When your phone recognizes those trusted things it will disable the lock screen. For example, you can have the lock screen disabled when your smartwatch is connected or when you’re at home. Here’s how to set up a trusted place, face, or device.
- Go to Settings > Security > Smart Lock
- You’ll be asked to create some sort of password, pin, or pattern lock
- Next you will see Trusted devices, Trusted places, and Trusted face
- In Trusted devices tap Add trusted device and then choose Bluetooth or NFC
- Simply choose a device that is connected or tap and NFC tag
- Trusted places will allow you to choose a place from your Google Maps locations, or use the map to create a new place
- Trusted face will guide you through the process of scanning your face
3. Customize Google Now
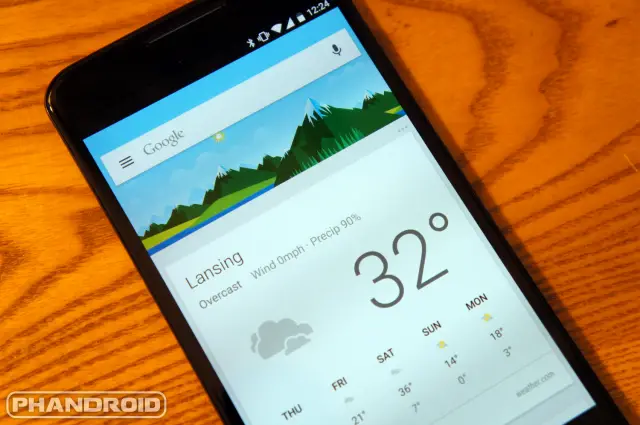
During the setup process you may remember seeing an opt in page for Google Now where we hope you selected “Yes, I’m in.” If you’ve used Google Now in the past it should already be set up, but if you’re a new user this is a feature you definitely will want.
Google Now is like your very own automated personal assistant app. Without having to ask it anything, it’ll show you traffic on your way home, flight times, packages that have shipped, where you parked, and tons more. The more you use it and customize it the better it gets.
To quickly access Google Now you can swipe up on the home button. From there swipe from the left to open the sidebar and select Customize. You should see a few sections such as Sports, Stocks, Places, etc. In each section there will be places for you to add things, such as favorite teams, and make choices for what things you want to be notified about.
If we back out of these settings and swipe from the left again we can tap Reminders. Here is where you can see all the past, present, and future reminders you’ve created. To create a reminder simply say “Ok Google, remind me to go grocery shopping tomorrow at 5PM” or something like that. Here is a list of all the voice commands you can do with Google Now.
4. Enable Battery Saver Mode
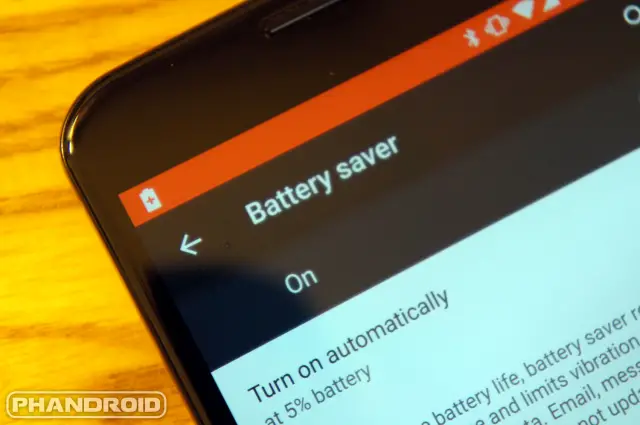
Another cool new feature found in Android Lollipop is Battery Saver mode. With this feature you can squeeze out extra juice when your battery is low. Battery Saver will put the Nexus 6 into low-power mode which will drop performance dramatically, turn off animation, and restrict background data. The phone will be extremely sluggish to use, but that’s a small price to pay for extra life.
To enable Battery Saver got to Settings > Battery > 3-dot menu > Battery saver. There will be an option to turn it on in a drop-down menu which will allow you to have Battery Saver mode automatically turn on when your phone reaches a low battery level. When Battery Saver mode is enabled the nav bars will turn bright orange. Here’s how you can quickly check your battery percentage.
5. Manage Notification Interruptions
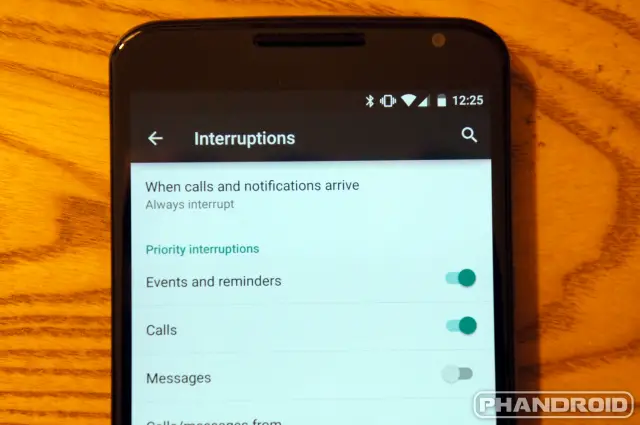
Android’s notification system has long been praised as one of the best in the mobile industry. In Android 5.0 it received some of the biggest changes we’ve seen in a very long time. You can now manage the type of notifications you would like to interrupt you. Located in the Settings under Sound and Notification, the Interruptions option will give you a whole new set of options.
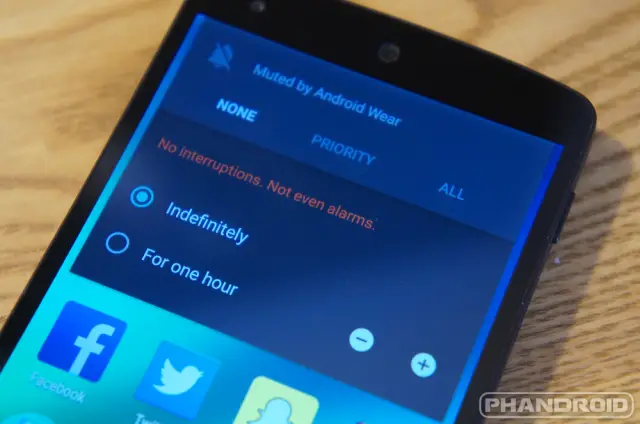
The first option, When notifications arrive, allows you to set which notifications can come through: all (always interrupt), important ones (only priority interruptions), or none at all (don’t interrupt). You can also find these settings with the pop-up that appears when you adjust the phone volume. They are worded slightly different (all, priority, none) but it’s the same thing.
When selecting a time duration to turn off notifications, you have a few options from 15 minutes up to 8 hours. Even when set to only priority interruptions, you can further tweak this by turning on/off events and reminders, or messages. One important thing to note is alarms will not be allowed to make sound or vibrate when in “none” mode. This is the only way to mute the Nexus 6.

Shown on the Nexus 5
Probably the most useful feature of new Interruptions settings is “Downtime.” You can set specific times and days you would only like priority interruptions to come through. The obvious example for this feature is setting Downtime for when you usually go to sleep since priority mode does allow alarms to go off.
If you ever find an app is bothering you with notifications, you can turn off its notifications completely in the App notifications setting. It’s here you can also set an app to “priority.” This way you can still get notifications while in priority mode. This can be useful for messaging apps such as WhatsApp or Facebook Messenger.
6. Hide Sensitive Content from the Lock Screen
Another new feature of notifications in Lollipop is the ability to show them on the lock screen. You don’t have to do anything to enable this feature, but something you might want to do is hide those notifications from prying eyes. The Nexus 6 has a feature that hides the content of lock screen notifications while still alerting you that there is a notification.
You can choose how much content notifications actually show when displayed on your lock screen. To get more privacy open Settings > Sound & Notification > When device is locked > Hide sensitive notification content. Or if you don’t want notifications of any kind on you lock screen (to each his own), choose Don’t show notifications at all.
Next: 7-11 and one bonus!
7. Enable Screen Pinning
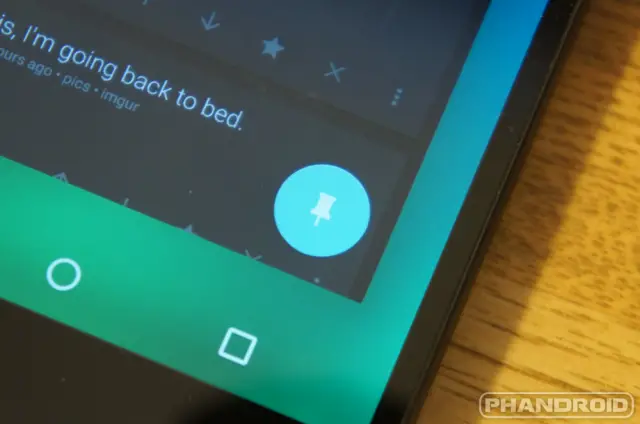
Sometimes you want to let someone use your phone to watch a video, look at photos, or play a game. You don’t want them to go snooping throughout all your apps and personal information. Screen Pinning allows you to lock your phone to one specific app so a guest can’t go snooping around.
To enable this feature go to Settings > Security > Screen pinning. To use screen pinning open the app you would like to pin, then press the square Overview (formerly multitasking) button, scroll up so you can see the blue thumb tack icon in the bottom right corner of the most recent app. To unpin an app simply long-press the back and overview buttons simultaneously.
8. Backup Photos & Videos
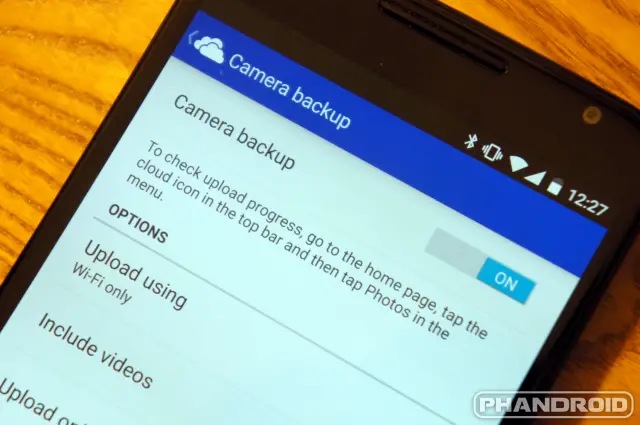
The best camera most people own is the one attached to their smartphone. This means pretty much all of the photos and videos you take are stored in your pocket. It’s very convenient to have a camera on you at all times, but it also makes it very easy to lose all of your precious photos and videos. The easiest way to prevent this from happening is using cloud backup apps.
There are three cloud backup apps that we like: Google+, OneDrive, and Dropbox. All three of these apps have some sort of automatic backup feature. When the feature is enabled it automatically adds photos and videos to your cloud storage right from the camera roll. You don’t even have to think about it.
When you open the Google+ app for the first time it will ask you if you want to enable Auto Backup. You can set it to only back up photos and videos when you’re connected to a WiFi network. In the OneDrive app you’ll find similar settings under Camera backup. In Dropbox it’s called Camera Upload, but it works exactly like the others.
9. Customize Your Home Screen
Now that we’ve got all the important stuff taken care of we can finally set up the home screen. The Android home screen is one of the most iconic things in smartphones. Nothing else comes close to the level of customization. You can change the wallpaper, fill it up with app icons, create folders, and add widgets. The only limit is your imagination.
Long pressing any blank area on the home screen will show you a zoomed out view of your home screen pages, as well as options to change the wallpaper, add widgets, or customize your Google Now settings. With all the extra screen real estate of the Nexus 6, you should have no problem fitting all the apps and widgets you want.
Don’t forget that most widgets can be resized by long-pressing after they’ve been placed. If you find you need more than single paged home screen, you can add more by dragging an icon from the app drawer over to the right of the screen where another page will then be added.
10. Accessorize your Nexus

You’re Nexus 6 is all set up and ready to go. Now you can start thinking about what accessories you might want. There is a sea of cases, charges, screen protectors, headphones, mounts, and more to go with your Nexus 6. Finding the best accessories, and the ones that don’t cost as much as your phone, can be a challenge. Luckily we’ve already compiled a list of our favorites.
Head on over to our list of the best Nexus 6 accessories. We’ve got picks for cases that are thin, durable, with holsters and kickstands, and wallet cases. There is also best wireless chargers, screen protectors, car mount, and headphones. It’s a great place to start for decking out your Nexus in the best gear.
11. Explore the Nexus 6 Forums

These steps are just the beginning of what you can do with the Nexus 6. Now you can graduate to our 13 Tips & Tricks for the Nexus 6. Another excellent resource is our Nexus 6 forum. There you will find conversations from other Nexus 6 users. It’s a great place to ask questions and learn how to do things with our How-To guides. Here are a few that you might be interested in right now:
- How to take a screenshot
- How to change keyboard
- How to edit contacts (and add and delete)
- How to uninstall apps
- How to use NFC
- How to use Wireless Charging
- How to Turbo Charge
You should also download the official Android app for Android Forums, and while you’re at it download the Phandroid app too.
Bonus: Play the Secret Lollipop Game

With every major Android release Google has “hidden” a fun little Easter Egg inside the Android version number. For Android 5.0 Lollipop Google went all out, including a full on Flappy Bird clone mini game.
All you have to do to get it up and running is press the version number 5 times (Settings > About phone > Android version) to activate the first part of the Easter Egg: an image of a Lollipop. Tapping on the lollipop will change its colors, but long press and it fires up the new mini game.
Everything is Android and Lollipop themed, but don’t be fooled, this version is just as excruciatingly difficult as the real thing. Play at your own risk.