

One of the differences between iOS and Android devices would be its messaging platforms. While there are plenty of third-party alternatives such as WhatsApp, Facebook Messenger, and Telegram, just to name a few, both iOS and Android have proprietary messaging systems that lets them chat with fellow iOS or Android users.
For iOS users, this comes in the form of iMessage, but what if you’re an Android user who wants to chat with their friends using iMessage? You might think it would be impossible to do so, but that’s actually not the case. It will take a bit of a workaround to chat with friends on your Android device through iMessage, and while it is a bit of a lengthy process, it’s not a particularly difficult process and you should have it up and running in no time.
Before we begin, you will need three things:
- An Android smartphone
- The AirMessage app for Android and Mac
- A Mac computer, whether it be an iMac or MacBook, as long as it is a Mac
Getting Started
Installing AirMessage
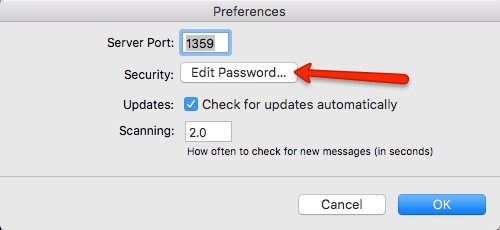
- Download AirMessage onto your Mac
- Install the application on your computer
- Follow the instructions on the screen to set a new password for the AirMessage server
Configuring Mac Sleep Settings
Since your Mac will essentially act as a server in which your iMessages will pass through, this means that your computer needs to be up and running 24/7. Given that by default, most computers will eventually turn themselves off and go to sleep when idle, you’ll need to change that.
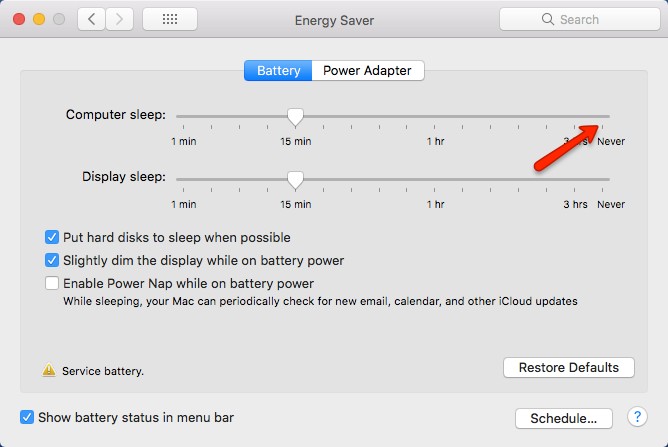
- Launch System Preferences
- Go to Energy Saver
- Under Computer Sleep, shift the slider to “Never”
Note that this setting persists whether you use AirMessage or not, so if you’re looking to cut down on your energy usage, you might want to keep this in mind.
Configuring Your Connections
To ensure a steady and reliable connection from your phone to your computer, you will need to setup a couple of things, such as port forwarding.

- Locate your local IP address by going to System Preferences > Network
- Select your network from the left and it should be down in the details panel to your right
- Take it down or copy it somewhere because you’ll need it again later.
- Connect to your router’s default gateway address
- Log into your router’s interface
- Look for port forwarding settings, which depending on the brand you’re using, could be under “advanced settings”
- Create a new port forwarding entry by entering your computer’s local IP address, your server’s port (which by default is 1359), type TCP
- Save the changes
- You can check to see if port forwarding works by going to PortCheckTool.com or CanYouSeeMe.org
Setting Up A Dynamic DNS (Optional)
If you can somehow guarantee that your IP address will never change, then you should be set. However, for the most part, our IP addresses do change every now and then due to a variety of reasons, like a power outage that resets the modem. This means that when that happens, we will lose our connect to our AirMessage server.
To avoid this problem, you might need to consider getting a dynamic DNS service, such as Dynu DNS. We should point out that this step is completely optional. It will make the overall service of AirMessage a lot more reliable, especially if you frequently reset your router, but if you don’t, you can feel free to skip this.
- Go to Dynu DNS website and register for an account
- Pick a hostname which is what will be used to connect to your server
- Download the Dynu DNS client
- Login using your Dynu DNS account
Using AirMessage
Now that you’ve set it all up, assuming you followed the steps correctly, your AirMessage server should be up and running. Now all you’ll need to do is download and install the app on your phone and you should be ready to start sending iMessage messages from your Android device to your friends on iOS.
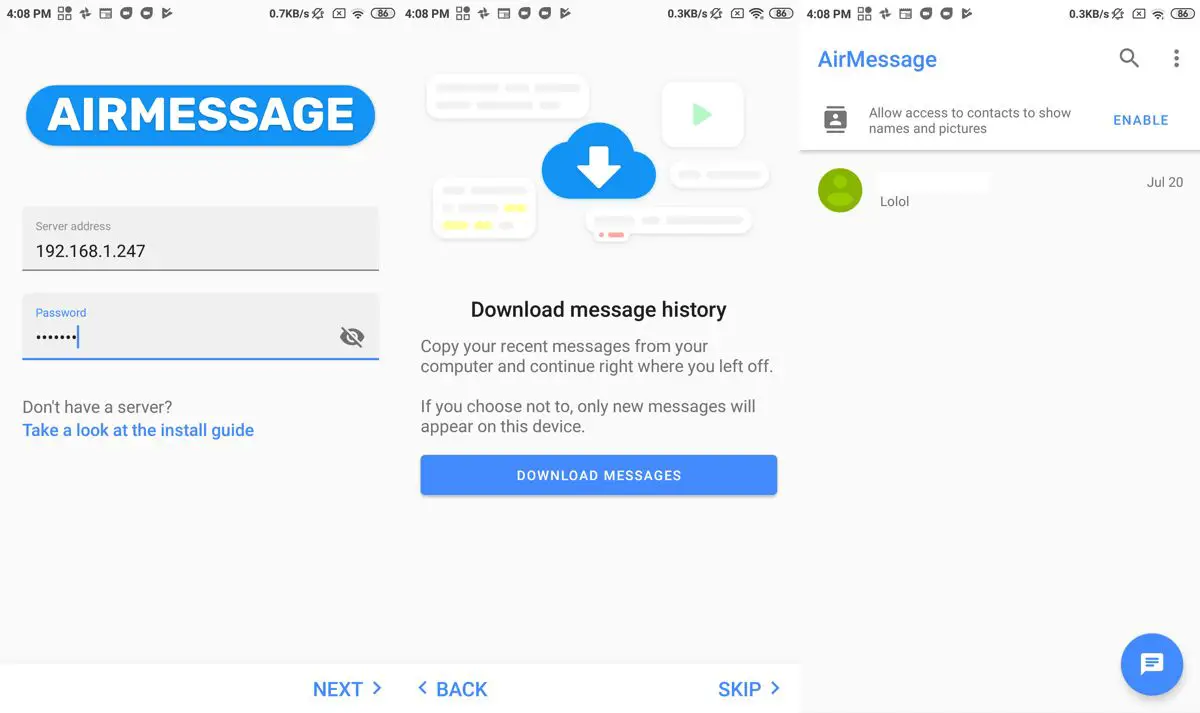
- Download AirMessage from Google Play
- Once the app has been installed, enter your server address and password (this will be the name of your hostname you chose with Dynu DNS, while the password will be the AirMessage server password you chose at the start of this guide)
- Alternatively, if you don’t want to use Dynu DNS, you can just enter your network’s IP address in its place.
- Once connected, you will be prompted to download your messages
- You will also be asked to grant access to your contacts
- Once that’s all done, you’re good to go!


Comments