While many Nexus owners are waiting for the Android 5.0 Lollipop OTA, Google has posted the official factory images. These images are essentially the same thing you’ll get in an OTA, but if you know what to do you can flash them immediately. A few of you asked us how to do this. It can be a little tricky if you’ve never done it before, but if I can do it so can you. Let’s do get started.
*Phandroid is not responsible for any problems you have. Proceed at your own risk.
First and foremost we need to download the factory image. You can find download links for most Nexus devices here. This guide will be for the Nexus 5.
We’re going to be using a a program that will install ADB and fastboo drivers for you. It’s very quick and easy to use. Follow the links below to download the program for your desktop OS.
Note: Mac users will have to write “./” before every command listed in this guide.
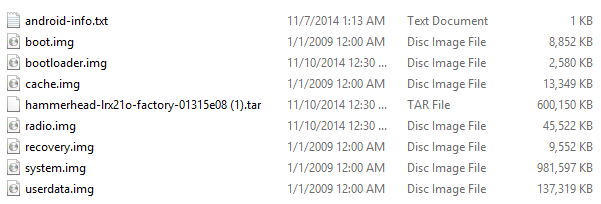
Okay, now we’re going to extract the factory image. First you’ll extract the factory image a couple of times until you get the files below.

At this point we should note that you need to have an unlocked bootloader. If for some reason yours isn’t you can find out how to unlock it here.
There are two methods to complete the process. This first method is easier, but it hasn’t been working for a lot of people. You can give it a try to see if you’re lucky.
- Power off your phone.
- Boot it in fastboot by pressing and holding Power Button + Volume Down at the same time.
- Connect your phone to your PC through your USB cable.
- Execute the flash-all.bat script (for Windows) or flash-all.sh(for Mac and Linux) in the folder where you extracted the factory images
- Remember, for Mac you’ll have to edit the flash-all.sh, and add “./” before every command.
- After everything finished, go to your phone and select “Recovery” using the volume buttons.
- When a small dead Android appears, press Power Button + Volume UP.
- Select “Wipe data/factory data reset”
- Reboot
If you see a “missing system.img” error after step 4 don’t fret. Most people have encountered this error (including me). The solution requires a little extra work, but it’s not a big deal.
We’ll need to extract the “image-hammerhead” .zip file into a new folder. Then move the “bootloader-hammerhead” and “radio-hammerhead” .img files into that same folder. I suggest renaming the bootloader and radio files so you get something like this:

Now all we’re going to do is flash all the .img files manually one-by-one. It’s a piece of cake. Open up the command prompt and change to the directory with all your .img files. Input the following commands in order. Allow each one to finish before moving on.
fastboot flash bootloader .img
fastboot flash radio .img
fastboot reboot-bootloader
fastboot flash recovery recovery.img
fastboot flash boot boot.img
fastboot flash system system.img (this one will take the longest)
To perform a full wipe do this:
fastboot flash cache cache.img
fastboot flash userdata userdata.img
That’s it. Now run command “fastboot reboot” and your phone will restart. The boot animation will last a little longer than usual, but eventually you’ll get the “Android is upgrading” message and you’re on your way to Android 5.0 Lollipop! That wasn’t so hard, was it? Let us know if this works for you!


pertamax
While not ideal here is what I did to flash it. I was on the 5.0 Preview. I went back to 4.4.4 factory image and set the phone back up. After this I turned the phone off and went back into fastboot mode. After this I ran the “flash-all.bat” script and it worked.
Interesting but i see why this would work. Thanks.
Weiird.
So I just flashed it to my nexus 5, the only adjustment I made was removing the “-w” from the “fastboot update image-hammerhead-lrx21o.zip” line to save my user data. I’m running into some weird bugs though. First off, I can’t access my quick settings most of the time. when i pull down twice nothing happens the second time. Even the first swipe downwards: where there’s supposed to be the date, time and battery info header, all I have is translucent nothingness with “no notifications” underneath. I also cannot close the app drawer by pushing the center button, in fact the centre circular button doesn’t seem to close or do anything. My gallery app is also missing.
Yeesh, I dunno how I messed that one up but if I didn’t, this thing is more buggy than the dev preview.
I’m going to try flashing again but this time i’ll wipe the data.
I think Gallery’s been removed. I did a clean flash and it’s nowhere to be seen.
I saw no gallery either.
Line one and two (ie “fastboot flash bootloader .img” and “fastboot flash radio .img”) for flashing sequence in this post is wrong. Refer to http://phandroid.com/2014/11/12/how-to-solve-android-lollipop-system-img-error/ for correct syntax.
or….. you could just double click flash-all.bat since its the batch file that does all that
so i do this but all i get is the “./fastboot no such file or directory found” i think im doing this right. i had this problem with my nexus4 when kitkat came out. but i cant remember how to fix it. also im doing this on a mac hence the “./”
If you get an error manually flashing the first two, make sure you type the name before it just like the others. ie flash bootloader bootloader.img. For some reason he left the first two without it. then it didn’t give me an error.
I’m getting this when I open flash-all.bat file.
And Installation failes when I try to flash image in recovery
Any Suggestions?
You’ll need to extract all the files to the ‘platform-tools’ folder of your ADK, have you done that? If you’ve downloaded the adb setup (or similar) you’ll need to extract the files to the same folder as the ‘fastboot.exe’ file.
i get the error unknown filename “bootloader.img”
cannot determine image filename for “bootloader.img”
I think I remember seeing some similar errors almost immediately after running the batch file, how long did you wait after the error before closing the window? I waited at least a minute and then the process began again transferring more files and installing them.
After much butthurt i found the problem
The code to flash the img files is wrong its this way
Fastboot flash bootloader bootloader.img
Fastboot flash radio radio.img
And the rest of the code is fine….
Holy Jesus, the battery life is so horrible on Nexus 5. Under KitKat I usually lasted till lunch time, starting a day at 7am, but with Lollypop I’m on a charger after 2 hours!!! WTF Google?
Your battery lasts until lunch time? Do you do anything else besides look at your phone?
My battery life seems to be reduced with Lollypop too. I’ll give it a day or two to see if anything changes. With the preview it seemed like people were happy with their battery life, I can’t imagine they would make it worse with the official release.
Believe it or not, but I don’t look at it all the time. However, I use LTE heavily during first half of the day, as I listen to online radio (while working), make VOIP calls and usually get more emails than in the afternoon.
It’s always a good idea to reboot once after an update is all done. I’ve seen strange behaviors (including excessive battery drain) on the first boot following an update (with multiple different phones) that go away after another reboot.
I rebooted multiple times since last night of upgrade. And since morning, this is the 3rd time I’m on the charger.
Time to break out Better Battery Stats and find out what’s draining it.
I was able to install it through the bat file. No problems with anything missing. The boot animation did take a long time and the screen actually looked a little weir like extra bright. But it is all booted up now and working fine.
Same here on Nexus 7 (2013 Wi-Fi)
Done manually. First time flashing. First time i got a dead android(red triangle) but I had done the full wipe commands at the end, guide didn’t really specify. So next time around I just didn’t run those lines. Everything is running fine now
I FINALLY HAVE IT!!! AND, this is my first time doing this. AND I did it all on my nexus 5 (my computer broke about a week ago
This was really easy. The flash-all.bat worked fine! I spent three hours yesterday trying to follow another guide and failed on every step. Now I’ve got Lollipop on my Nexus 10.
I flashed the latest hammerhead image on the Nexus 5 of a friend of mine, and he’s experiencing lots of issues: audio stops working all of a sudden, phone randomly shuts itself off, severe lag from time to time; it’s unusable by all means.
He had a Cyanogenmod 11 before, I used Nexus Root Toolkit, then after noticing the problems, I tried the flashing again with the bundled .bat script, then a tried a third time by issuing commands through adb manually and flashing everything one piece at a time: the result was always the same: flashing process went ok but then the phone had the same crazy behavior at runtime. At that point I had to flash the Cyanogenmod 11 back, and everything is working just fine right now.
That very same image file has been flashed by me on other two Nexus 5 devices (one of which is mine) without any issues, from the same computer and with the same tools, even the same USB cable.
Does anyone know what could have happened?
I flashed following all the above steps , got Lollipop Installed without any errors and now i get 12.55GB storage instead of 32GB, i wiped cache etc still no help.
Please help !
I just flashed it on my nexus 5 using the flash-all.bat. The command prompt said that system.sig is not found. At that point i thought that id take a break and do it the slightly longer way later. I came back to find Lollipop working perfectly. I didnt even get a chance to put it into recovery mode and do another factory reset. Should i still do those last couple of steps even if its working perfectly?