
How to back up your photos with Google+ [Android 101]


The device that people use to take a majority of photos is their phone. Even when smartphone cameras weren’t that great it was still better than lugging around a camera. The result of this convenience is people carrying around all of their personal photos everywhere they go. That makes losing them all that much easier. Luckily there are plenty of ways to back-up your photos for safe keeping. A popular method for Android devices is through the Google+ app. We’ll show you how.
When you download the Google+ app from the Google Play Store it also gives you a companion “Photos” app. The icon should look like this:


If you’re not already signed in with your Google account it will ask you to do that now. When you are signing in for the first time it will ask if you want to automatically back-up your photos. You can enable it right there. If you haven’t already done that, or you want to adjust the settings, follow the steps below.
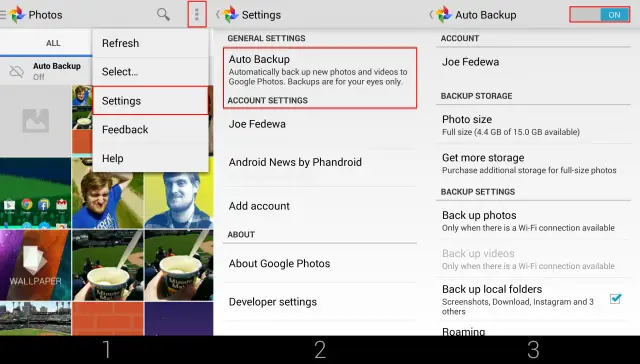
- Tap the Menu button in the top right corner and select Settings.
- On the next screen select Auto Backup at the top of the screen.
- Now flip the switch in the top right from Off to On.
- That’s it!

Now you can adjust the auto back-up settings. You can adjust things like photo resolution, when photos should be uploaded, which folders to back-up, and more. One thing you will want to do is make sure photos only upload over WiFi, which is found in the “Backup Settings” section.
Now that you have this enabled you will be able to access all of the photos you take on the web. Go to Google+ and visit the “Photos” page to see all of your automatically uploaded photos. These photos are private by default. They will only be shared if you share them yourself. All your photos are now safely backed up. Should something happen to your phone you won’t have to worry about losing them! Do you have this set up on your device?