
Meta Quest is a lineup of feature-rich and value-for-money virtual reality (VR) headsets. While the primary objective is to deliver immersive VR content and experiences, the team keeps working on new ways to help you enjoy content in different ways. This is the reason it has announced a new app called Meta Quest HDMI Link.
This new app will allow users to use a Meta Quest device as a massive display for any HDMI device. It will work with any device as long as it has an HDMI or DisplayPort output. These include PCs, laptops, gaming consoles, handhelds, and more. Meta says it will allow users to display 2D content in VR on a massive low-latency screen, similar to the Theater View.
The best part is HDMI Link is capable of streaming content in up to 1080p with near-zero latency. The screen can also be resized and repositioned as per the user’s preference.
Here is how you can stream content from any HDMI device to your Meta Quest with the HDMI Link.
Eligible Meta Quest Devices for HDMI Link
The newly launched Meta Quest HDMI Link app is compatible only with a few selected devices. These are the Meta Quest 3, Meta Quest 2, and Meta Quest Pro.
What do you need?
Apart from an eligible Meta Quest device, the HDMI Link app also needs extra hardware to work. You will need a UVC (USB Video Class) and UAC (USB Audio Class) compatible capture card and cables. Meta recommends USB 3.0 cables for the connection to work.
Another thing to remember is that certain apps including streaming apps use built-in copy protection software. This may interfere with the HDMI Link functionality.
Set up Meta Quest HDMI Link
- Install the Meta Quest HDMI Link application on your Meta Quest device.
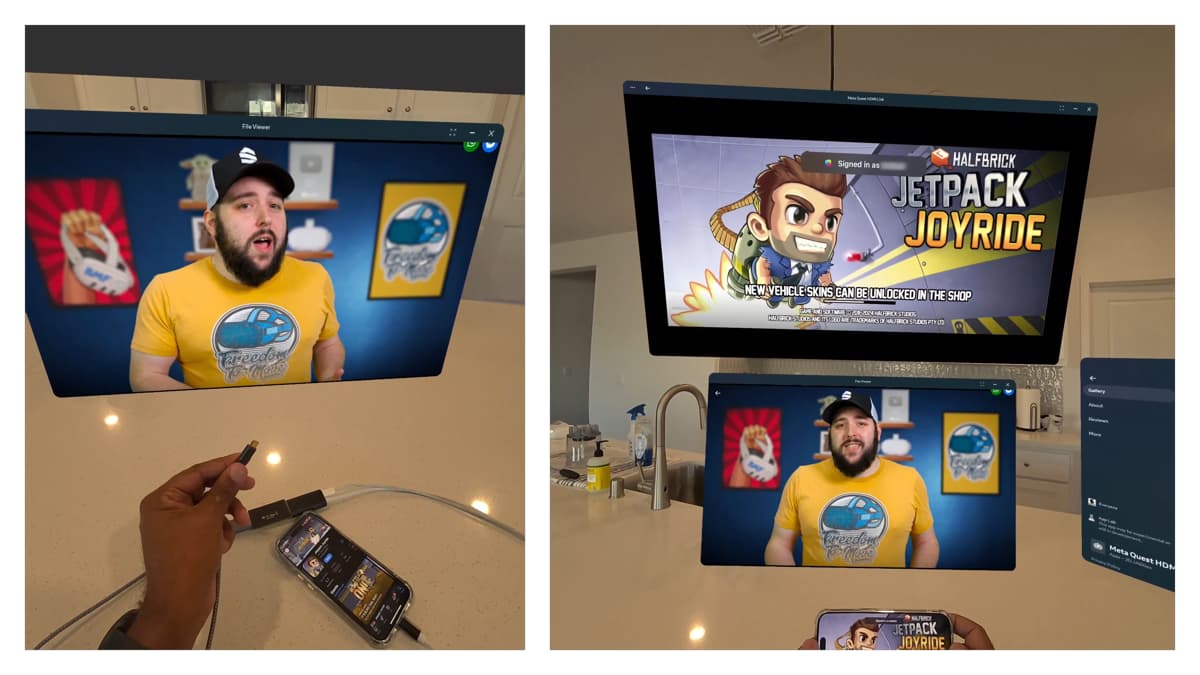
- Connect your source HDMI device to the capture card using an appropriate cable. It could be a simple HDMI cable, a USB-C to HDMI cable, or a Lightning to HDMI cable depending on what ports the source device has.
- If available, run USB-C power to your capture card as it will help keep the Meta Quest device charged. This is an optional step.
- Use a USB-A female to USB-C male cable to connect your Meta Quest headset and the capture card.
- Power on the headset, grant all required permissions, and it should work.


Comments