
The Samsung Galaxy Note 8 has been out for quite some time, and we’ve spent enough time with the device to compile a list of the best tips and tricks for Samsung’s latest and greatest. So without further adieu, here are the best tips and tricks for the Galaxy Note 8.
How to take a screenshot
Taking a screenshot with the Galaxy Note 8 and sharing it with other apps or contacts is really easy. It’s actually a tad different from previous generations (depending on which Galaxy you’re coming from), so here’s how you do it:
- Press and hold the power button and volume down button simultaneously.
- Wait until you see the screenshot animation
For a brief moment after taking a screenshot, you’ll have the following options (this can be turned off in Settings > Advanced features > Smart capture):
- Scroll capture – Take a scrolling screenshot of a web page/app
- Draw – Doodle over your screenshot then crop, share, or save (you’ll need to give Screen write permission to access photos, media, and files on your device)
- Crop – Crop your screenshot then save then draw, share, or save
- Share – Immediately share your screenshot to another app, or by creating a link via Link Sharing.
If sharing through Link Sharing, you’ll have to confirm you want to share your contacts’ information with Samsung. Links shared via Link Sharing are temporary and expire after 24 hours.
Palm swipe to capture
Of course, Samsung still includes their unique Palm swipe to capture feature. This allows you to take a screenshot by swiping your hand across the display. You’ll find it inside Settings > Advanced features > Palm swipe to capture > ON.
Smart Select
If you’re like me and only want to screenshot a portion of the screen, the included S Pen functionality makes this extremely easy. The S Pen includes a feature called “Smart Select” which will allow you to draw either a circle or square around an area on your screen and capture just that portion.
In order to activate, simply remove the S pen, select Smart Select, choose the specific option (Lasso, GIF, Rectangle, Circle), and capture your image. From there, you will be presented with a sharing menu, making it easy to send that snippet to whomever you want.
Keep your Note 8 protected

Yes, the Galaxy Note 8 is absolutely gorgeous with its bezel-less design, smooth curves, and glass front and back. However, accidents do happen, and glass does scratch so we always recommend using a case or skin. Personally, I have been switching between using my Dragon Skin dbrand and Spigen Tough Armor case. The dbrand skin doesn’t interfere with the case and vice-versa, so I can have as much protection as I need depending on my day.
However, you’ll want to check out some of our favorite cases by hitting the button below.
Get rid of the charging cables
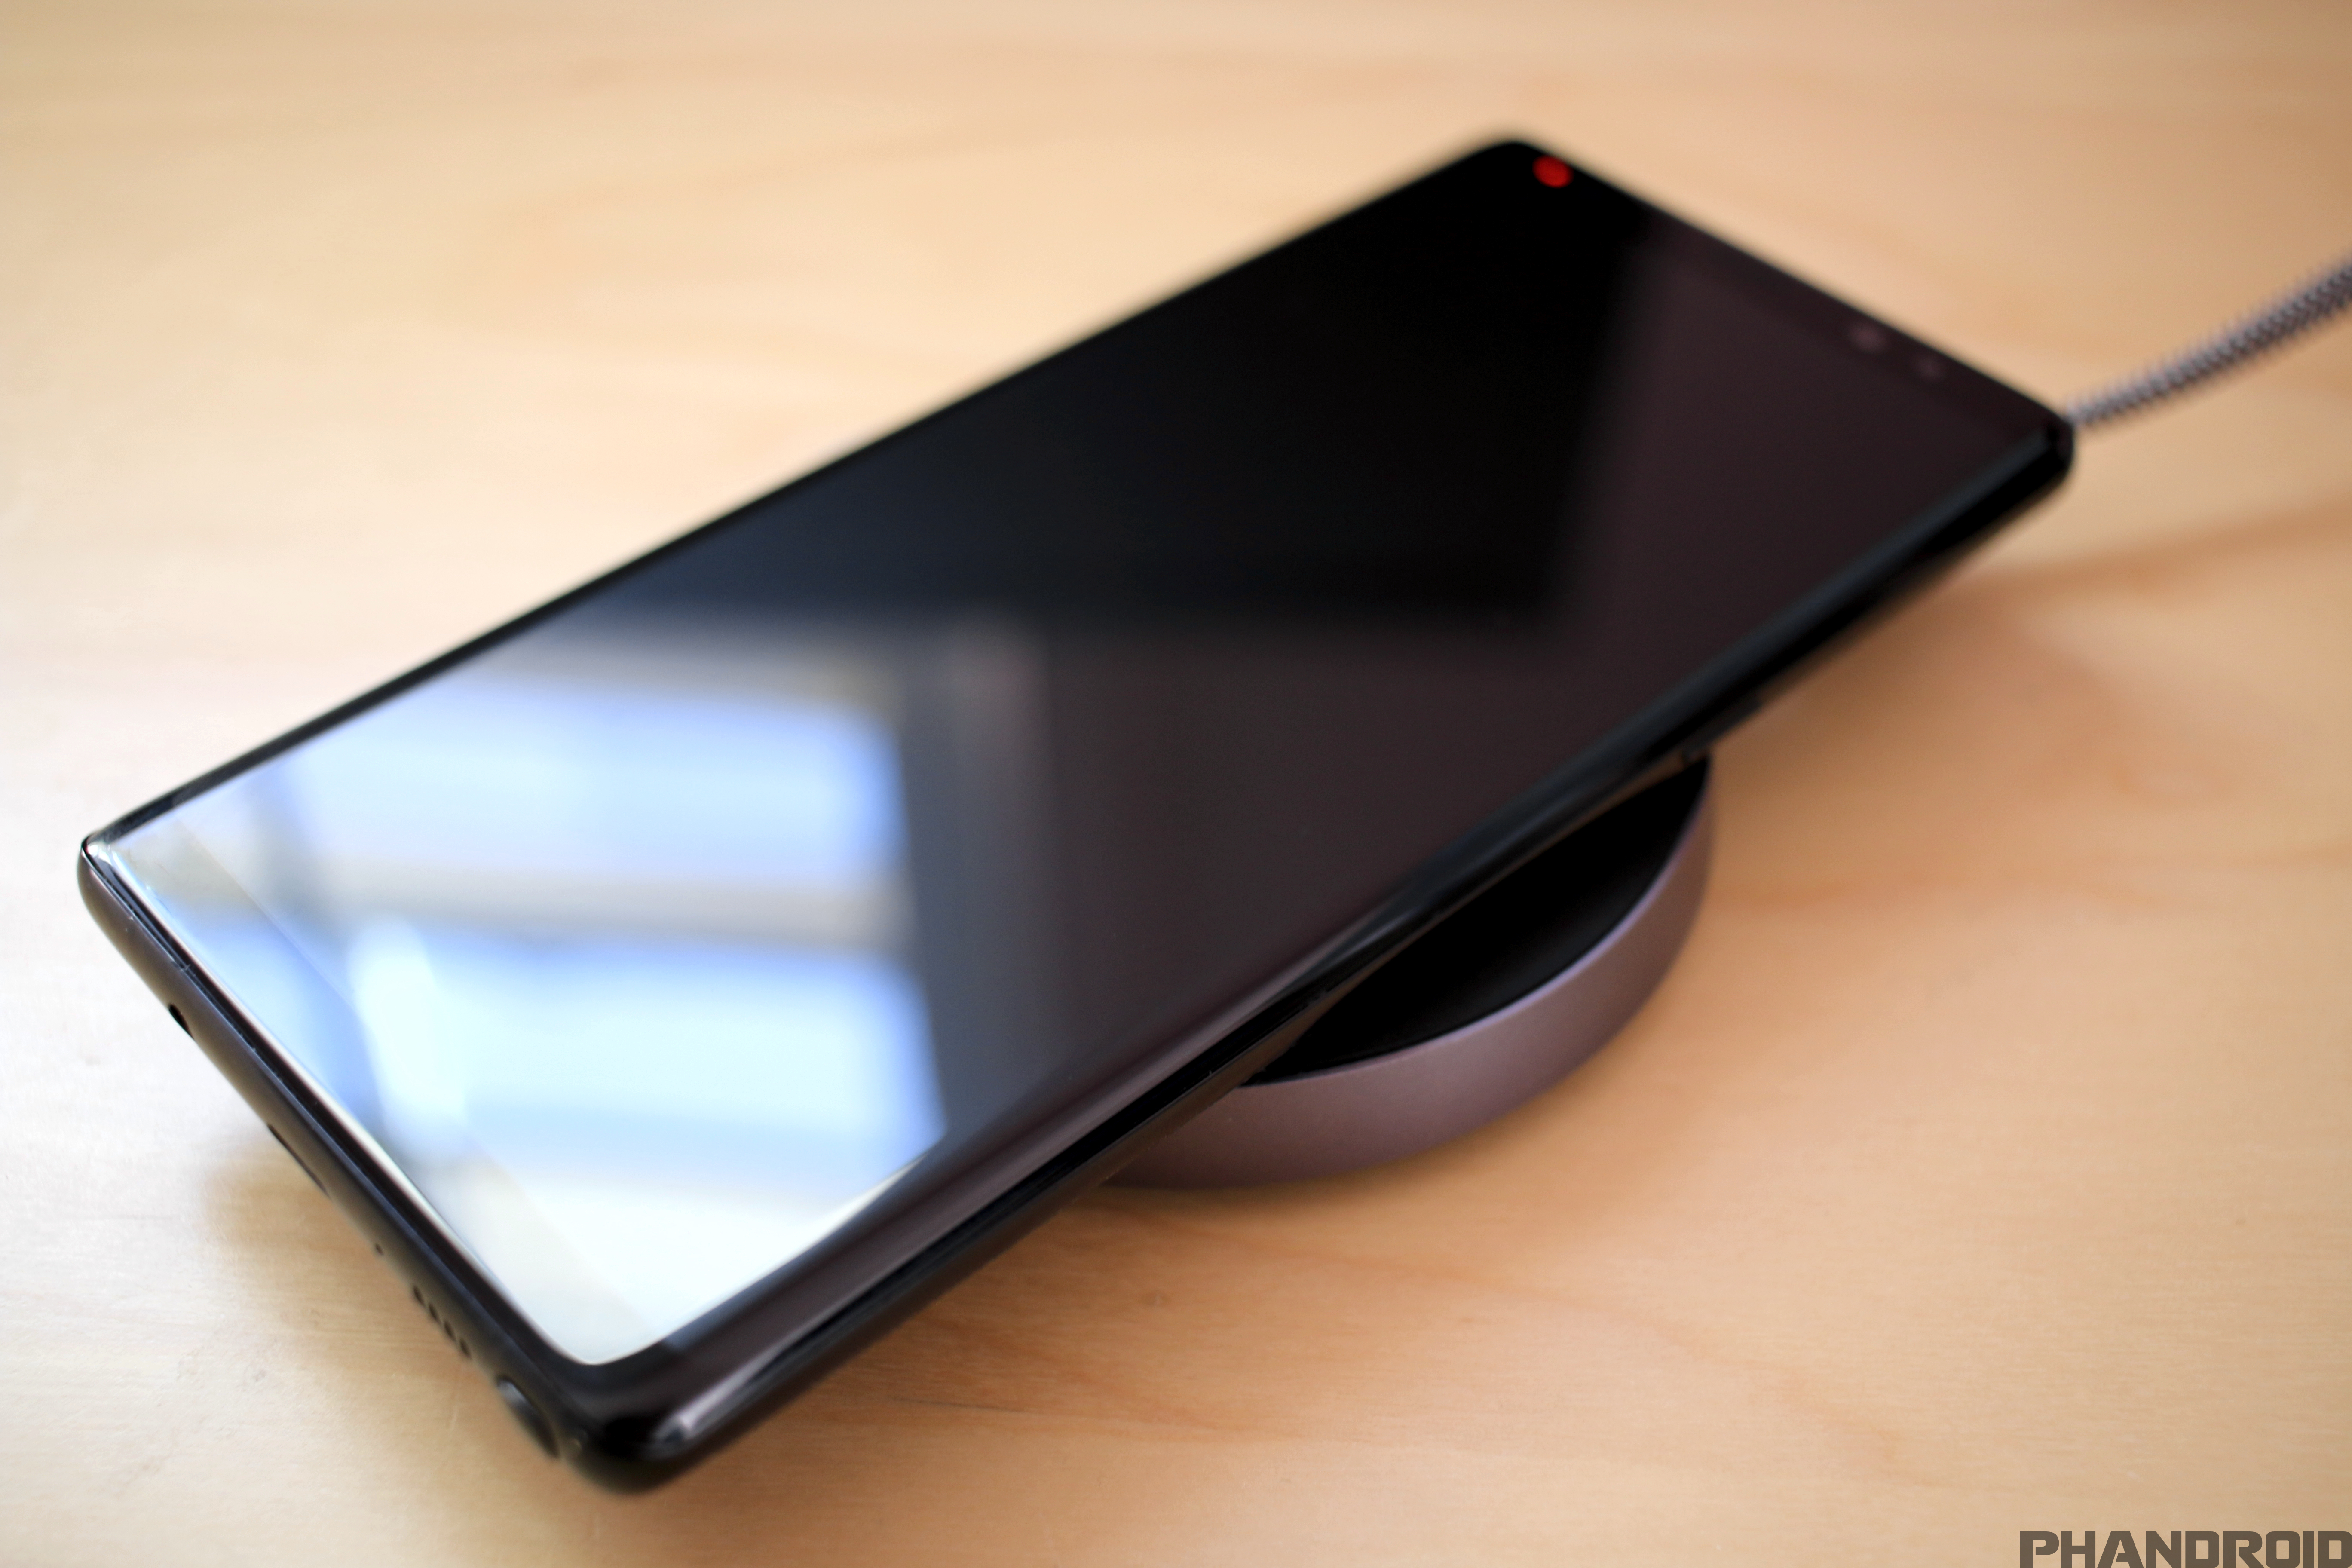
The Galaxy Note 8 features wireless charging and supports both Qi and PMA standards, making it compatible with almost any wireless charger out there.
Wireless charging is typically pretty slow at charging your device — nowhere nearly as efficient as charging with a USB cable — but the Galaxy Note 8 always features wireless fast charging. Using a compatible fast wireless charger (and a wall charger with a 2A output), the phone charges much more quickly.
There are plenty of fast wireless chargers on the market and most are pretty affordable. Here’s a list of my top picks:
- CHOETECH Qi Certified Charging Pad – $11.99
- RAVPower Fast Wireless Charger – $12.99
- Anker Fast Wireless Charger – $25.99
- Samsung Qi Charging Pad – $24.99
- Samsung Fast Charge Stand – $36.95
Store all the content you need

Samsung dropped the microSD card slot for a while, but they have thankfully added it back. You can easily upgrade your storage capacity without buying the expensive high storage models or a cloud storage subscription and relying on a data connection. Buy these great SD cards and pop one in.
- SanDisk 32GB microSD – $12.99
- SanDisk 64GB microSD – $22.99
- SanDisk 128GB microSD – $44.37
- SanDisk 200GB microSD – $74.95
- SanDisk 256GB microSD – $129.99
Unlock with nothing more than your eyes
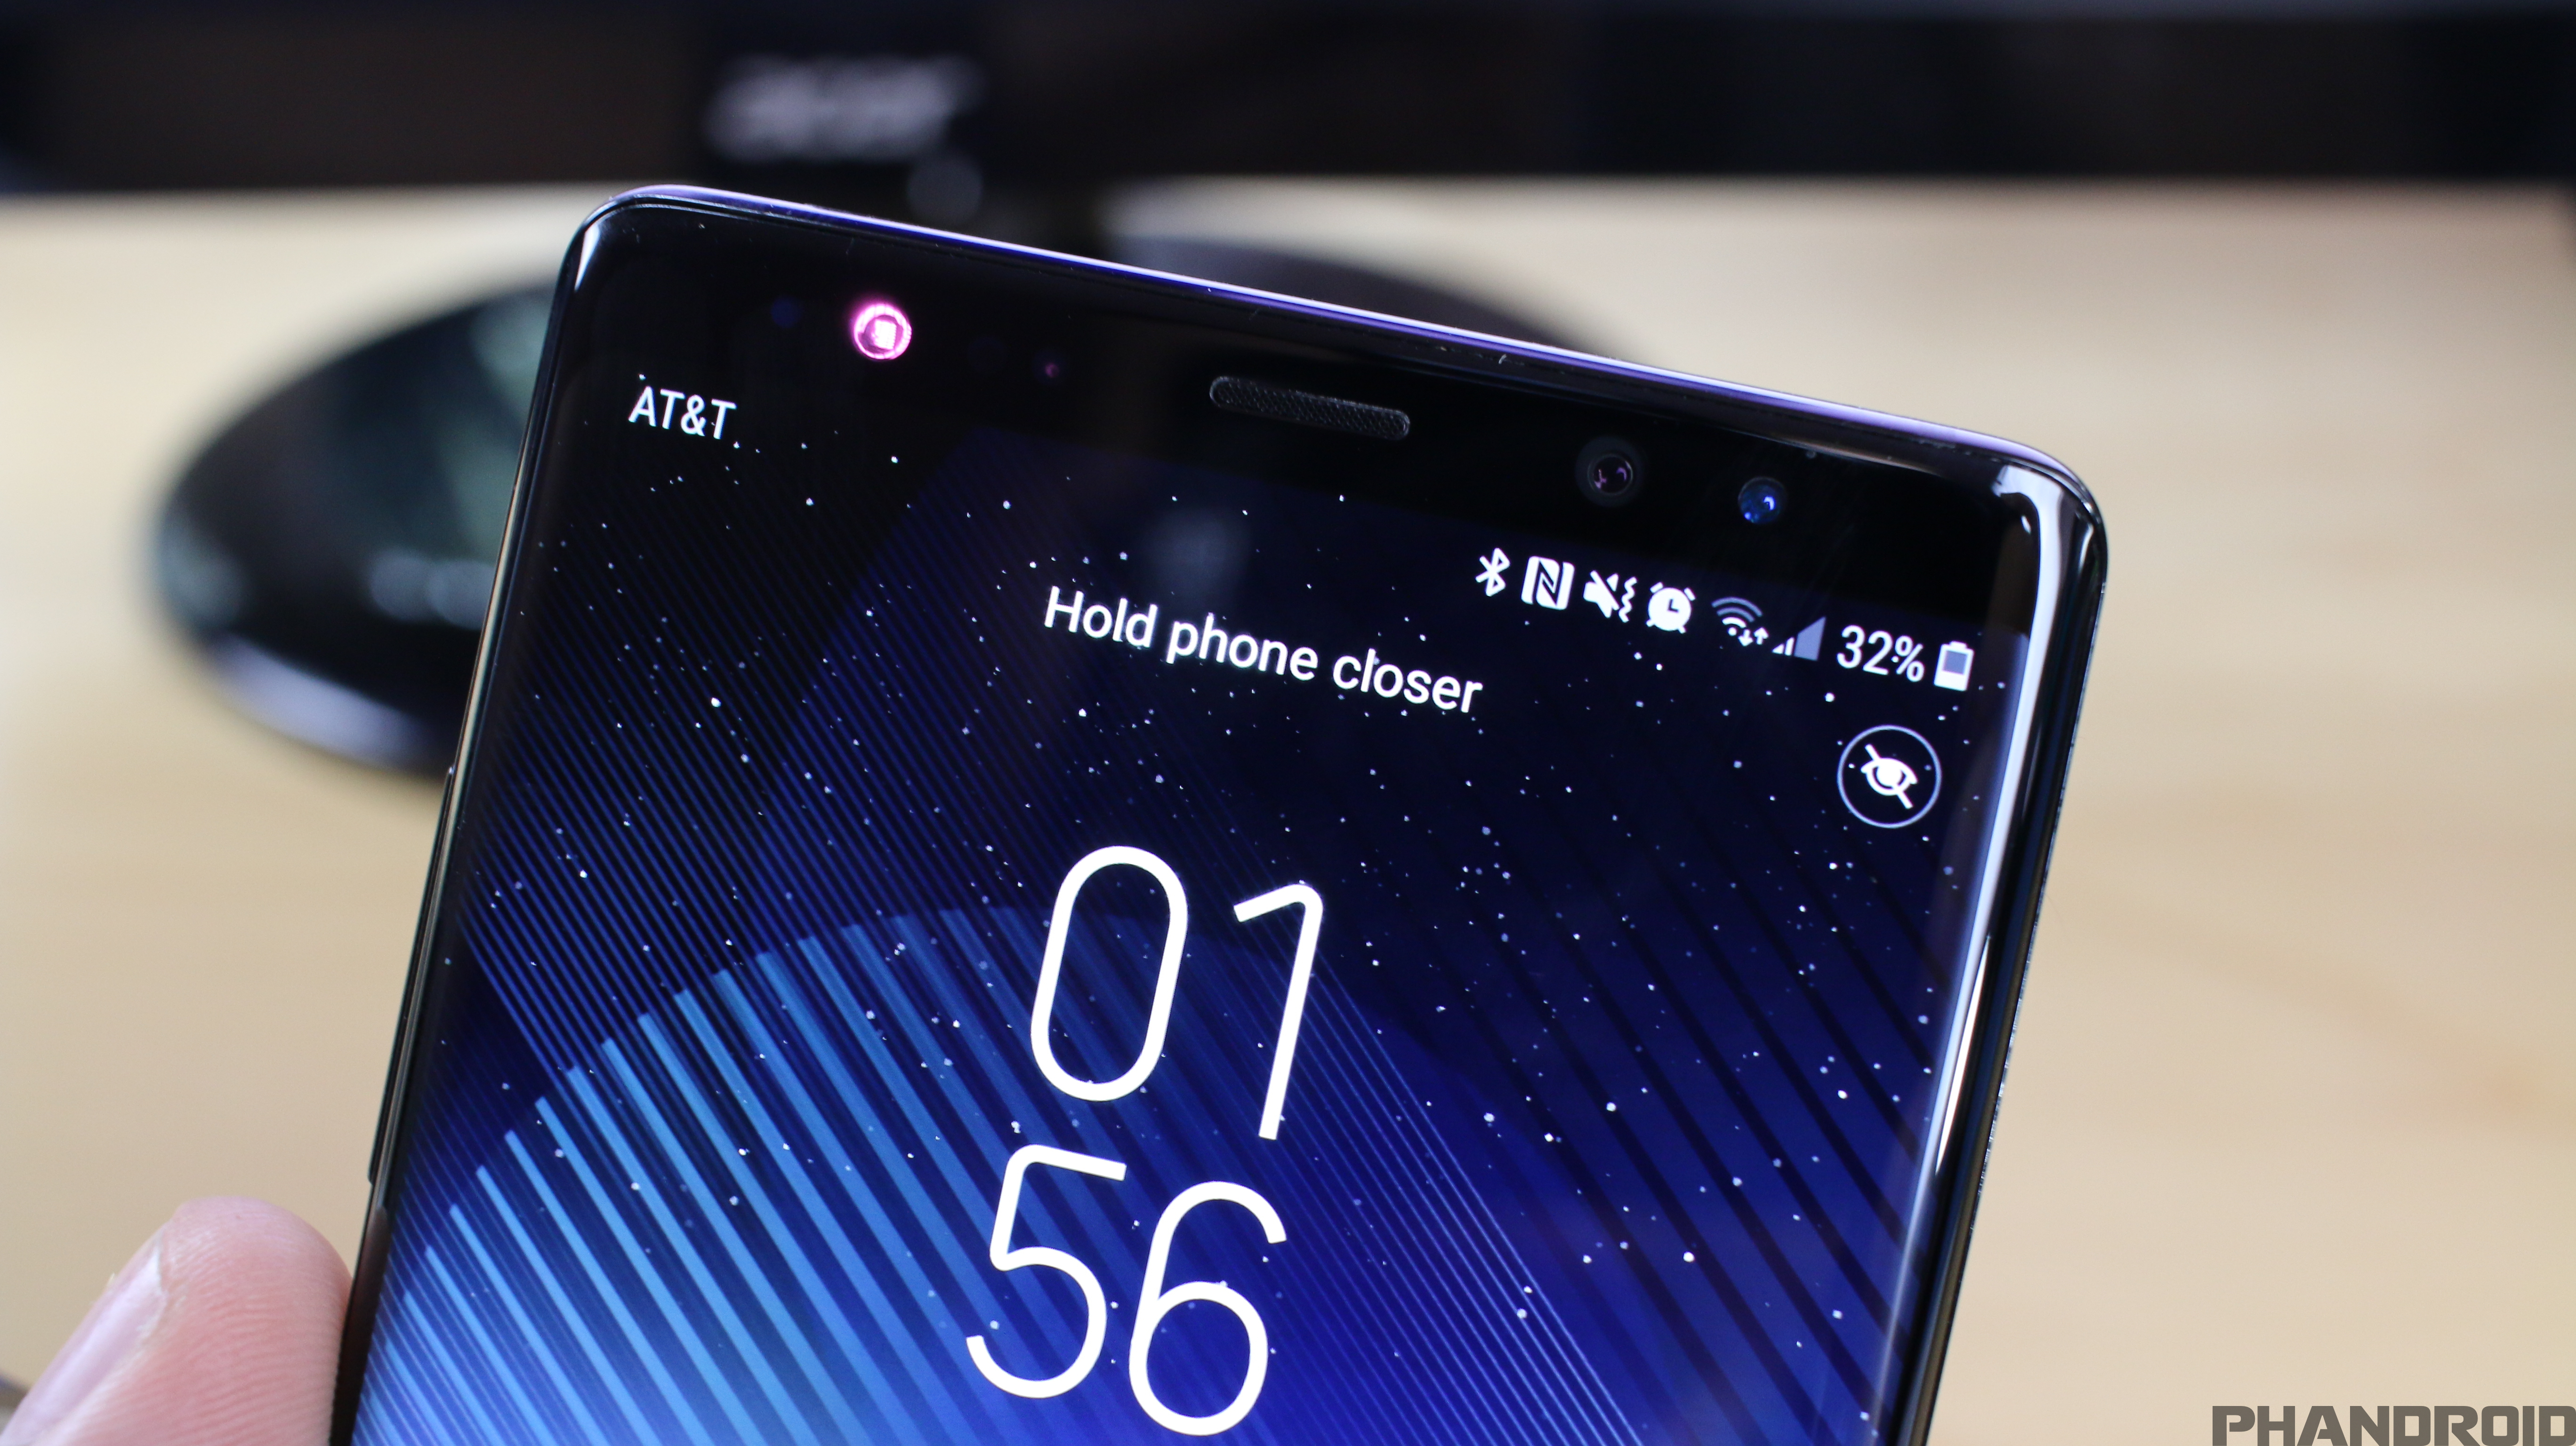
The Galaxy Note 8 is one of the first Android devices to feature an iris scanner for securing and unlocking the phone. It’s more secure than the face unlock feature, but isn’t quite as fast as unlocking your device. If that’s worth the trade-off, here’s how you can set up the iris scanner on the Galaxy Note 8:
- Open the Settings app
- Tap on Lock screen and security
- Tap on Iris Scanner and confirm lock method
- Agree to Disclaimer
- Read the onscreen directions and tap Continue
- Position your eyes in the circles shown on the display
- Wait until the 0% reaches 100%
- Read the tips (or Skip)
- Choose between Face unlock or Iris unlock (you can only use one or the other)
Things to keep in mind when using the iris scanner on the device:
- To protect your eyes, keep the phone at least 8 inches away from your face when using the iris scanner
- Do not use the iris scanner with infants as it may damage their eyesight
- Anyone with a history of epileptic conditions should see a doctor before using the iris scanner
- The iris scanner is not intended for use as a medical device
The Galaxy Note 8 may not recognize your irises when:
- Something prevents a good view of your irises (glasses, glare, low eyelids, or disease)
- Something gets in the way of the camera or the LED (screen protector, dirt, damage to the camera)
- The lighting is very different from when you recorded your irises (much brighter room)
- The phone is tilted too much or is moving
There’s still a fingerprint scanner

If the iris scanner isn’t your cup of tea, the Galaxy Note 8 also has a fingerprint scanner. Unfortunately, it’s not in the best spot. Samsung put it high up on the back next to the camera. The good news is it still works pretty well. Here’s how to set it up and use it.
- Go to Settings > Lock screen and security
- Select Fingerprint scanner
- Tap Add fingerprint
- Follow the instructions until 100% of your fingerprint has been scanned
- Tap DONE
- Toggle on Fingerprint unlock
Keep specific files away from prying eyes
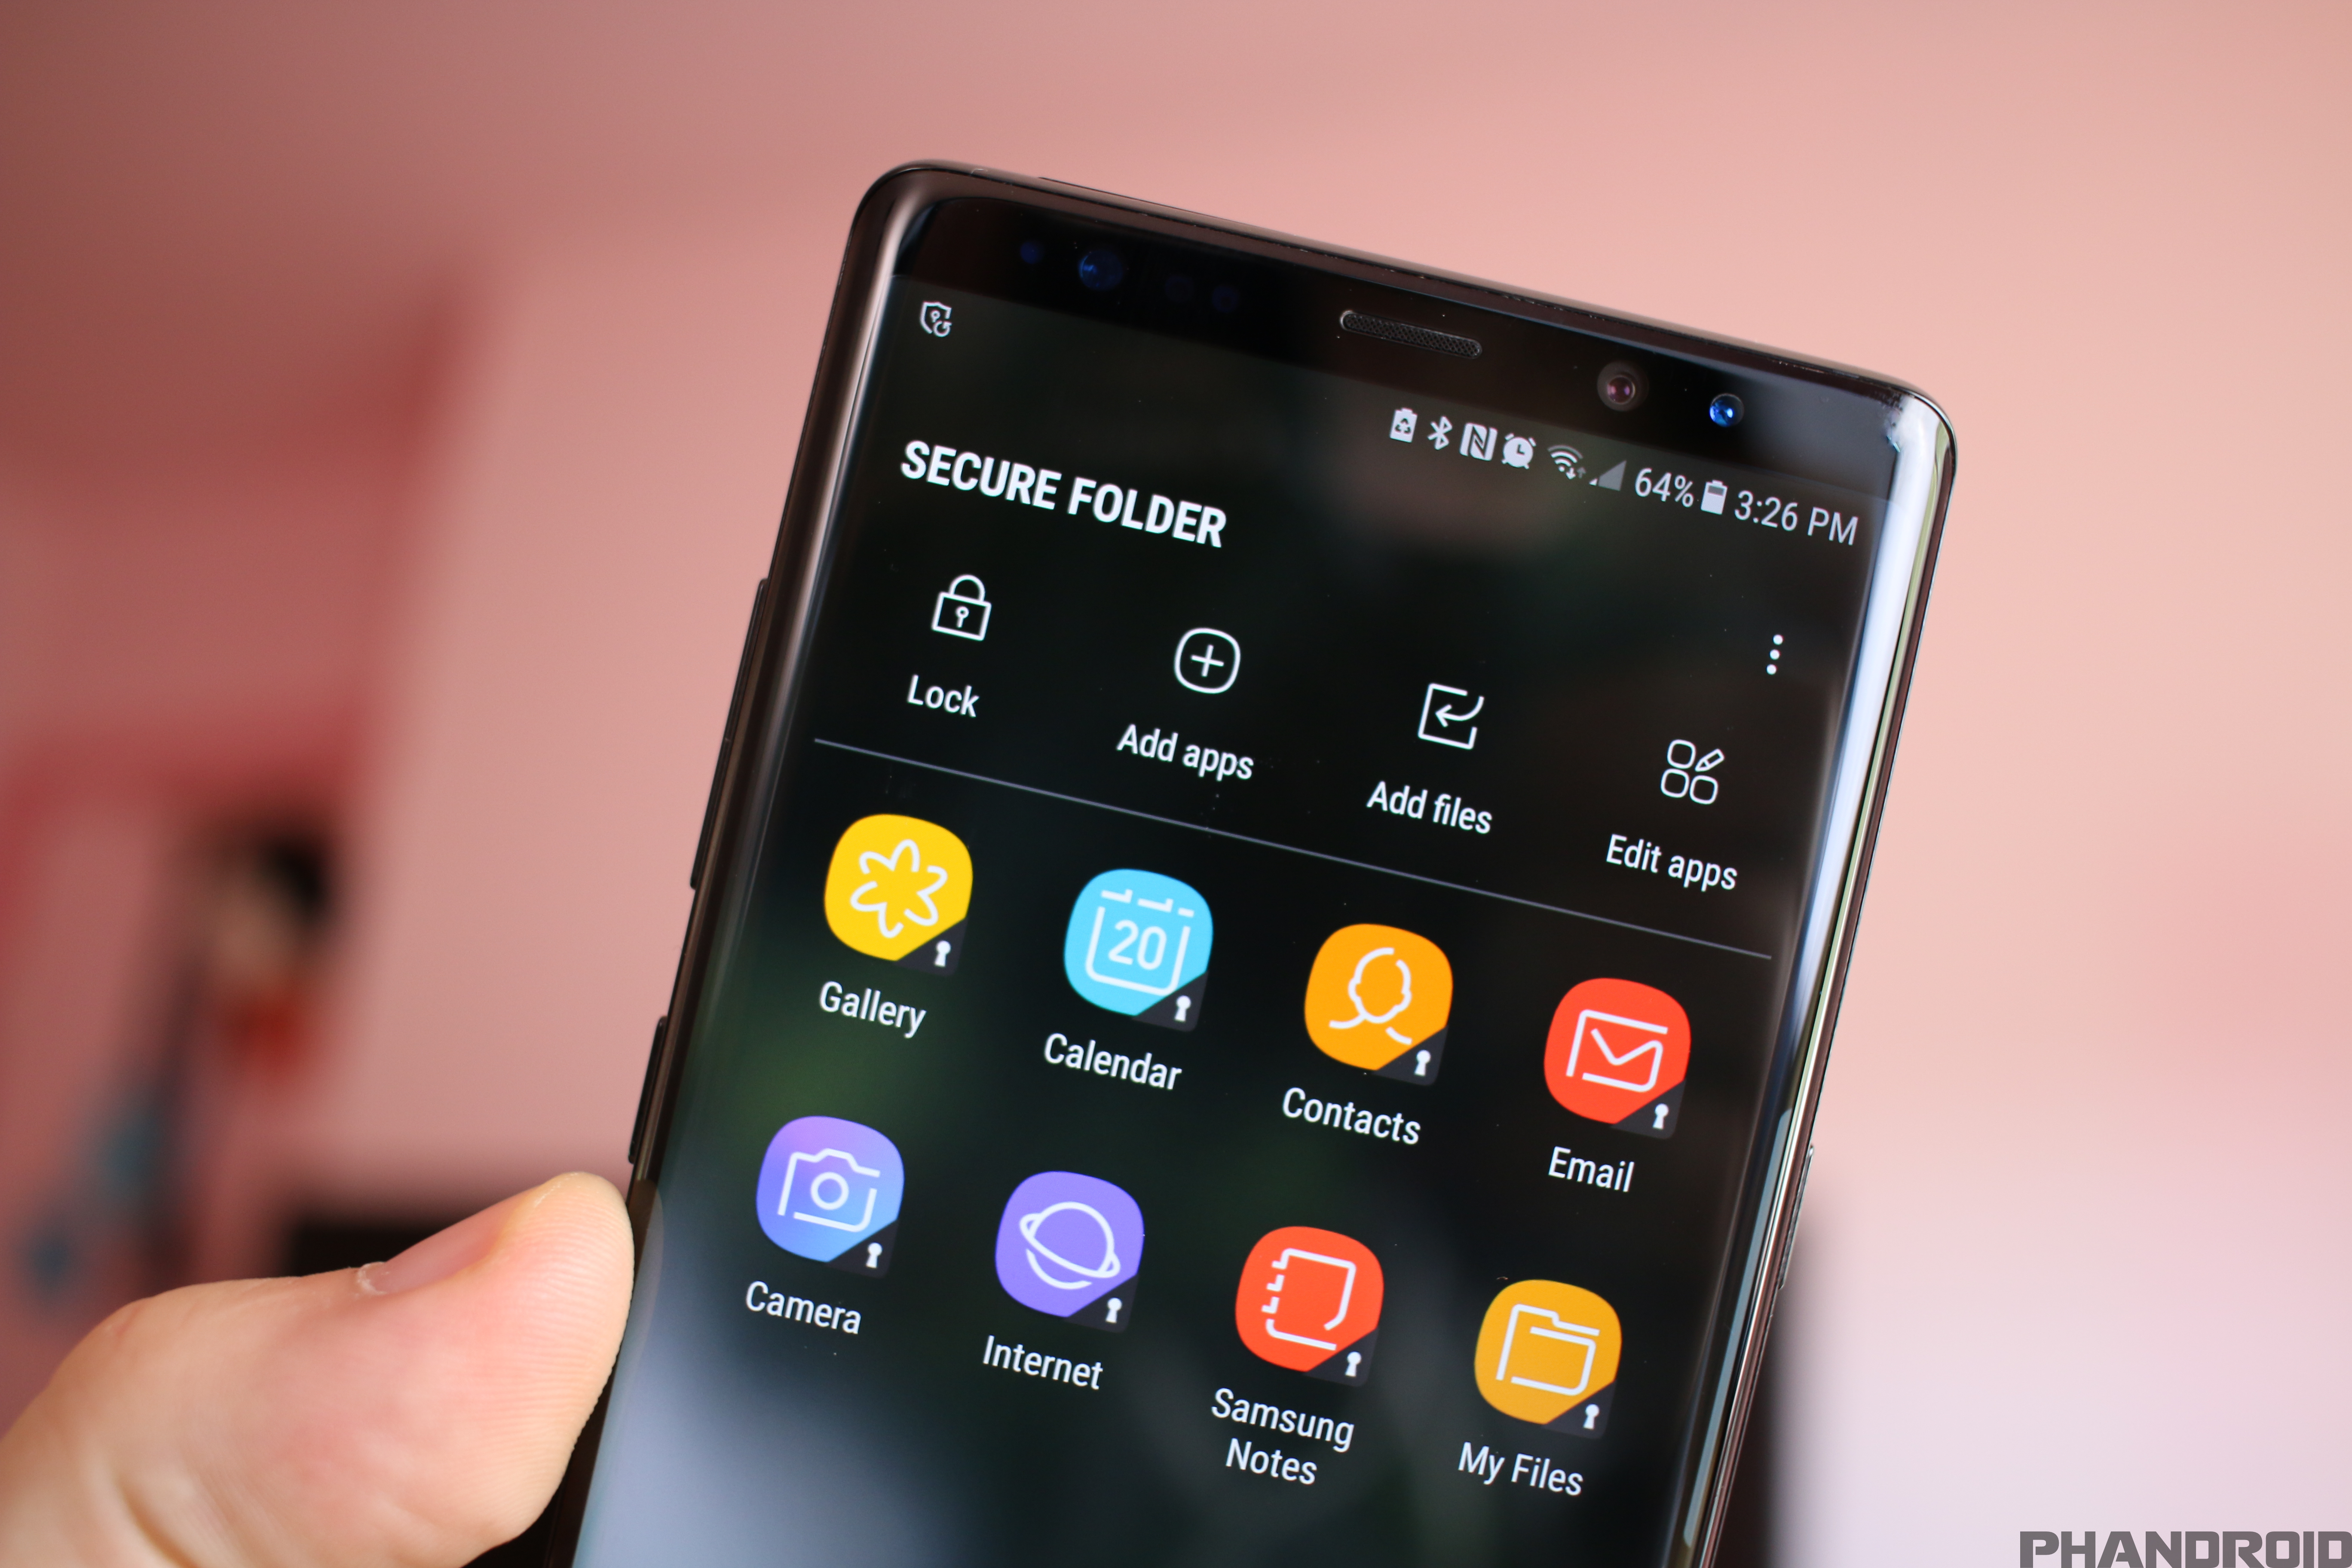
In previous versions of Samsung’s software, they had a “private mode” you could use to hide things like photos and videos. For the Galaxy Note 8, they’ve expanded on this idea with something they call a Secure Folder that allows you to add everything from photos, to files, notes, and even apps.
- Go to Settings > Lock screen and security
- Tap Secure Folder
- Follow the on-screen instructions
You should now see a Secure Folder on your home screen. You can add photos, videos, files, notes, and apps by doing the following:
- Open the Secure Folder and tap (+) ADD to add more apps to the folder
To add something to the Secure Folder, such as a photo, open it and if the item can be moved to the Secure Folder, you should see the option by tapping the 3-dot menu icon and selecting “Move to Secure Folder.”
Keep it unlocked at home
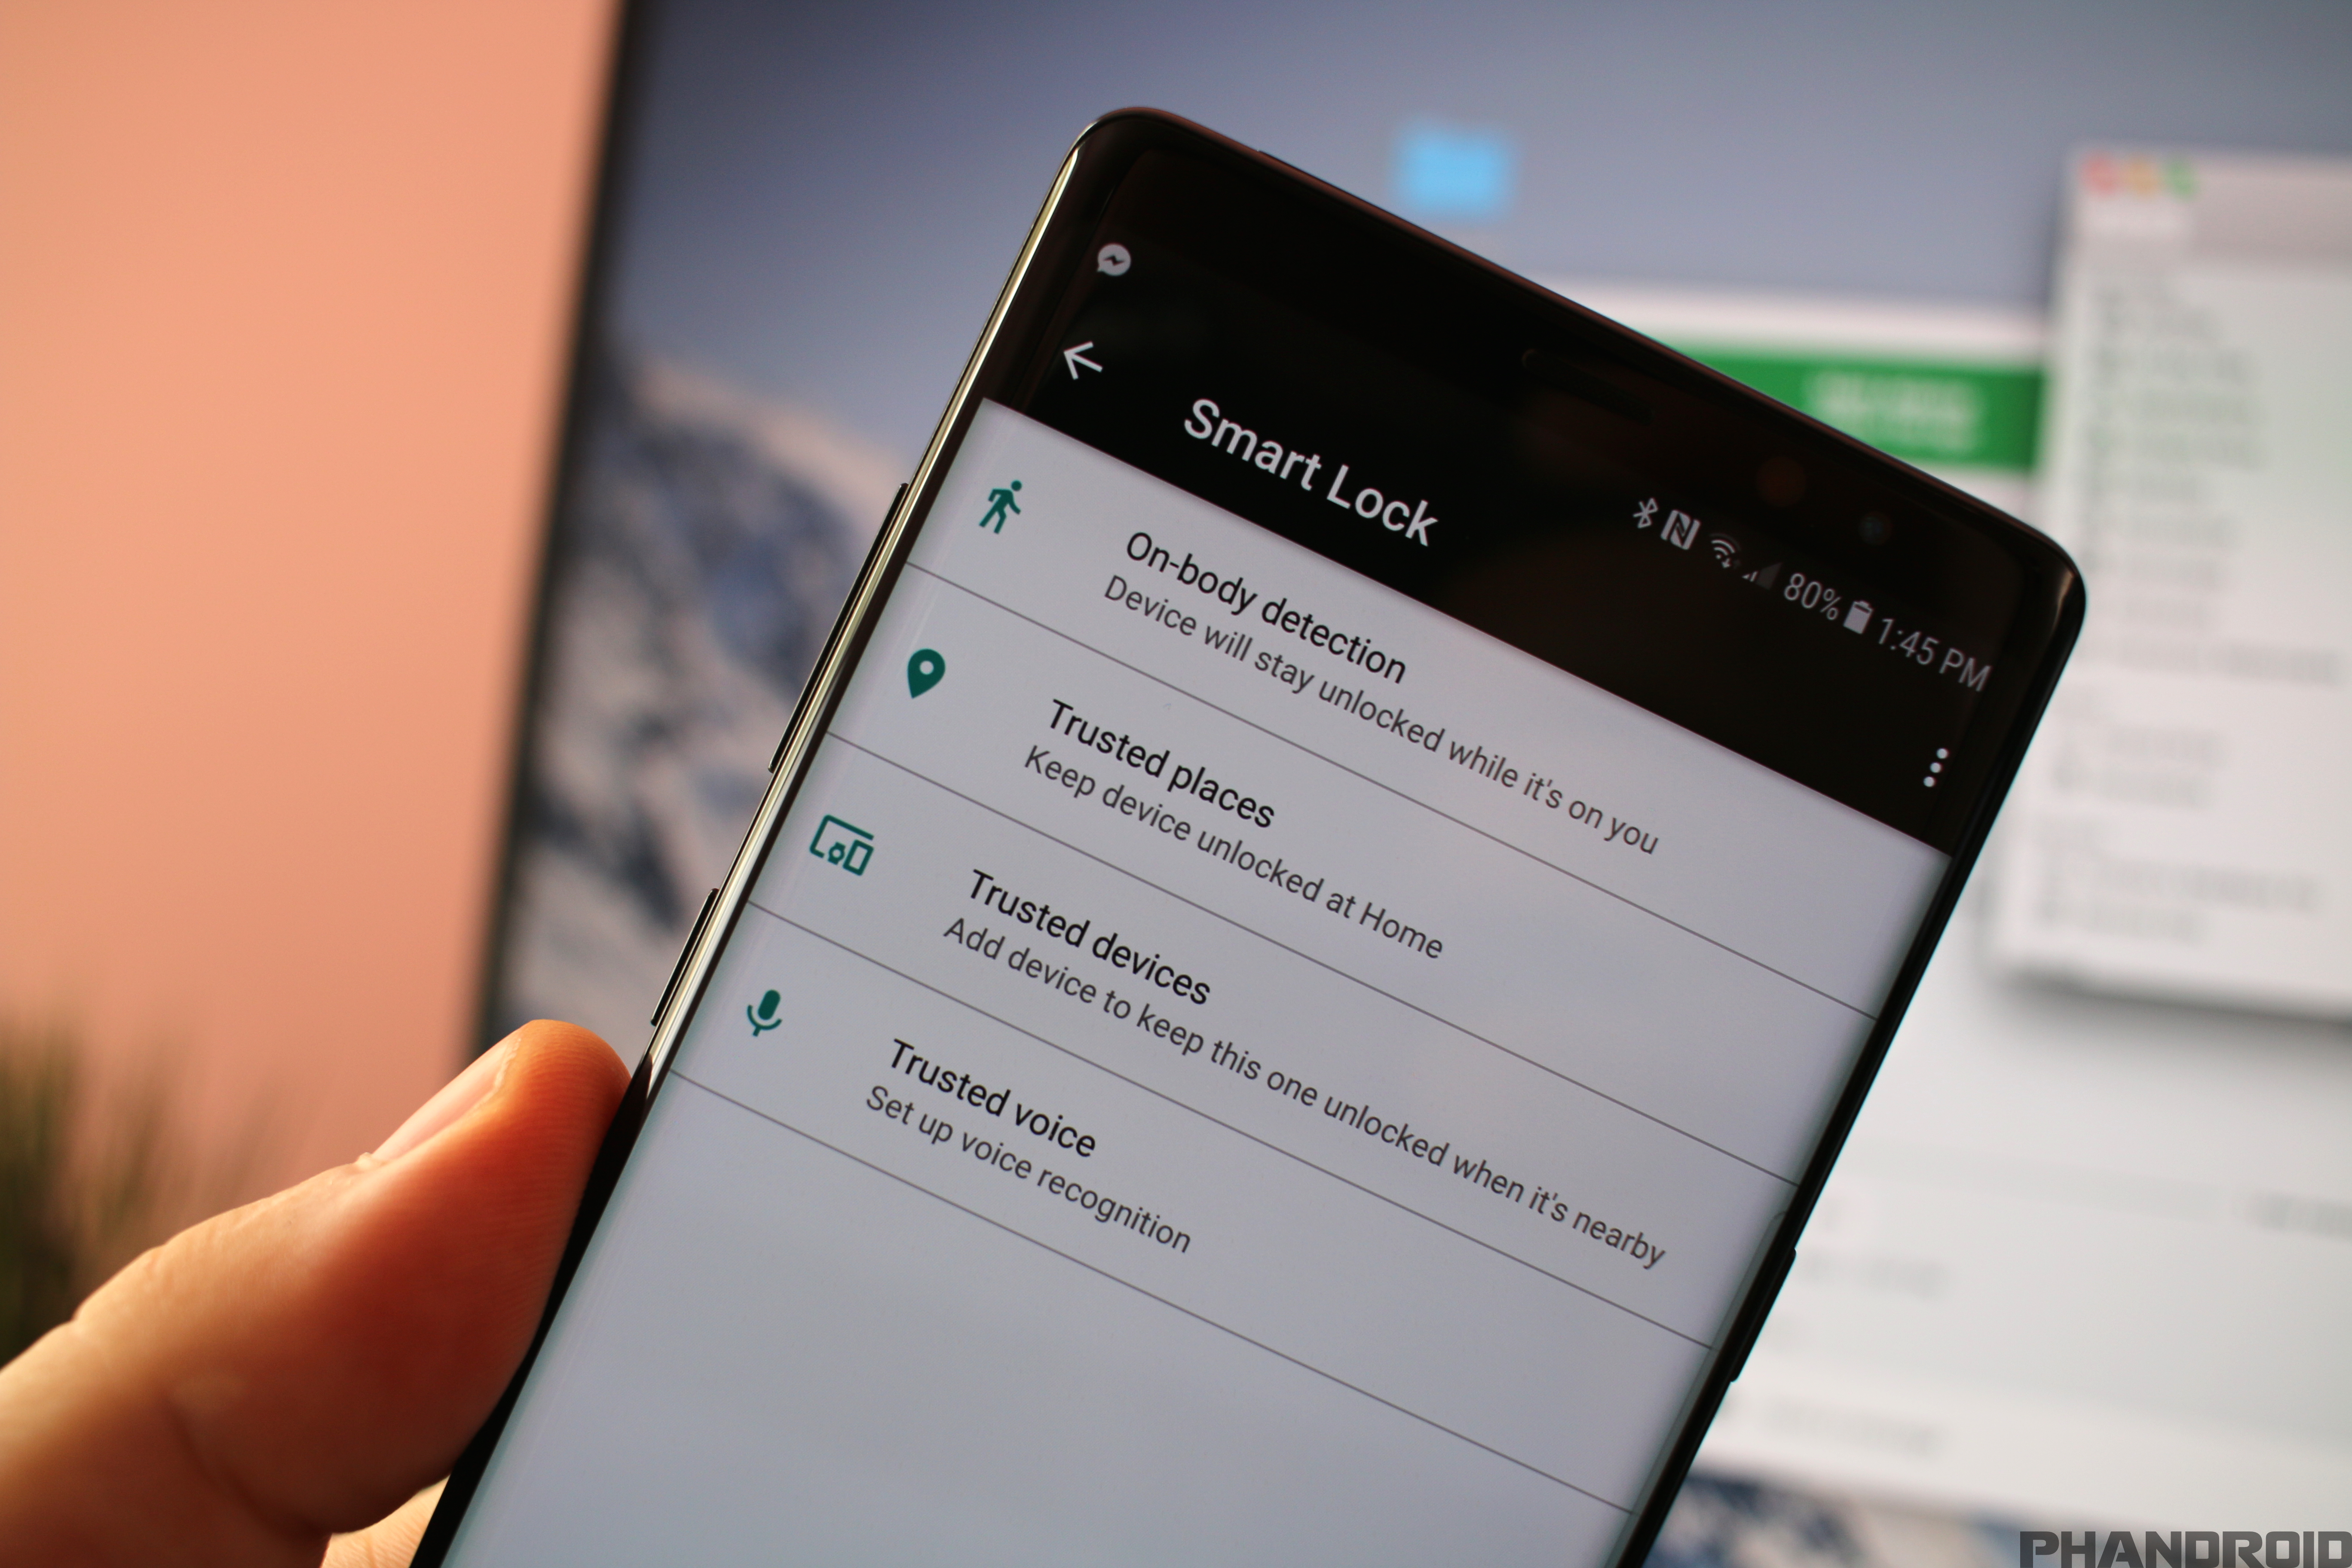
Should you decide to lock down your Galaxy Note 8 down with a fingerprint, iris, or facial recognition, it’s still possible to keep your device unlocked when you’re home or when it’s on you.
It’s called Smart Lock and this feature will keep your phone unlocked as long as its connected to a Bluetooth device (smartwatch, car stereo, Bluetooth speaker). There’s even an option to keep your phone unlocked while it’s on you. Once the phone detects no movement, it locks itself down.
Here’s how you activate Smart Lock on the Galaxy Note 8:
- Open the Settings app
- Tap Lock screen and security
- Tap Smart Lock
- Confirm your password/pattern
- Configure On-body detection, trusted places, trusted devices, or trusted voice
Do Not Disturb

Nobody likes having their sleep interrupted by a random notification or message. While you could try to remember to silence your phone every night, there’s actually a better way.
The Galaxy Note 8’s “Do Not Disturb” feature will not only silence all notifications, but it will still allow alarms to come through or even specific contacts if you’d like (in the event of an emergency). Here’s how you set it up:
- Go to Settings > Sounds and vibration
- Tap on Do not disturb
- Toggle the switch on OR
- Create a schedule with days and times
Multi-task like a wizard with Multi-Window
It’s possible to open up two apps at the same time with Multi-Window mode. Thanks to the S8’s unique aspect ration, there’s now more room than ever to comfortably display two separate app windows on the screen. Here’s how you do it:
- Tap the physical “Recents” button to the left of the Home button
- All your recent apps will show up on the screen like a Rolodex
- Apps that can be used in multi-window will show a twin-rectangle icon next to the (X) in the right corner
- Tap that icon to open the app in the top half of the screen
- The lower half of the screen will now show only recent apps that can be used in multi-window mode
- Tap one to open it in the lower half
- You can re-size the apps by dragging the middle line
Alternatively, you can long-press the Recents button while using an app to immediately snap it to the top half of the screen. On the bottom half, simply scroll through your recent apps, or tap MORE APPS to see a list of all your apps.
If you’d rather have a floating window (like on a desktop PC), you can also drag your finger diagonally from the top left corner of the display to put an app into a Pop-up view mode.
Get rid of those slow animations

While the Galaxy Note 8 comes equipped with 6GB of RAM, the animations still feel a bit slower than most would like. To speed things up and make the UI feel more snappy, you can increase the speed of the animations. But you’ll first need to activate the hidden Developer Options by following these steps:
- Go to Settings > About phone
- Select Software info
- Tap Build Number 7 times until you see “You are now a developer” message
- Go back to the main settings and you’ll see Developer Options
To speed up animations:
- Go to Settings > Developer options
- Scroll down select Window animation and choose .5x
- Select Transition animation and choose .5x
- Select Animator duration scale and choose .5x
Keep the kids tied to just one app

Should you find yourself lending someone your phone — be it to play a game, or place a phone call — window pinning (screen pinning) is a secure way to lock someone down to a specific app and prevent them for wandering elsewhere through your phone. Here’s how you can turn enable it:
- Open Settings > Lock Screen and Security
- Tap Other Security Settings
- Find Pin Windows and switch it ON
- Specify whether you want your secure lock screen to come up before unpinning
To activate screen pinning, simply open your recent apps by tapping the Recent Apps button next to the right of the home button. Press the push pin icon located in the lower right corner of the most recent app to pin it and make it — and only it — accessible to the user.
Avoid complete disaster

It’s something nobody thinks about until it happens, but one of the worst things that could happen to you is losing your smartphone or having it stolen. In the event that your device does go missing, you need to know exactly how to recover your device or erase any personal information stored therein.
Android’s built-in feature — “Android Device Manager” — is the perfect way to track down a lost device, you just need to know where to find it.
- Go to google.com/android/devicemanager
- Select your phone from the drop-down menu.
- You’ll see the device on a map and a few options for finding it (ring), locking it (if it wasn’t locked already), or erasing all of its contents with a full factory reset.
Send an SOS in the case of an emergency

Should you ever find yourself being held at gun point (or abducted), you might not be in the position to type out a message or place a call with your phone. For those instances where discretion is key, Samsung’s SOS feature makes it easy to let a trusted contact know you’re in danger, but first you have to activate it.
- Go to Settings > Advanced features
- Select Send SOS messages
- Turn the switch to ON to enable the feature.
- Specify recipients to receive the message, as well as any text, photos and audio recordings you want to attach to the message.
Tapping the power button 3 times will then activate the SOS message. We hope you never find yourself in a position to use it, but better safe than sorry.
Spruce up the look and feel

Samsung’s 2017 lineup of devices come with a built-in theme picker and the Galaxy Note 8 is no different. The themes can change your wallpaper, icons, sounds, and even system apps and UI. Samsung has included a few themes that you can try out, plus a bunch more to download (Material Blue and Gray is pictured in this post).
- Long-press on any blank space on the home screen
- Tap Wallpapers and themes
- Go to the Themes tab
- Scroll down to explore themes
- Find a theme you like, select it, and tap DOWNLOAD
- After it installs you can tap APPLY
Make Always-On Display your own
One of the biggest features of Samsung introduced in the Galaxy S7 was its Always On Display. Making a return for the Galaxy Note 8, AOD gives users the ability to glance over at the time, view notification app icons, or other useful information straight from the lock screen while having a very minimal impact on battery life.
Because it’s always running, there’s no interaction required by the user to view this information, although the AOD is interactive. Here’s how it works:
- Double tap a notification icon to view the notification (you’ll still need to unlock your phone to view it). Hard press the Home button to turn on the screen.
- Double tap the clock to show Face Widgets. Tap the FaceWidget to show more information. Swipe left or right or tap the arrows to switch to different FaceWidget or the clock. Wait 5 seconds and the default widget will be shown again.
There are a number of clock styles and widgets you can choose for the Always On Display and you even have the ability to put AOD on a schedule. You’ll find all the settings as well as different “clock styles” (widgets) by going into:
- Settings app
- Lock screen and security
- Always On Display
- Tap a Clock Style to configure the widget and view options
Additional ways to use AOD:
Pin to AOD – Pin text and images you wish to remember to the AOD screen by creating a memo or Reminder and Share via.
AOD Themes – Download AOD-exclusive themes from Theme Store to change up the look of your AOD screen.
Force the Galaxy Note 8 to restart
From time to time, you may experience some hiccups with your device and in some cases, the display will freeze altogether. Since you can’t interact with the display, you’ll need to force your Note 8 to reboot so you can get back to the fun.
In order to force the Note 8 to reboot, you’ll need to press hold down the power button and volume down button for between 7 to 10 seconds. From there, you’ll see the display turn off and the device will restart, and then everything should back to normal!
Get a clean slate
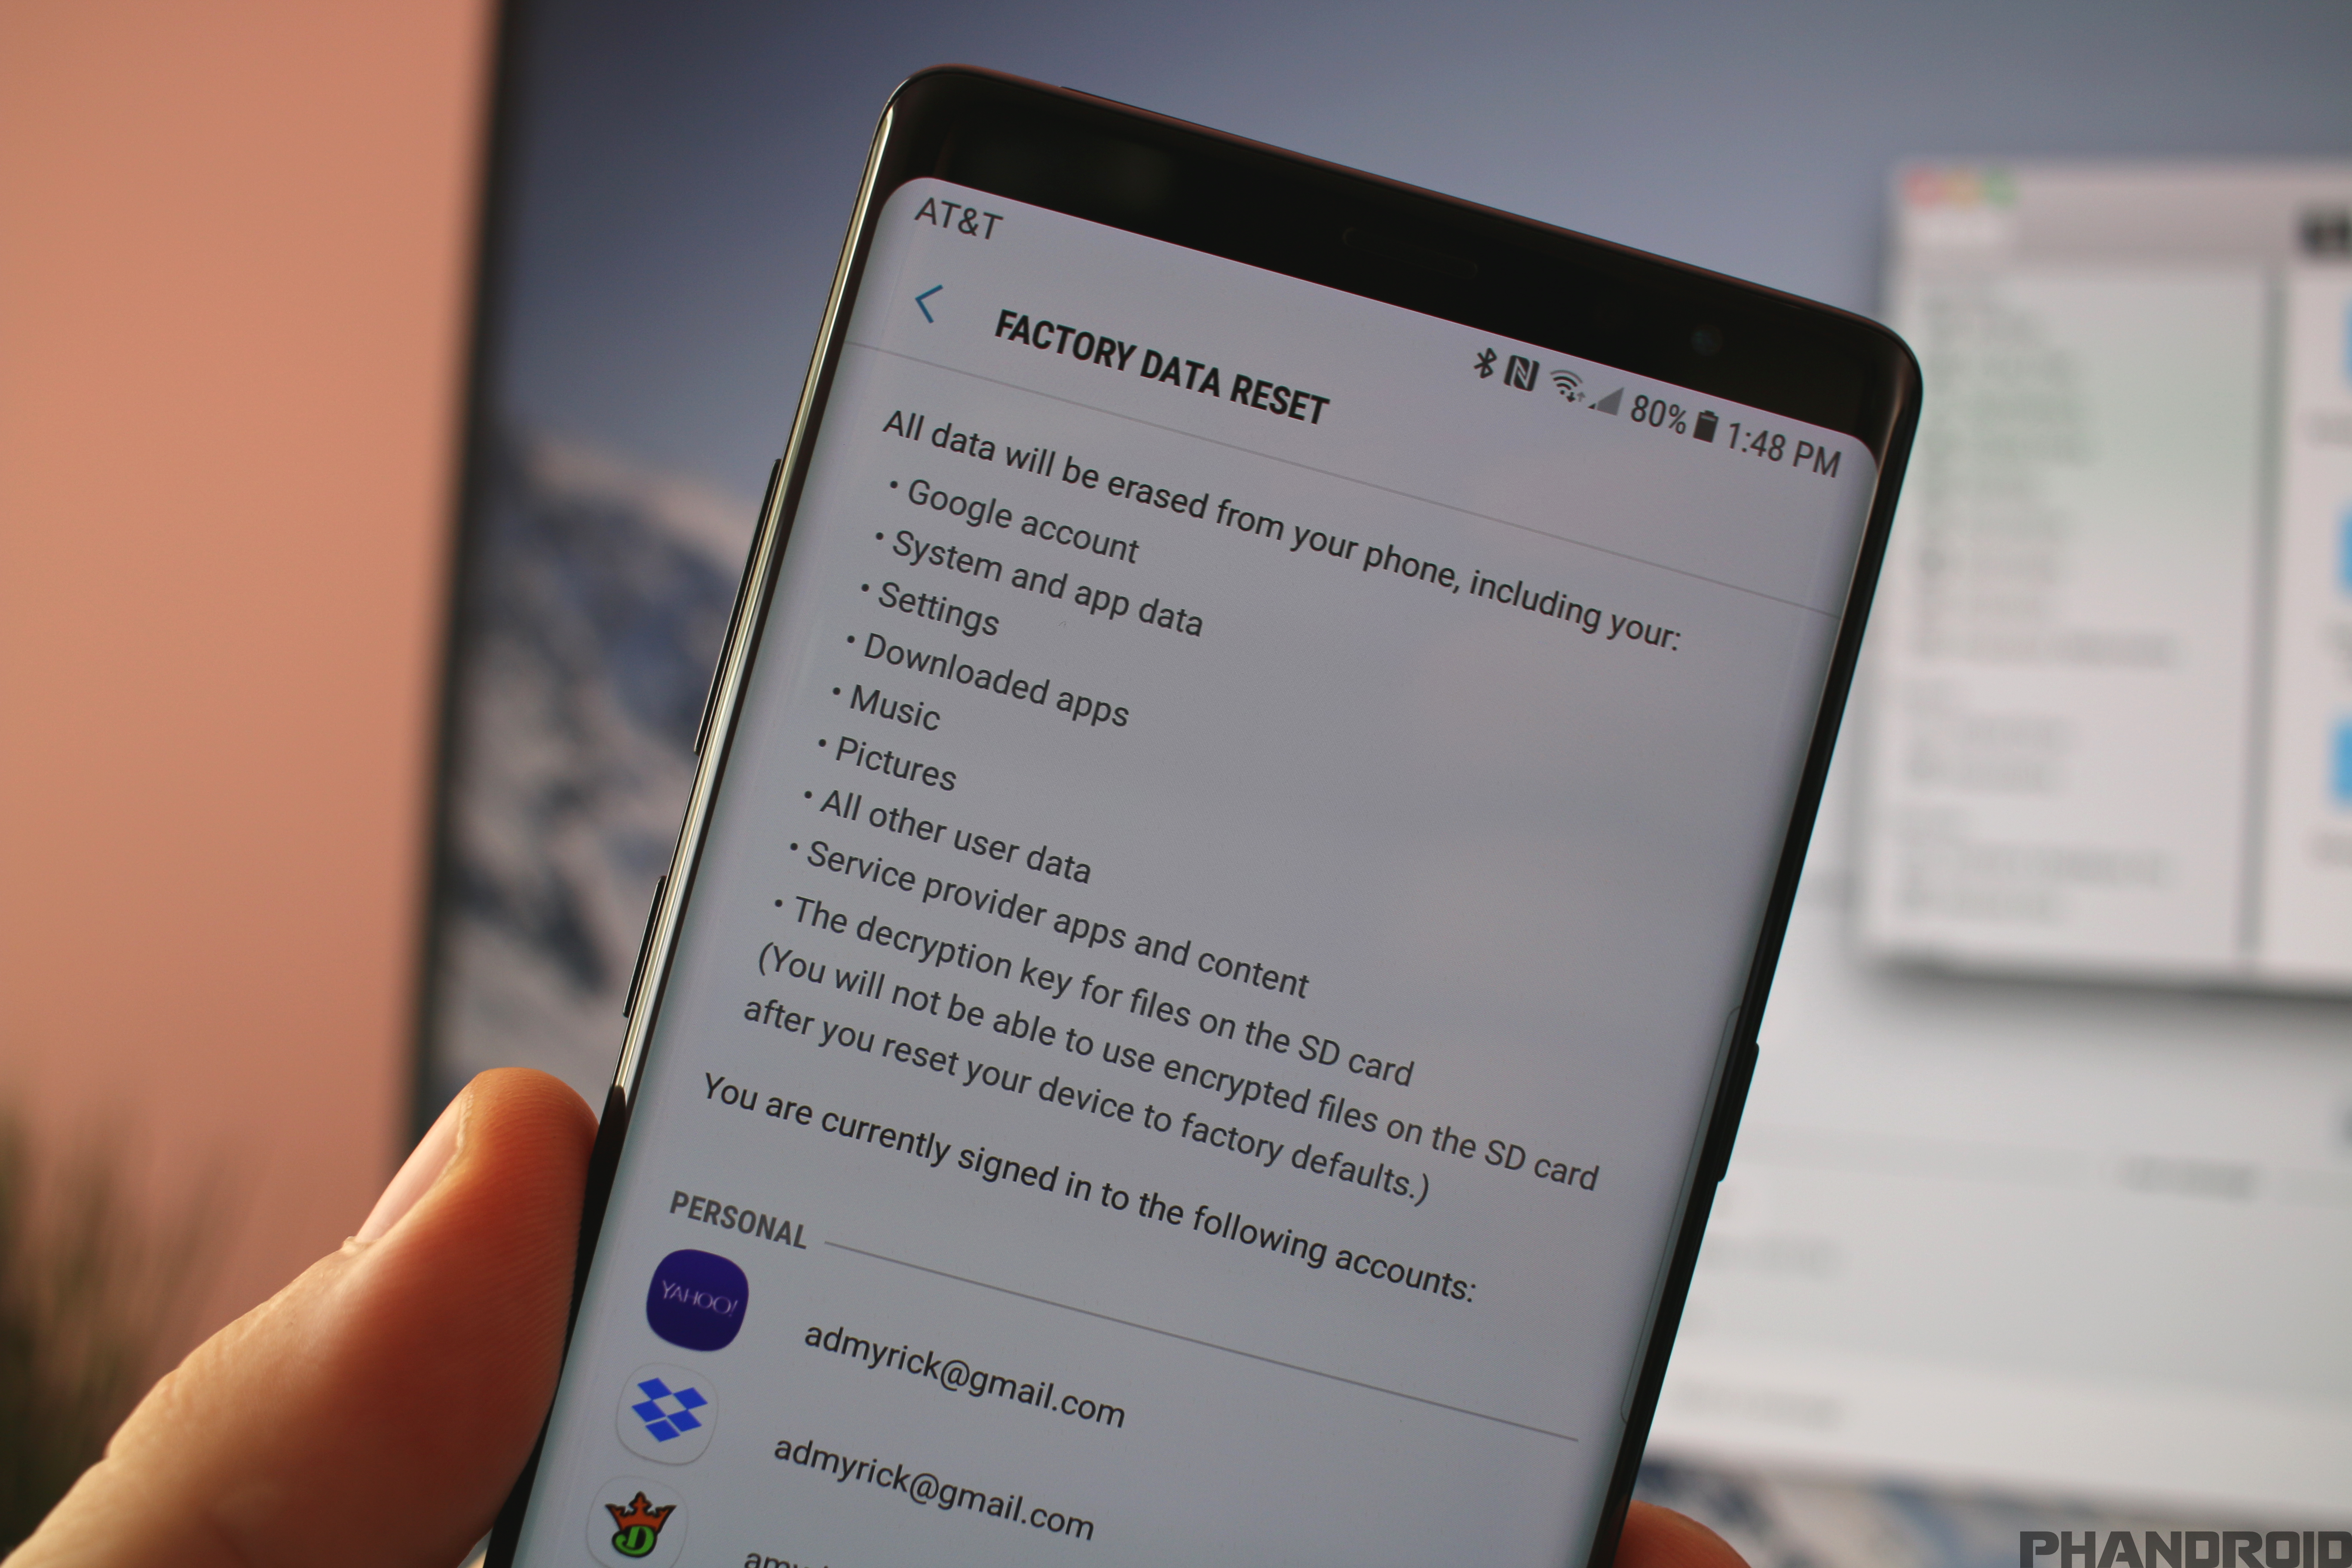
Sometimes you just want to clean the slate and start fresh after a few months of messing around with your phone, in which case you’ll want to perform a Factory Reset on the Note 8. The process is extremely simple, and you’ll need to follow these steps:
- Open Settings
- Select Cloud & Accounts
- Select Backup & Reset
- Tap Factory Data Reset
From there you will need to sign into your Samsung account to ensure that someone else is not wiping your shiny device in the event it has ended up in the wrong hands. After you enter your Samsung password, your phone will reboot and the device will be wiped clean, allowing you to get a clean slate.
Change how hard you push the screen

Since the Galaxy Note 8 comes equipped with Samsung’s new Infinity Display, this allows the company to get rid of the traditional home button that would take up way too much space. Instead, we now have on-screen navigation buttons, but Samsung packed a little bit of extra functionality here.
The home button on the Galaxy Note 8 is always accessible — whether the navigation keys are on screen or not — it’s just invisible. To activate it, all you have to do is give the area where it would appear a hard/firm press and you’ll be taken back to your home screen. Simple as that.
This one’s for older folks

Not everyone has the best eyesight. For those that either struggle making out tiny fonts and icons, there’s Easy mode. It’s essentially an extremely simplified home screen without all the fluff and once activated, cranks the Galaxy Note 8’s zoom to maximum for enlarged fonts and buttons throughout the entire OS.
It’s great for people that don’t want or need complicated features, or those that have trouble seeing them. Here’s where you’ll find the option to activate it:
- Settings app
- Display
- Easy mode
- Apply
Tiny Hands? No Problem

Thanks to the Infinity Display, the Galaxy Note 8 is actually smaller than devices with equally as large displays. But when compared to similarly sized smartphones, the screens are now much taller. This can make pulling the notification bar or tapping on UI elements difficult to do with one hand. To help address this, Samsung has added a feature called One-handed mode.
You can find it inside Settings > Advanced features > One-handed mode > ON. There are two ways to activate the feature — either by swiping up from the bottom left/right corners or by tapping the home button 3 times (you’ll need to choose one or the other).
Activating One-handed mode shrinks the UI to about half of its size, anchoring it in either the bottom left or right corners of the display. From there you can tap arrows to move it to either side or click a settings button to go back into the One-handed mode settings. To enlarge the display again, you just perform the same gesture or tap the home button 3 times again (whichever method you chose initially). That’s it.
Take advantage of the gorgeous display

Out of the box, the Galaxy Note 8 doesn’t take full advantage of its 2960×1440 resolution QHD+ display. By default, it’s displaying at a lower 2220x1080p resolution, aka Full HD+. While this may be fine for most folks, those with a keen eye may notice fuzzy images and text.
For a clearer, more crisp visuals, you may want to enable the phone’s native WQHD+ resolution. You’ll find it inside the Settings app > Display > Screen resolution > WQHD+ > Apply.
Make those colors pop

There’s no question the Galaxy Note 8 features one of the most beautiful displays on the market. While the overly saturated colors might look nice, they’re nowhere near accurate. For those who like to do photo editing on their device — or anyone who prefers more accurate tones — you might want to play around with the color mode.
The Galaxy Note 8 features a few presets to choose from – Adaptive display, AMOLED cinema, AMOLED photo, and Basic. Switching between the modes will lower color saturation, slightly adjust the contrast, and warms up the display considerably. The most color accurate of the bunch is Basic, while Adaptive display is the only mode that gives you the Color balance option which allows you to tweak the white balance of the display.
Get as much screen real-estate as possible

Whether your eyesight isn’t the best or if you prefer holding your phone a little farther from your face, the Galaxy Note 8 can accommodate you by adjusting the display size. Changing the display size or “zoom” shrinks or enlarges the entire UI, including fonts and buttons, icons, contact photos, etc.. Of course, if you only want to adjust the size of the font, you have that option as well. Here’s where you’ll find the setting:
- Open the Settings app
- Select Display
- Tap on Screen zoom and font
- Adjust the sliders for SCREEN ZOOM and/or FONT SIZE
- When you’re finished, tap Apply to save your settings
Keep your most-used settings just a swipe away

The notification panel is full of handy toggles called “Quick Settings.” By default, Samsung has this area crammed with every toggle known to humans. It’s a bit of a mess. You should organize it and put your favorites at the top.
- Pull down on the notification shade
- Pull down again to reveal all the Quick Settings
- Tap the three-dot menu icon and select Button order
- Drag and drop icons to rearrange
- Move icons to the bottom to remove from Quick Settings
- Tap the back button when finished
Use Google’s Nav Button layout

For years, Samsung has been using a navigation button configuration that is different from every other Android phone. If you only use Samsung devices, it’s not a big deal, but it can be very annoying if you’re coming from something else. The Galaxy Note 8 has software navigation buttons, which means we can finally swap them around.
Samsung is the only Android OEM that uses the Recents, Home, Back order. Here’s how to switch it.
- Go to Settings > Display
- Select Navigation bar
- Tap Button layout
- Choose Back, Home, Recents
Quickly hide or show the navigation bar
Now that the home button is gone from the Galaxy Note 8, users now have to use on-screen navigation buttons to maneuver around there devices. However, thanks to the Infinity Display, Samsung has made it possible to easily hide the navigation bar to provide users with the ability to view more content.
In order to make the navigation bar disappear, simply double-tap on the dot placed on the left of the bar. Double tapping this dot will automatically hide the bar, but you can make it reappear by swiping up from the bottom. If you want to re-enable the bar, swipe up to bring it up, then double tap the same dot on the left-hand side.
Launch the camera with a couple of clicks
Being able to quickly access your camera at a moment’s notice can mean the difference between getting the shot or missing it entirely. There’s already a shortcut on the lockscreen, but if you need an even quicker method for opening the camera, there’s an open in the settings that will launch the app with two quick taps of the power button. Here’s how you enable (or disable it):
- Open the Settings app
- Scroll down and select Advanced features
- Tap on Quick launch Camera to turn it on/off
Switch away from those default applications

The Galaxy Note 8 has a funny way of automatically choosing your default apps the first time you select them from the Android intents list. On regular Android devices, you’re always given the option to open a link or shortcut with a specific app either “Just this once” or “Always.”
Because of Samsung’s weird way of handling this, you’re probably going to need to change your Default apps at some point. Here’s where you’ll find the setting:
- Open the Settings app
- Tap on Apps
- Tap on the 3-dot menu
- Select Default apps
From there, you’re given a list of the bigger apps (Browser, Calling, Messaging) but you can also dive into Set as default to set any app as a specific default.
While you’re in the Default apps, you may want to consider changing your Default app selection to Ask before setting default if you like having the option to choose whenever opening links or shortcuts.
If you already set a bunch of apps to open automatically and want to clear them, simply go back into the main Apps page > 3-dot menu > Reset app preferences > Reset to start fresh.
Help extend your battery life even further

Occasionally you’ll see a notification on your Galaxy Note 8 from “App power monitor” telling you that “X apps running in the background have been put to sleep to save power.” It’s a little misleading in that often times these apps weren’t actually doing anything (as evidenced by their power usage percentage), but in order to prevent added battery drain, App power monitor preemptively puts them to sleep. You know, just in case. Here’s how Samsung describes this somewhat extreme app hibernation feature:
“Apps that were using your battery in the background have been put to sleep to extend your battery life. Sleeping apps may not receive updates or send you notifications, but they’ll wake as soon as you use them again.”
The problem with app sleeping is that the thinking is flawed. You don’t have to use every app on your phone every single day in order to want it to function normally. Whether it’s a messaging app or social network, sometimes it can be multiple days (even longer) before you open an app — doesn’t mean you want to stop receiving notifications from it. By freezing these apps on your device, you’re essentially allowing them to stay installed, but keeping them in some sort of app purgatory. An app coma if you will. This isn’t a decision your phone should make for you.
So what can you do about it?
Well, you can turn the feature off entirely (recommended) or you can increase the length of time it takes before App power monitor kicks in and freezes your apps. The default is 3 days, but you can extend this up to 7 days. M suggestion is that you turn off the auto-sleep feature, but still keep App power monitor active so that you can still choose which apps to sleep on an app-by-app basis.
To configure App power monitor you can tap the notification to see a list of the apps that have recently been “put to sleep” and adjust the settings. You can also adjust App power monitor settings by selecting the following…
- Open the Settings app
- Device maintenance
- Battery button
- 3-dot menu
- Advanced settings
- App Power Monitor
Here you can turn off App power monitor completely, turn off the auto-sleep feature (recommended), or adjust the length of time before apps are automatically put to sleep by tapping Put unused apps to sleep and moving the slider.
To manage which apps you’d like to put to sleep, again, open the Settings app and tap the following:
- Device maintenance
- Battery
At the bottom, you’ll see a list of your most frequently used apps. You can sleep apps individually or in a group by selecting them then tapping the big SAVE POWER button. Apps that are sleeping will appear in the SLEEPING APPS list at the bottom (tap it to expand the list).
Scrolling further — all the way to the very bottom — and you’ll find Unmonitored apps. These are apps that you specifically want to exclude (white list) from App power monitor. When inside the Unmonitored apps menu, you can tap the 3-dot menu to add or delete apps from the list.
Or, you know… turn this entire feature off
Rather than bothering with any of that, it’s my personal recommendation that you just turn off the App power monitor feature completely as it has little-to-no impact on battery life and only serves to handicap the normal functioning of your Galaxy Note 8. It’s excessive and in some cases downright misleading, using scare tactics to keep you reliant on Samsung’s software when other Android devices get by just fine without it. Seriously, don’t even bother.
Get app shortcuts without widgets
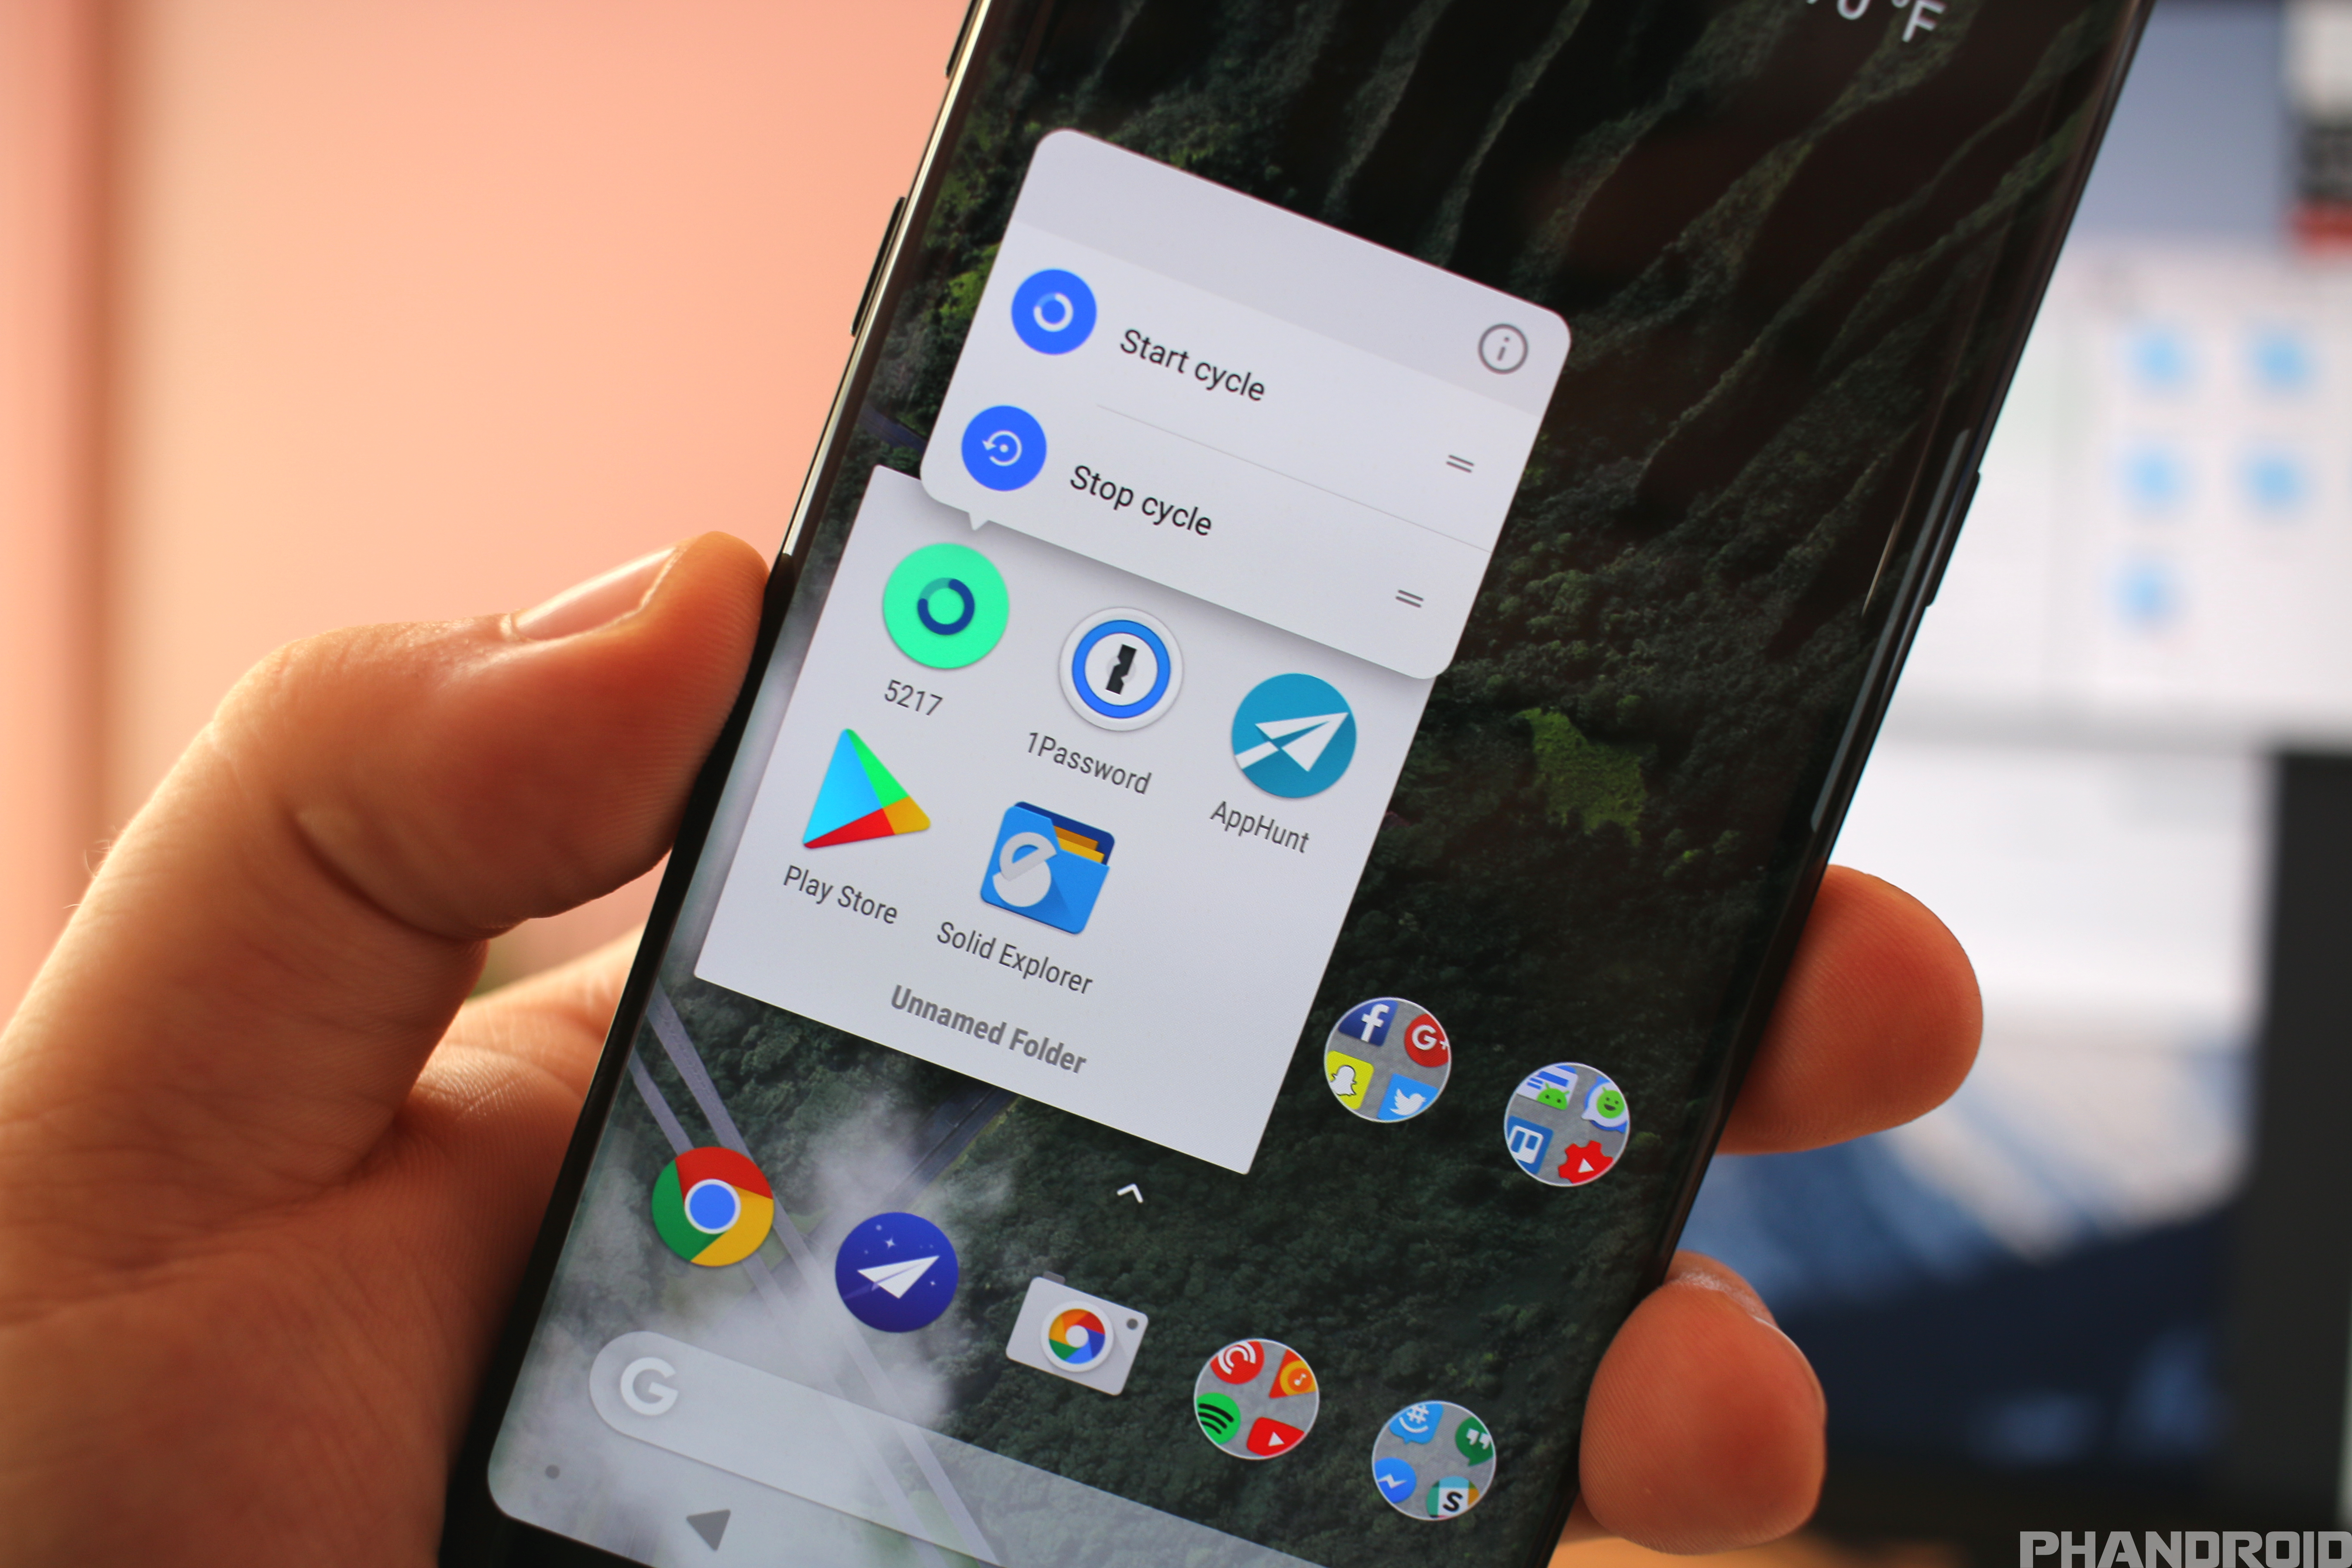
A new feature introduced in Android 7.0 Nougat was the ability to long press app icons on the home screen to pull up a list of executable shortcuts. The Galaxy Note 8’s TouchWiz home launcher has it’s own variation of this with its own list of shortcuts to quickly perform actions.
These actions include like Select multiple items, remove shortcut (app icon), move from folder, add to Secure Folder, sleep, uninstall, or view app info.
Use a traditional App Drawer icon

By default, the Galaxy Note 8’s home screen doesn’t have an app drawer button. This is because the home screen now uses up/down gestures to pull up your app drawer, eliminating the need to tap a button. If you really miss that old app drawer button, it’s possible to add it back. Here’s how.
- Long press a blank area of the home screen
- Tap Home screen settings
- Tap on Apps button
- Select Show Apps button
Keep your App Drawer organized

I’m not sure why they do this, but TouchWiz home on the Galaxy Note 8 doesn’t sort their apps alphabetically. It’s a little annoying, but it’s easy to set things straight. Just swipe up/down to open the app drawer and tap the 3-dot menu in the upper right corner. Select Sort > Alphabetical order and set things right.
Hide those unnecessary apps

Whether you’re looking to tidy up your phone’s app drawer, or you want to keep some apps out of view of others, hiding apps is easy on the Galaxy Note 8 thanks to TouchWiz home.
- Simply swipe up or down on the home screen to pull up your app drawer
- Tap the 3-dot menu button in the upper right corner of the screen
- Tap Settings
- Tap on Hide apps
- Select desired apps you’d like to hide
- Tap APPLY in the upper right corner
To un-hide apps you’ve hidden, you’ll need to go back into that same menu and un-select the apps you’ve selected. Easy as that.
Get rid of what you can

Carriers love to pre-load tons of useless apps on Android phones. The Galaxy Note 8 is no different. There could be over 20 apps already on your device that you have no intention of ever using. The good news is we can uninstall, or at least disable, most of the bloatware.
- Open the app drawer to see all of your apps
- Long-press on any app
- Tap Select multiple items
- Select all the apps you want to remove
- Tap Uninstall
- Tap OK or Disable on all the prompts
If you would like to revive a disabled app you can go to Settings > Apps. Select Disabled from the drop-down menu and tap the app you’d like to Enable.
Get rid of the Squircles
![]()
If the “squircle” (square + circle) app icons on the Galaxy Note 8 bother you, it’s possible to change them to normal non-uniform Android icons. You know, without the background frames. Here’s how:
- Open the Settings app
- Tap on Display
- Tap on Icon frames
- Select Icons only
Add more icons to Samsung’s launcher
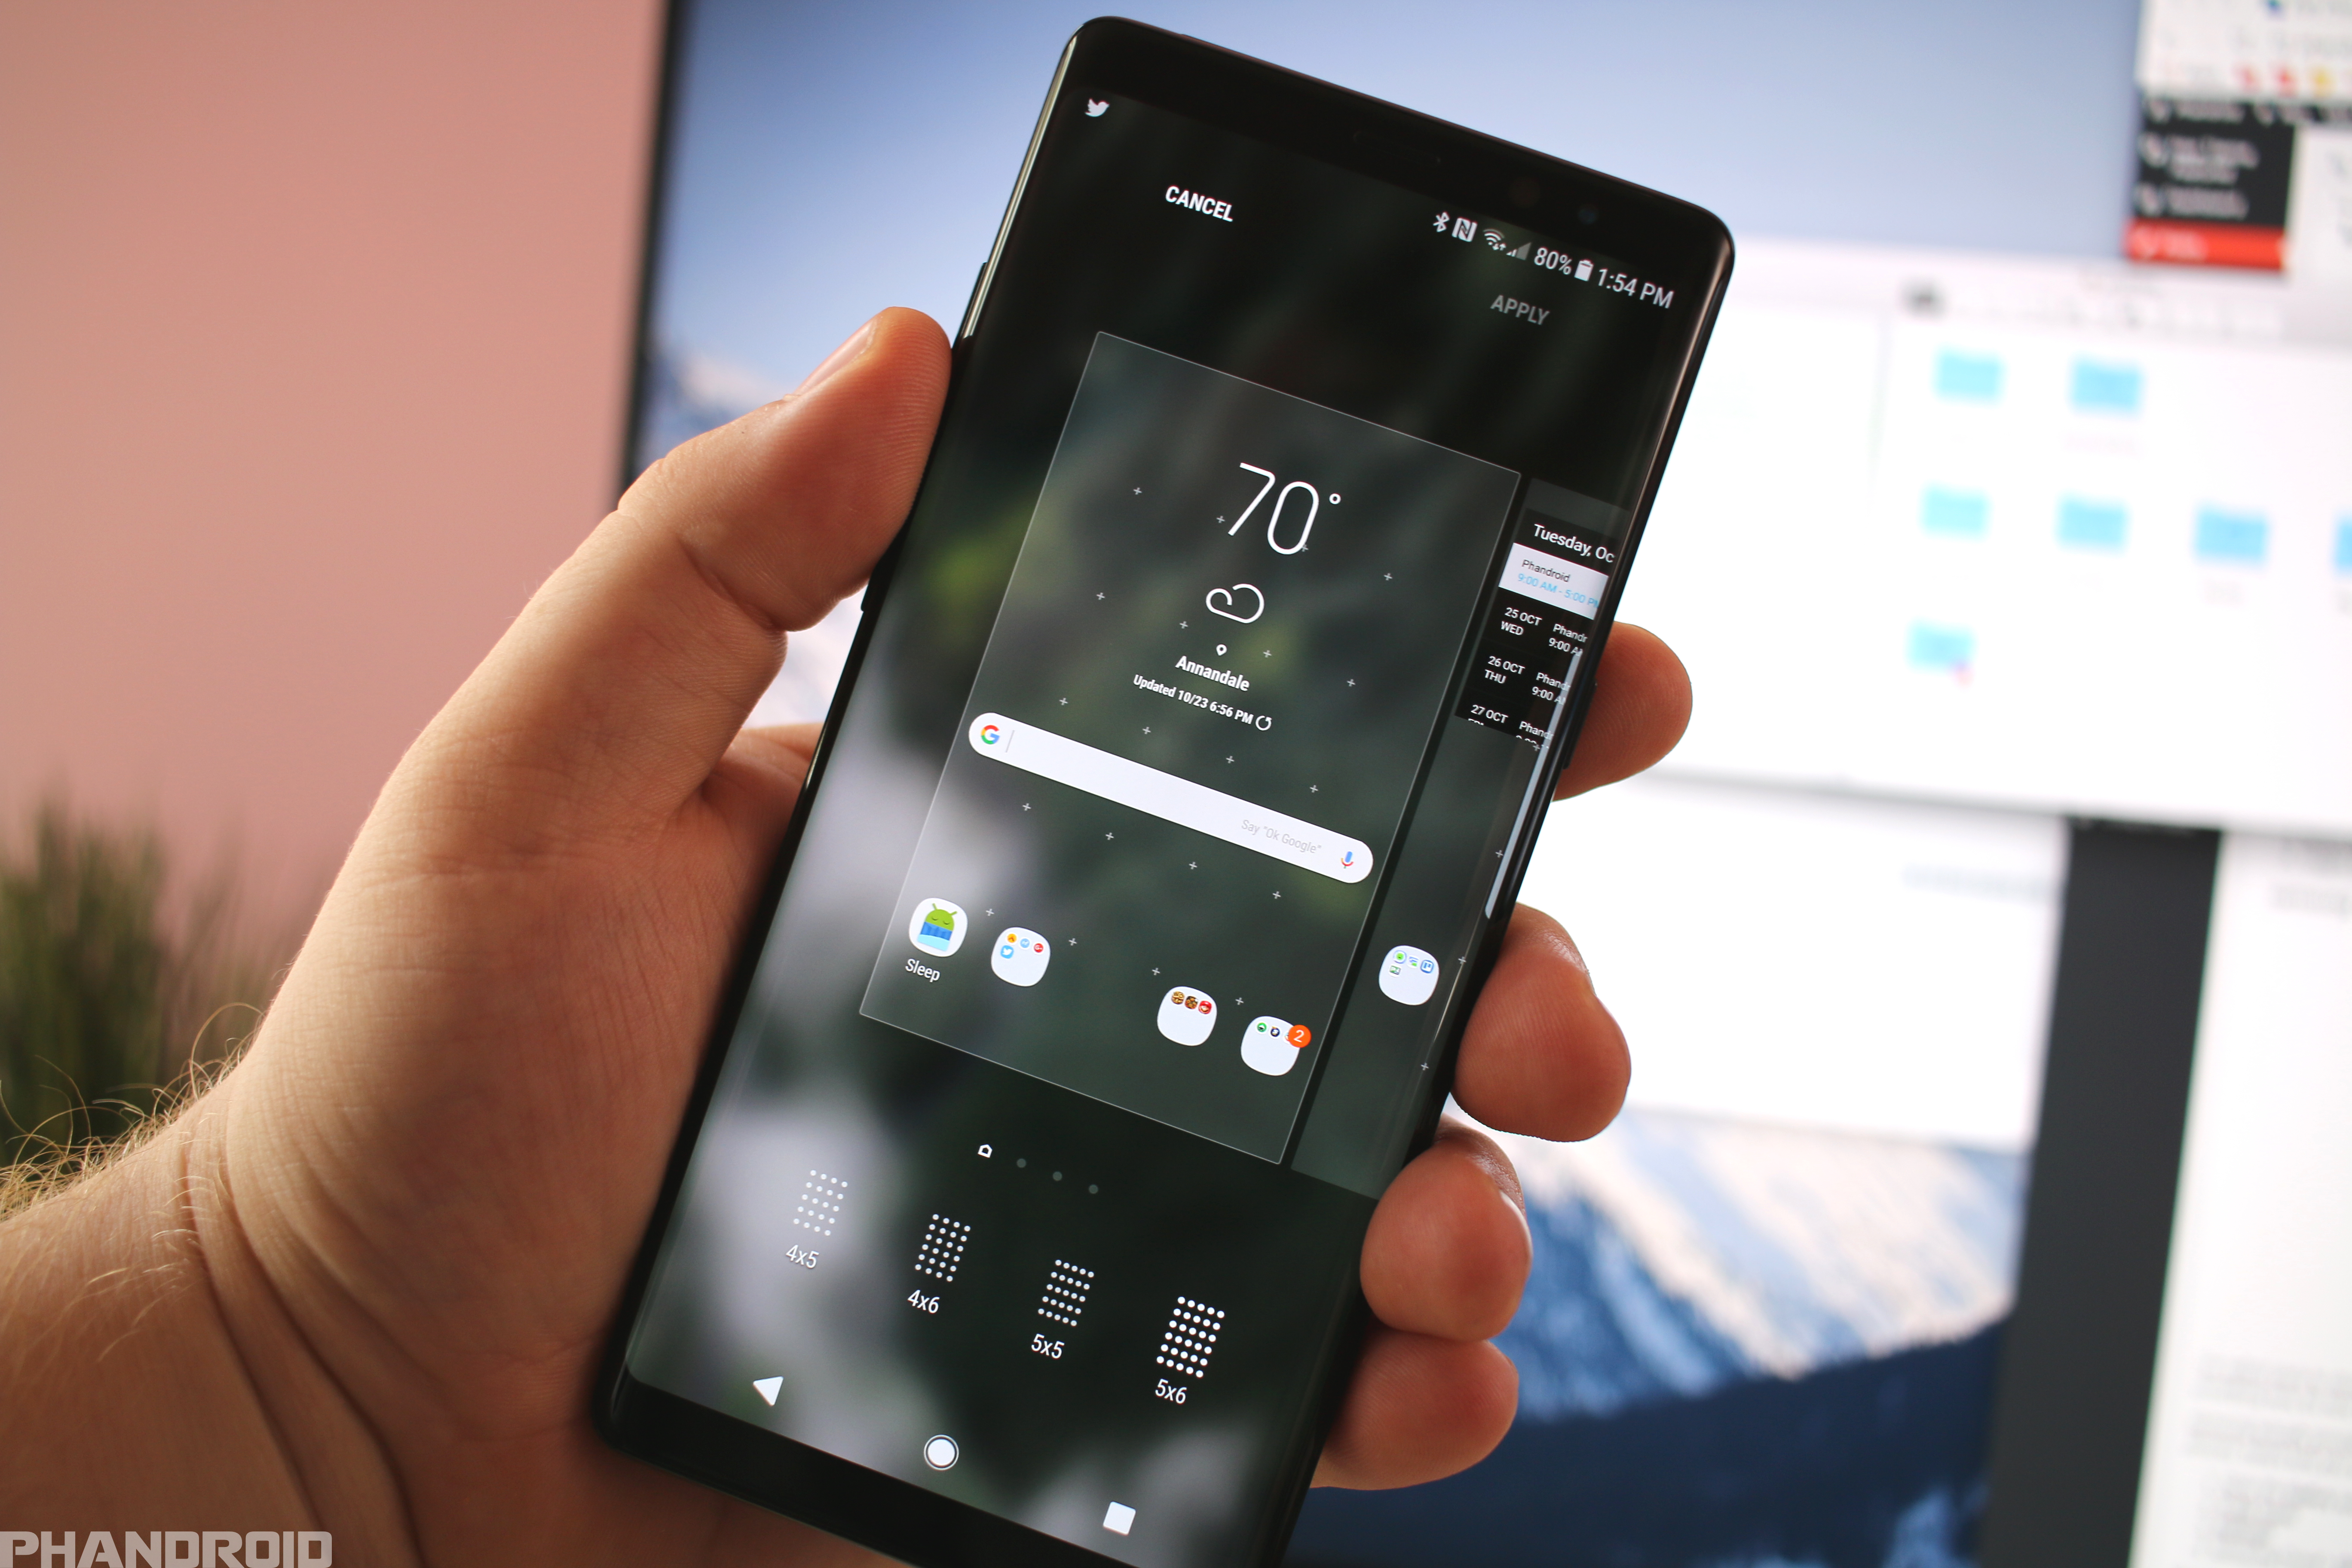
Samsung has slowly but surely been upgrading its built-in launcher for those who don’t immediately install something like Nova Launcher when a new device arrives. A new update to the Samsung Experience launcher on the Galaxy Note 8 lets you actually change the grid size of the launcher, with four different options.
If you want to switch things up on the Samsung home screen, follow these steps:
- Press and hold on an empty space on the launcher
- Select “Home screen settings“
- Tap “Home screen grid”
- Select your grid of choice:
- 4×5
- 4×6
- 5×5
- 5×6
Make your videos pop!

There’s no question the AMOLED display on the Galaxy Note 8 is fantastic for viewing most types of media, but the phone’s “infinite black” contrast ratio can make it difficult to see what’s going on in darker videos. Samsung’s “video enhancer” feature looks to fix this by automatically cranking up the brightness and lightening up shadows and darker areas of a video in compatible apps. Here’s how you turn it on.
- Open the Settings app
- Tap on Advanced features
- Scroll down to Video enhancer and turn ON
If you tap on the words, you can see video enhancer in action thanks to a sample video image, along with apps that are currently compatible with Samsung’s video enhancer.
Ensure your eyes won’t be strained too much
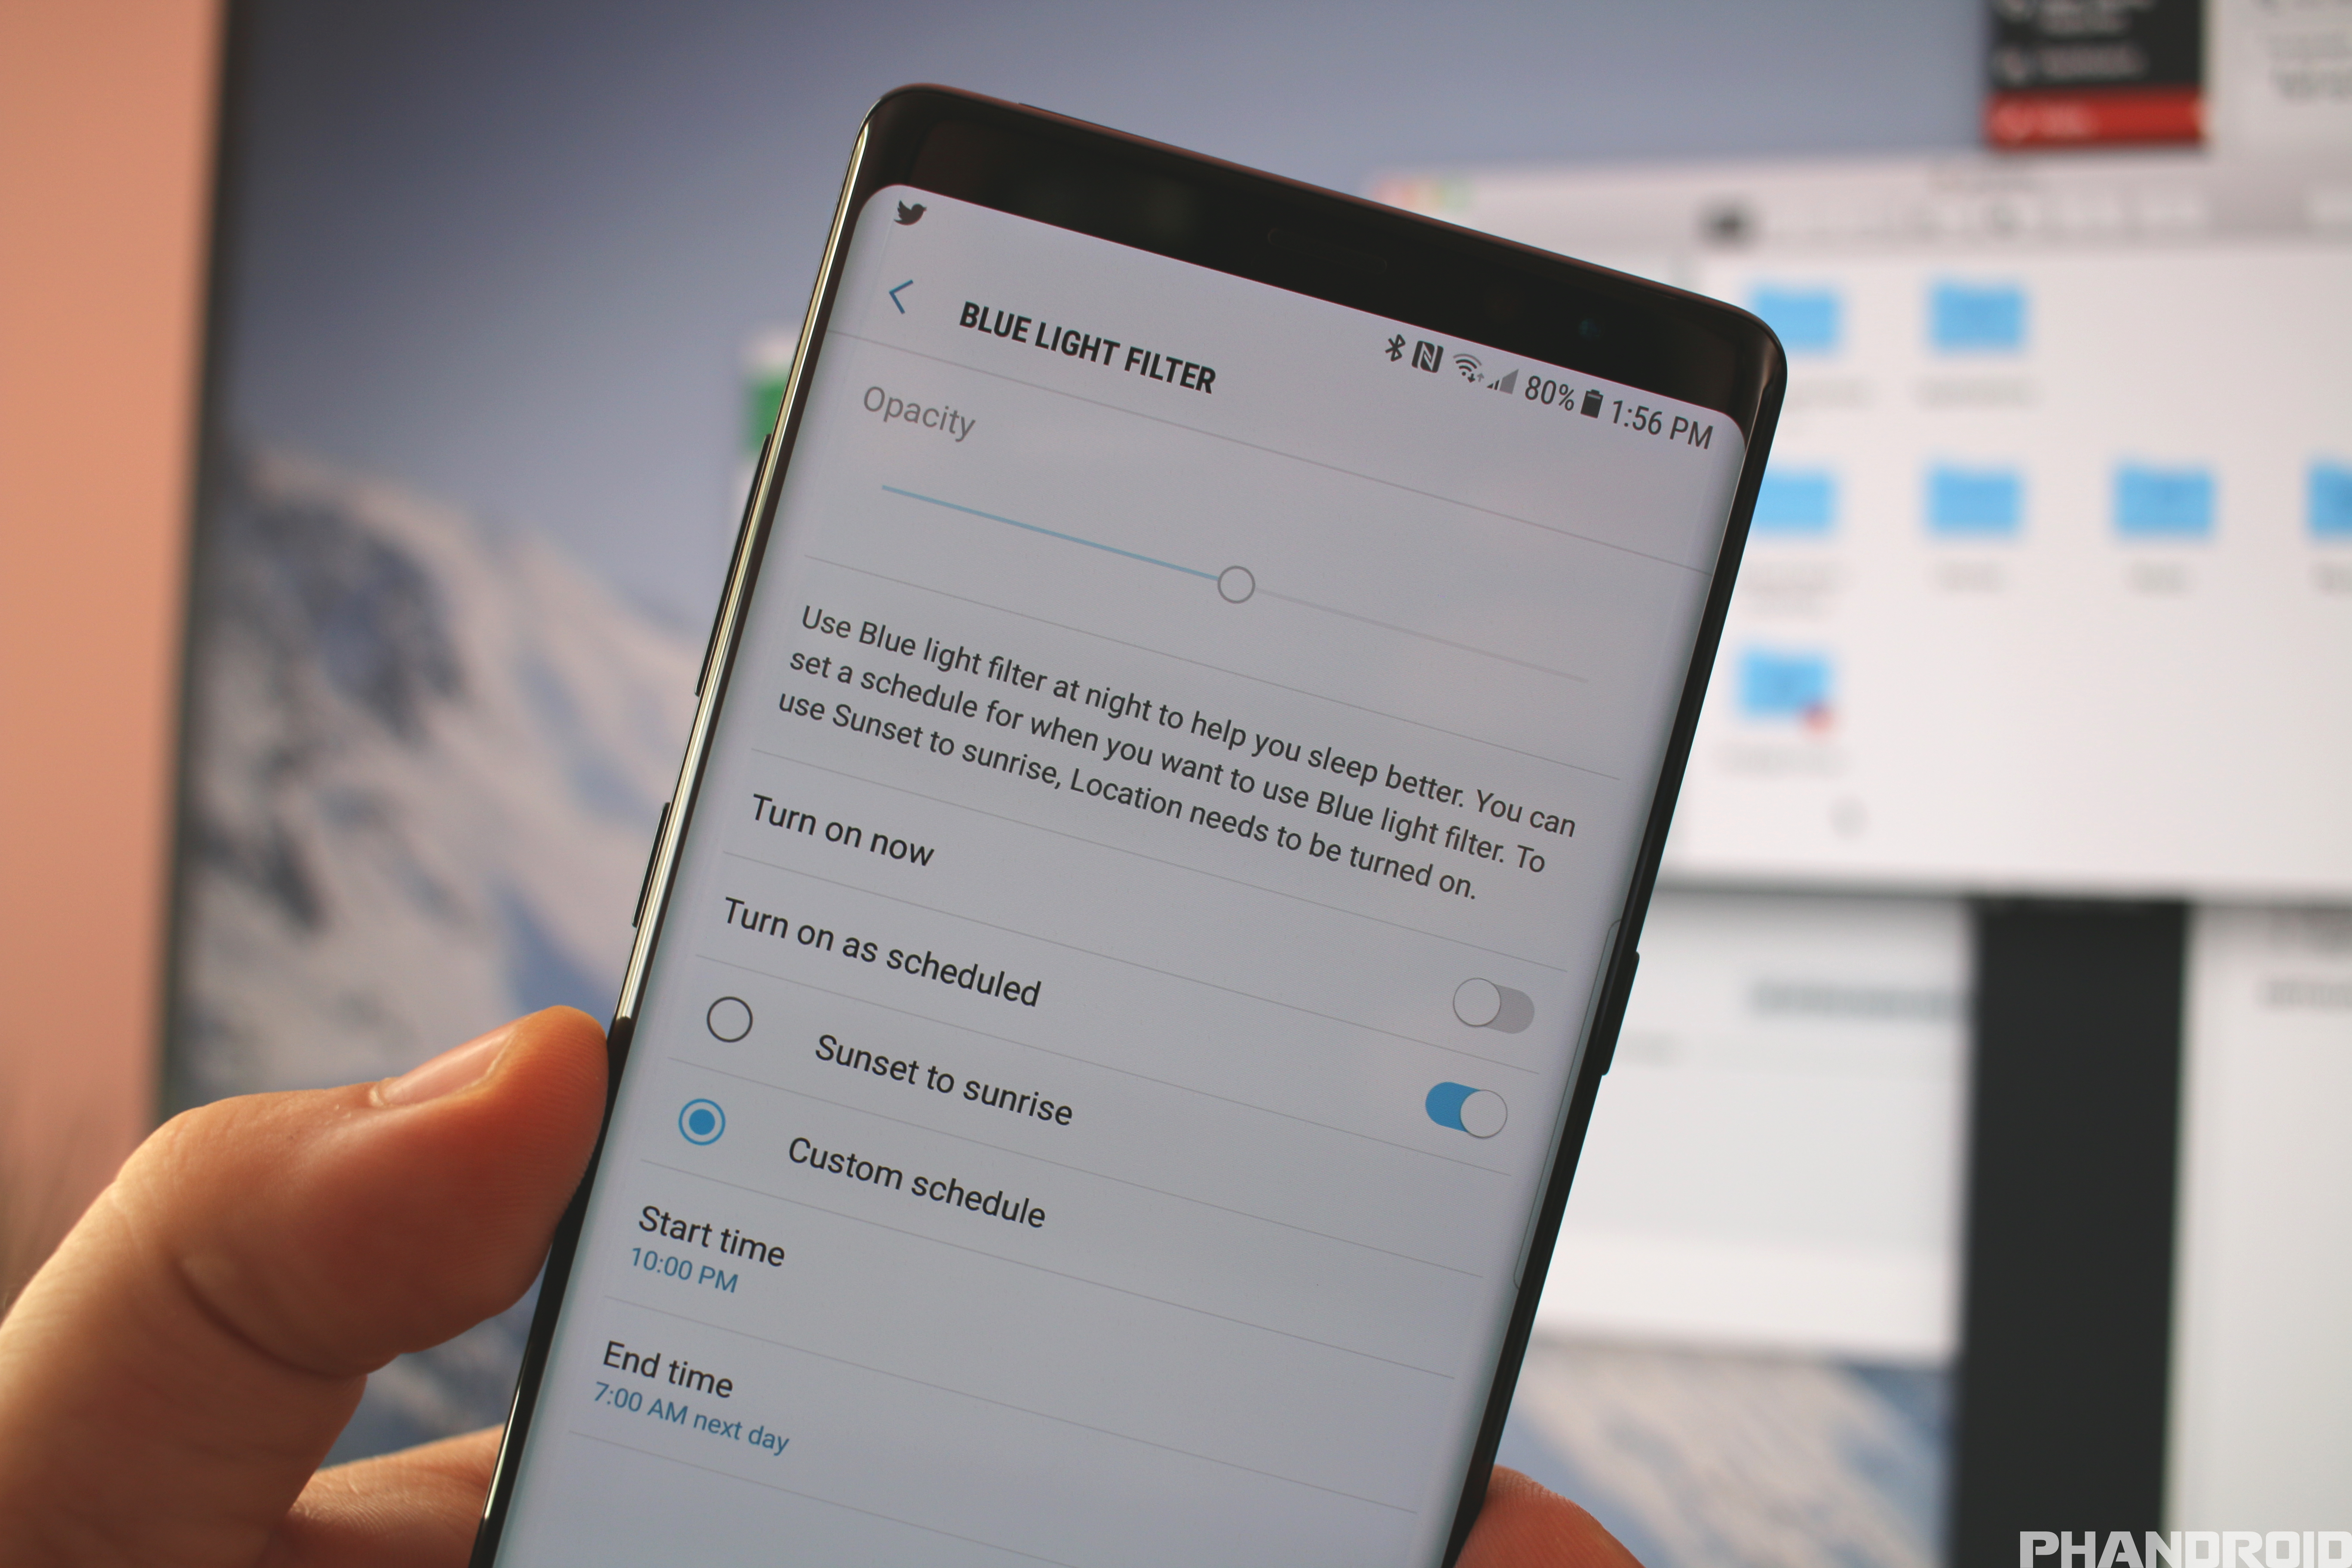
After studies showed that the blue light emitted from our smartphones can interfere with the body’s natural ability to fall asleep, most manufacturers these days now include some sort of Night Shift mode. On the Galaxy Note 8 it’s known as the Blue Light Filter and you can find a shortcut for it in the Quick Settings (pull down twice on the notification bar).
While you could always set it manually using the Quick Settings tile, there are additional settings that allow you to schedule times you’d like it to activate automatically (either at a specific time or at sundown). You can even adjust the intensity of the filter to better match the ambient lighting around you.
- Open the Settings app
- Tap on Display
- Select Blue light filter
- Select Turn on as scheduled
- Choose either Sunset to sunrise (need location permission), or create your own Custom schedule
Keep an eye on notifications without the display

The Galaxy Note 8 is outfitted with a notification light that glows whenever you receive a new notification, battery is low, or when you’re recording sound. Should the Galaxy Note 8’s LED notification light become a nuisance, you can easily turn it off by following these steps:
- Open the Settings app
- Select Display
- Tap LED indicator > OFF
Search everything with Finder

With so much information accessible on your smartphone, sometimes the hardest part is figuring out where to look. Whether it’s locally stored content like contacts, apps, or documents — or even something you want to find online — the first place you should look is the Finder search bar.
You can find it by swiping up or down on the home screen to open the app drawer. At the top just start typing and results will appear in real time. Everything from applications (both on your device or in the app store), calendar entries, contacts, photos, music, files, phone logs, settings — it can all be found using Finder.
Look ma’ No hands

Taking a selfie using your smartphone is always sorta tricky. Most of the time you have to over extend your arm while keeping yourself or others in the frame, then tapping the shutter button while somehow keeping a secure grip on your phone.
Thankfully Samsung has made this struggle easier on users by incorporating different ways to snap a photo while taking a selfie (selfie mode is activated by swiping up or down on the view finder).
The first is by pressing the heart rate sensor (not the fingerprint reader) on the back of the device. Since the photo is only snapped when you let go of the heart rate sensor, you can have your finger resting on it the entire time while you frame your shot, letting go to release the shutter.
The other method is by simply holding your palm up next to your face. The Galaxy Note 8 camera will recognize your palm and begin counting down to the shot. All you have to do is worry about keeping your phone steady and let the camera app handle the rest.
Zoom in with just a slide

Most smartphones aren’t equipped with optical zoom, so in the event you’d like to get closer to your subject, you’re stuck using digital zoom. It’s best to avoid using it unless absolutely necessary, but there are a few different ways to digitally zoom on the Galaxy Note 8.
First is the one-handed method and involves sliding the camera button left or right. Just make sure you don’t press it too long before sliding or you’ll take a burst shot. The second method is by using pinch-to-zoom on the viewfinder but requires the use of two hands.
Camera Modes Galore

For camera enthusiasts, the Galaxy Note 8 is outfitted with a nice variety of shooting modes to help stretch your photo creativity. From the view finder screen, all you have to do is swipe to the right to see all the modes that come pre-installed on the S8:
- Auto – This is your standard shooting mode which chooses camera settings for you.
- Pro – This mode gives you full control over your ISO, shutter speed, filter, auto focus, white balance, metering, and more.
- Panorama – Takes and stitches multiple photos together to form one large panorama.
- Selective focus – Allows you to change the focus of a photo (near or far) after the fact.
- Slow motion – Records 240fps slow motion video at 720p.
- Hyperlapse – Takes photos over a long period of time then combines them into a video.
- Food – High saturation photos with radial lens blur to perfectly capture food.
- Virtual shot – Capture a photo that allows you to move around the subject after the fact.
Download more camera modes from the Galaxy Apps store
If the above camera modes just aren’t doing it for ya, there are additional modes you can download from the Galaxy Apps store. The easiest way is simply by opening doing the following:
- Open the Camera app
- Swipe right to open the camera modes screen
- Tap the “+” button in the upper right corner
This will take you to the appropriate page in the Galaxy Apps store allowing you to browse and download all the shooting modes currently available for the Galaxy Note 8. There aren’t too many available right now and it’s possible more will be added later so keep checking back.
Edit the order of your camera modes
From the camera modes screen, you can edit the order/placement of shooting modes by doing the following:
- Pressing the 3-dot menu in the upper right corner of the display
- Selecting Edit
- While in edit mode, you can drag around the camera mode tiles to rearrange, or delete a mode you’ve downloaded from the Galaxy Apps store.
- Once you’re finished editing the placement, tap Done to save.
Create shortcuts to your favorite camera modes on your home screen
You can also create shortcuts to your favorite shooting modes on your home screen by pressing the 3-dot menu in the upper right corner and selecting Add shortcut to Home screen. From there you can move the shortcuts around like any other app icon, placing it however you like or inside a folder.
Get started with Bixby…

Bixby is Samsung’s new virtual assistant for the Galaxy S8, S8 Plus and Galaxy Note 8. At launch, it’s basically a Samsung version of Google Now, plus some camera features. The main feature is a page that displays cards with useful information. Even if you don’t want to use Bixby, it’s worth a shot to check it out.
- Press the Bixby button on the left side of the device
- Tap Start
- Agree to the conditions
Now you’ll want to customize what Bixby can show
- Tap the Settings icon in the upper right
- Select Hello Bixby cards
- Toggle all the content you want to see
- Go back, select Hello Bixby on Lock screen
- Toggle all the content you want to see on the lock screen
Bixby can be accessed from anywhere with the physical button or by swiping to the left on Samsung’s launcher.
Another way to use Bixby is a feature called “Bixby Vision.” This uses the camera to scan items and find relevant information.
- Open the Camera
- Tap the eye icon
- Point your camera at something
- Bixby will scan and show results, such as images and shopping
…Or get rid of Bixby altogether
However, Samsung has recently released an update which makes it possible to completely disable Bixby. If you are looking to go that route, you can follow these steps:
Disable via Bixby App
- Press the Bixby button
- Select the “Gear” icon at the top right-hand corner
- Toggle the switch for Bixby Key
Diable via Bixby Settings
- Press the Bixby button
- Select the three-dot menu button in the top right-hand corner
- Select Settings
- Scroll down and tap “Bixby key”
- Select “Don’t open anything”
- Profit!
Have Bixby help you shop with your camera

Another handy feature found in the Camera app is Bixby Vision. Once activated, you simply point your camera at an object or location and Bixby will start searching for products online, discover new places nearby, or even translate foreign text.
The Bixby Vision button is located right below the viewfinder and once you’ve scanned something, you can adjust the scan area and then you’re presented with 2 options: Image or Shopping. Tapping Image will pull up search results from images found online, while Shopping will identify objects and pull up shopping results on Amazon.
In the upper right corner, tapping the 3-dot menu will allow you to access Bixby Vision’s:
- History — Scanned results are saved and sorted by shopping, places, images, text, wines, and QR code.
- Settings — Configure what you’d like to show up in search results (shopping, images, places, wine) and additional options like the ability to save captured images.
You can also use Bixby Vision for photos you’ve already taken. Just open the Gallery app and when viewing a photo, tap the Bixby Vision button in the lower left. A glowing circle will appear in the middle of the photo and tapping it will take you to the scanning screen (with Image and Shopping options).
Use Bixby with just your voice
Hello Bixby is Samsung’s personal assistant app. It’s accessible either by swiping right on the home screen, or by pressing the dedicated Bixby button located beneath the physical volume rocker.
It shares many similarities with Google Now, giving you a quick list of the day’s events, news articles, weather, daily fitness activity, as well as reminders. There’s a handful of apps that support Bixby which include a variety of social networks and services.
You can configure which Bixby cards show up inside the app, the lockscreen, as well view the full list of supported apps by opening Bixby on your device and tapping the settings (gear icon) in the upper right corner.
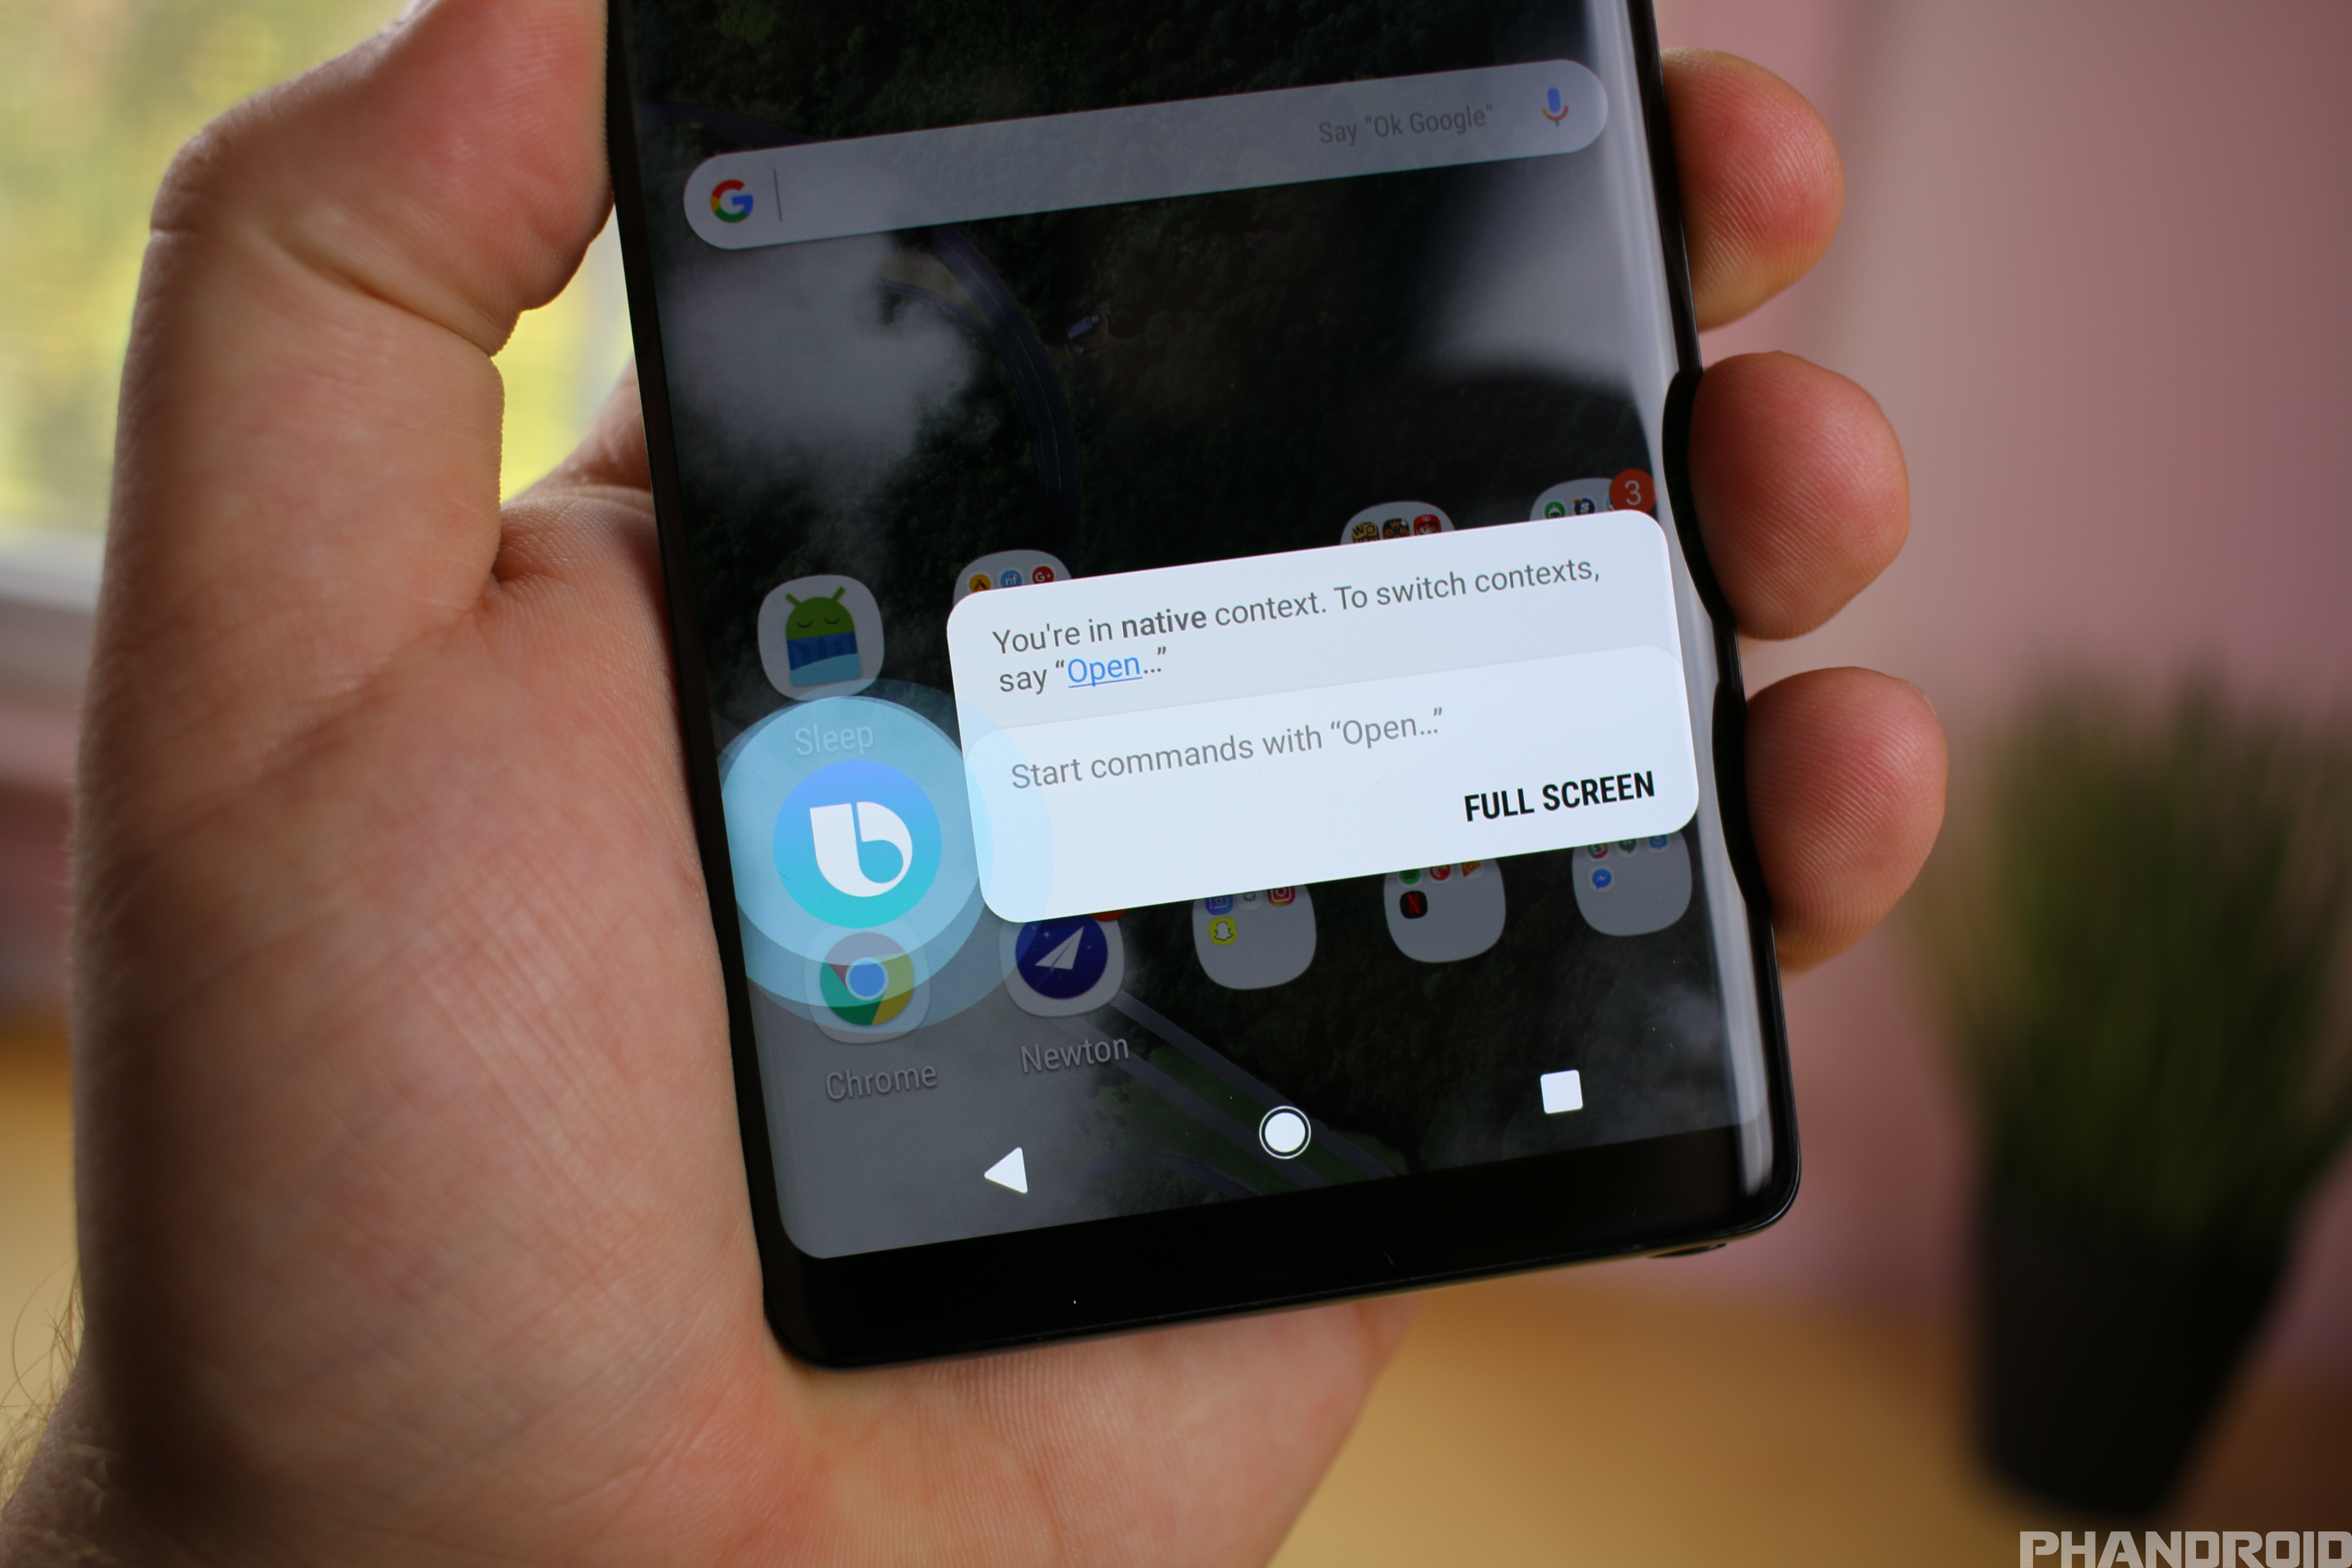
Don’t worry, Google Assistant is still here
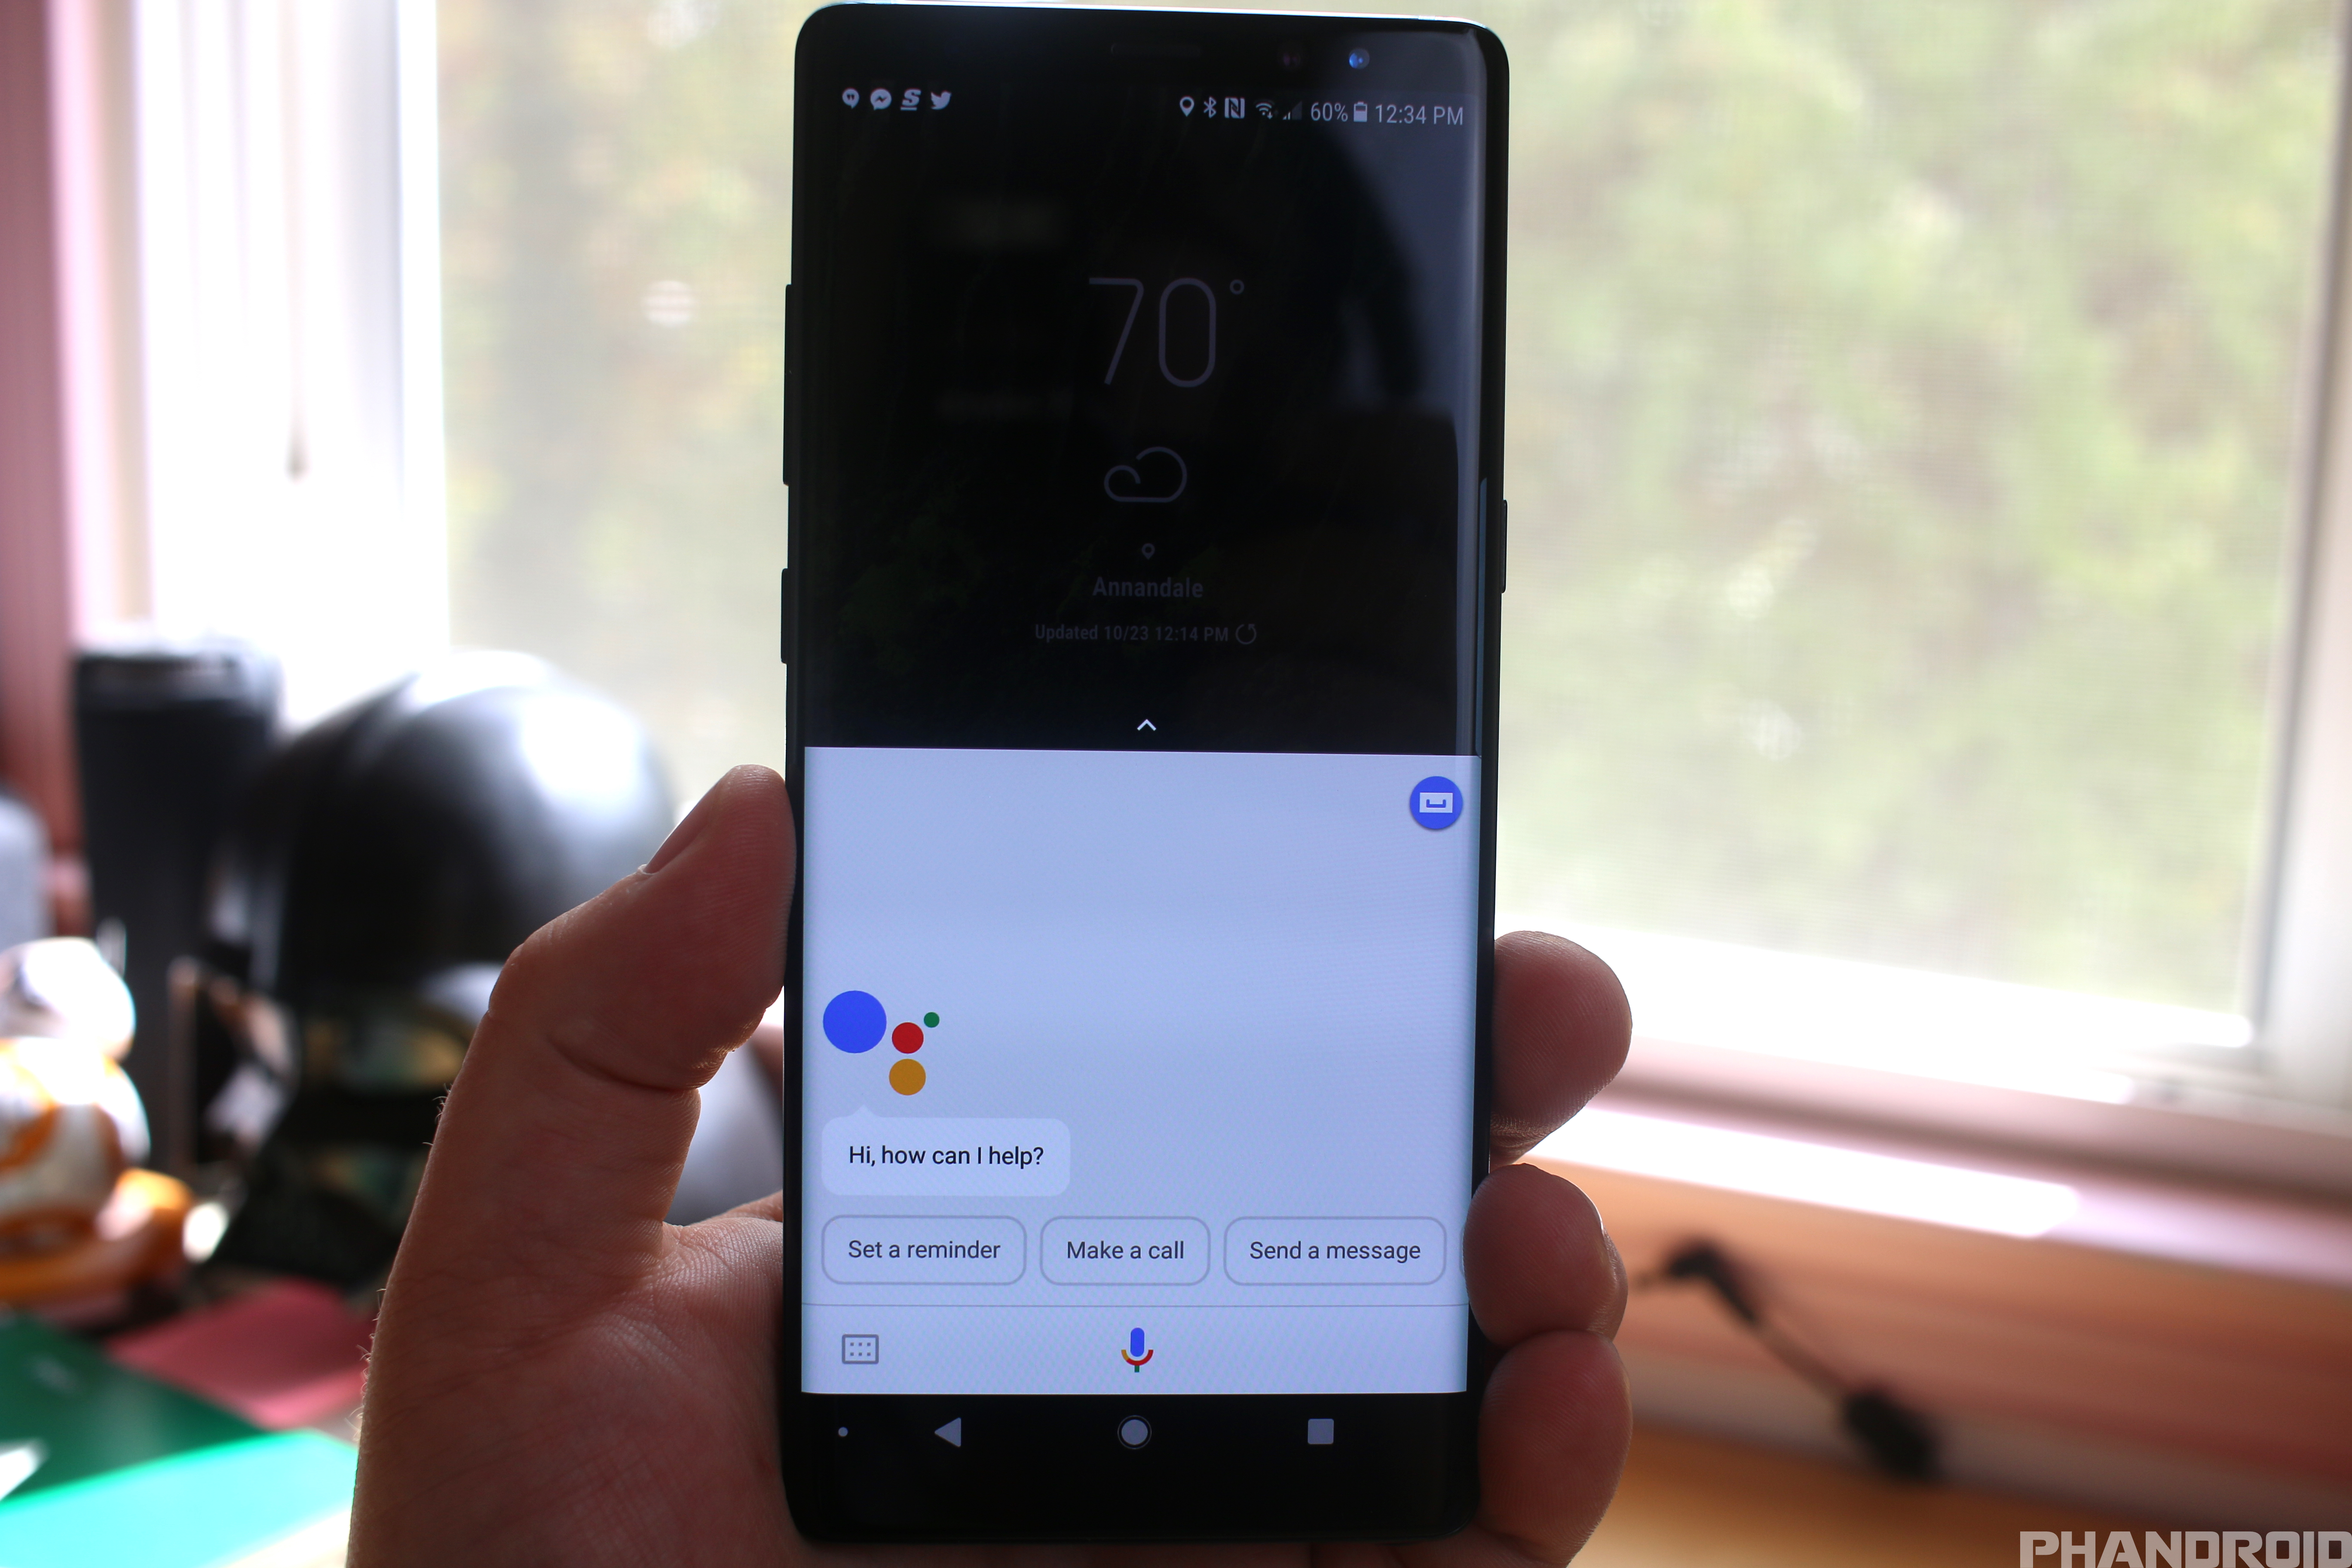
Samsung is really trying to push its users into using the Bixby digital assistant, but the rest of us still want to use Google Assistant due to its ease of use and the fact that it is feature packed. Thankfully, Samsung allows you to activate Google Assistant without messing with any settings.
In order to activate Google Assistant, press and hold the home button on the navigation bar for the 3 seconds. Then you will see the edges of the display light up and the Google Assistant prompt will appear.
Make the Edge Panels yours

The Galaxy Note 8’s curved displays means you get to enjoy Samsung’s new Edge Screen features. There’s a whole lot you can do with it
Shortcuts to apps & people
- Swipe the Edge screen handle from the edge of the screen
- Swipe left or right on the panel until you see People or Apps
- Tap the + icon to add an app or contact
- To remove an app or contact, long press and drag to the trash
- Drag the apps or contacts to re-order the list
You can add more panels by going to Settings > Display > Edge screen. Select Edge panels.
Switch up the Edge Handle position

By default, the Edge Panel handle is placed on the right-hand side of your Galaxy Note 8, but if that area is an inconvenient position, Samsung has included the ability to switch things up.
- Swipe the Edge screen handle from the edge of the screen
- Tap the Gear icon at the bottom of the screen
- Tap the overflow menu in the top right-hand corner
- Select Handle settings
- Adjust the positioning
While you’re tinkering with the position of the Edge Panel handle, it is highlighted in blue so that you will get a better idea of where the Edge Handle will be placed. From this screen, you can change the position (left or right), Size, Transparency, and whether the Note 8 will vibrate when you activate the Edge Panel.
Edge Display Notification Lights
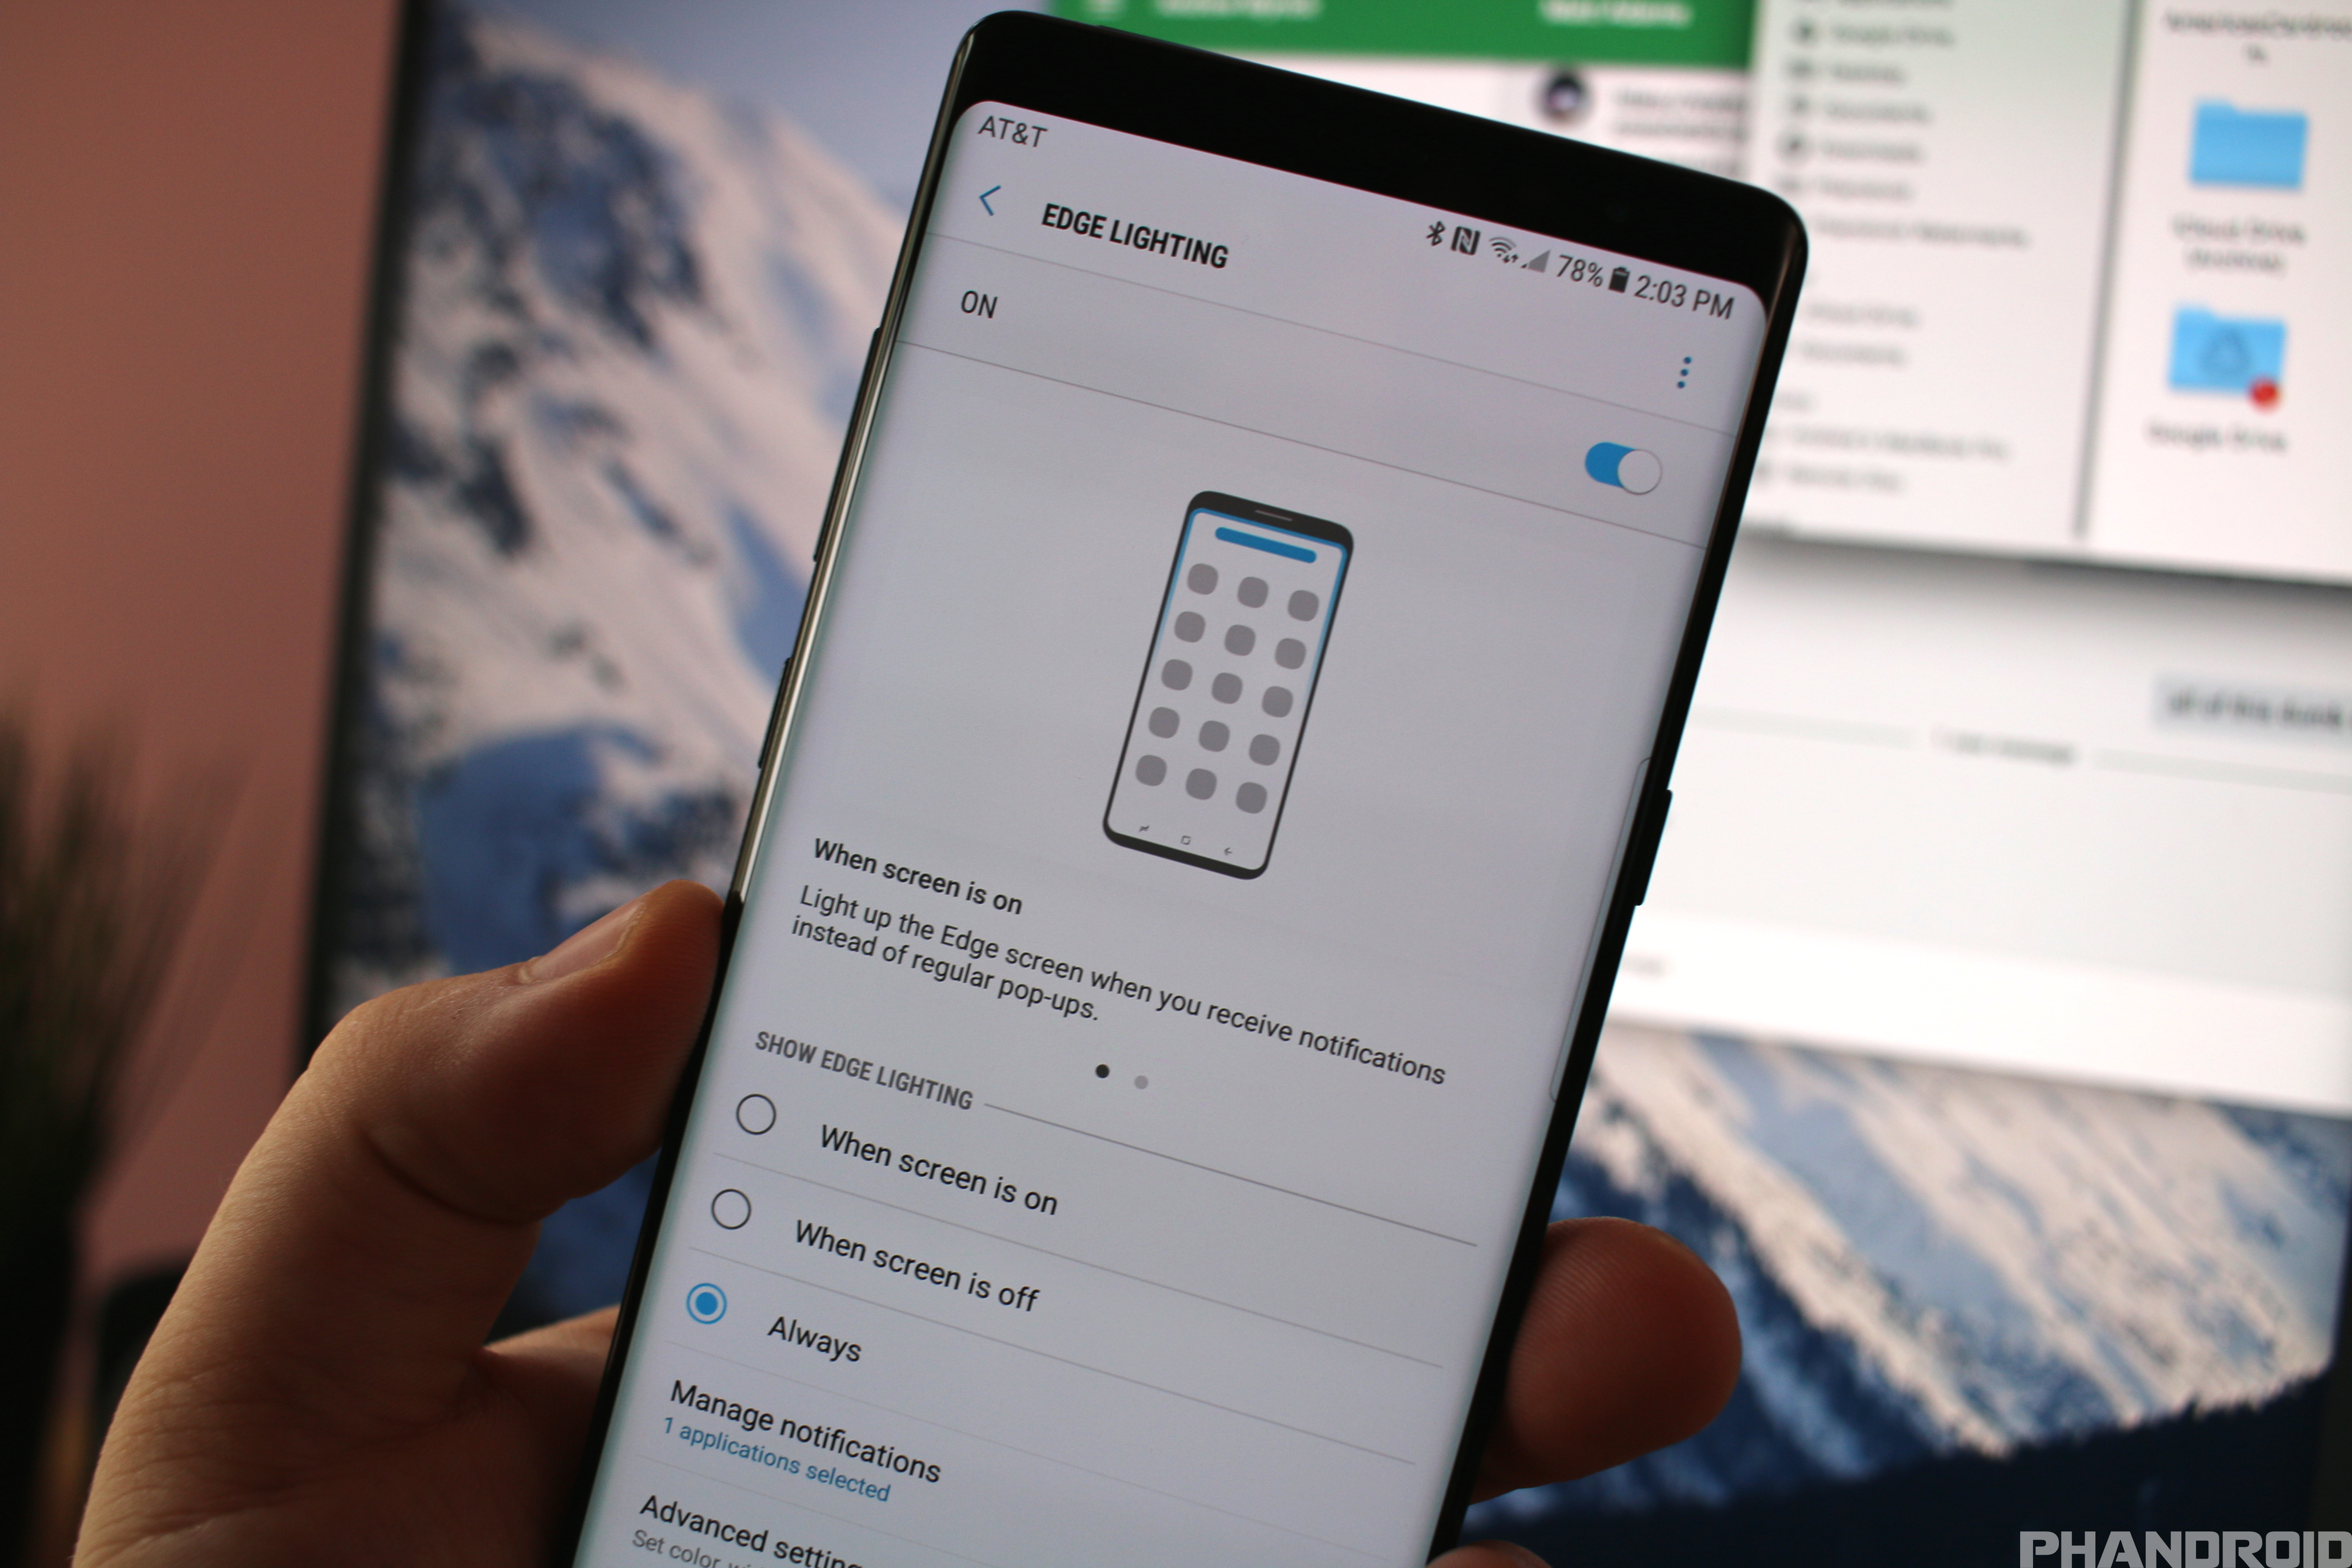
You can have the edge of the display light up when you receive notifications.
- Go to Settings > Display
- Select Edge screen
- Toggle on Edge lighting
- Tap Edge lighting and choose when to show it
Split Screen App Pair

One of the key features of the Galaxy Note 8 is the ability to quickly launch two apps in split-screen mode at the same time. This feature is called “App Pair” and can easily be accessed by using the “Apps Edge” panel. In order to create an App Pair, follow these steps:
- Swipe on the Edge Screen Handle to open the Edge Panels
- Swipe until you see the Apps Edge panel
- Tap the “+” button
- Select Create App Pair in the top right-hand corner
- Scroll and select which apps you want to use in the App Pair
- Profit
It’s important to note that when you’re creating an App Pair, the first application selected will appear at the top of the split-window setup, with the second application appearing on the bottom. If you find the two applications but need to switch the orientation, there’s a “Switch” button in the App Pair settings which will switch the orientation without needing to delete the App Pair altogether.
Block accidental touches
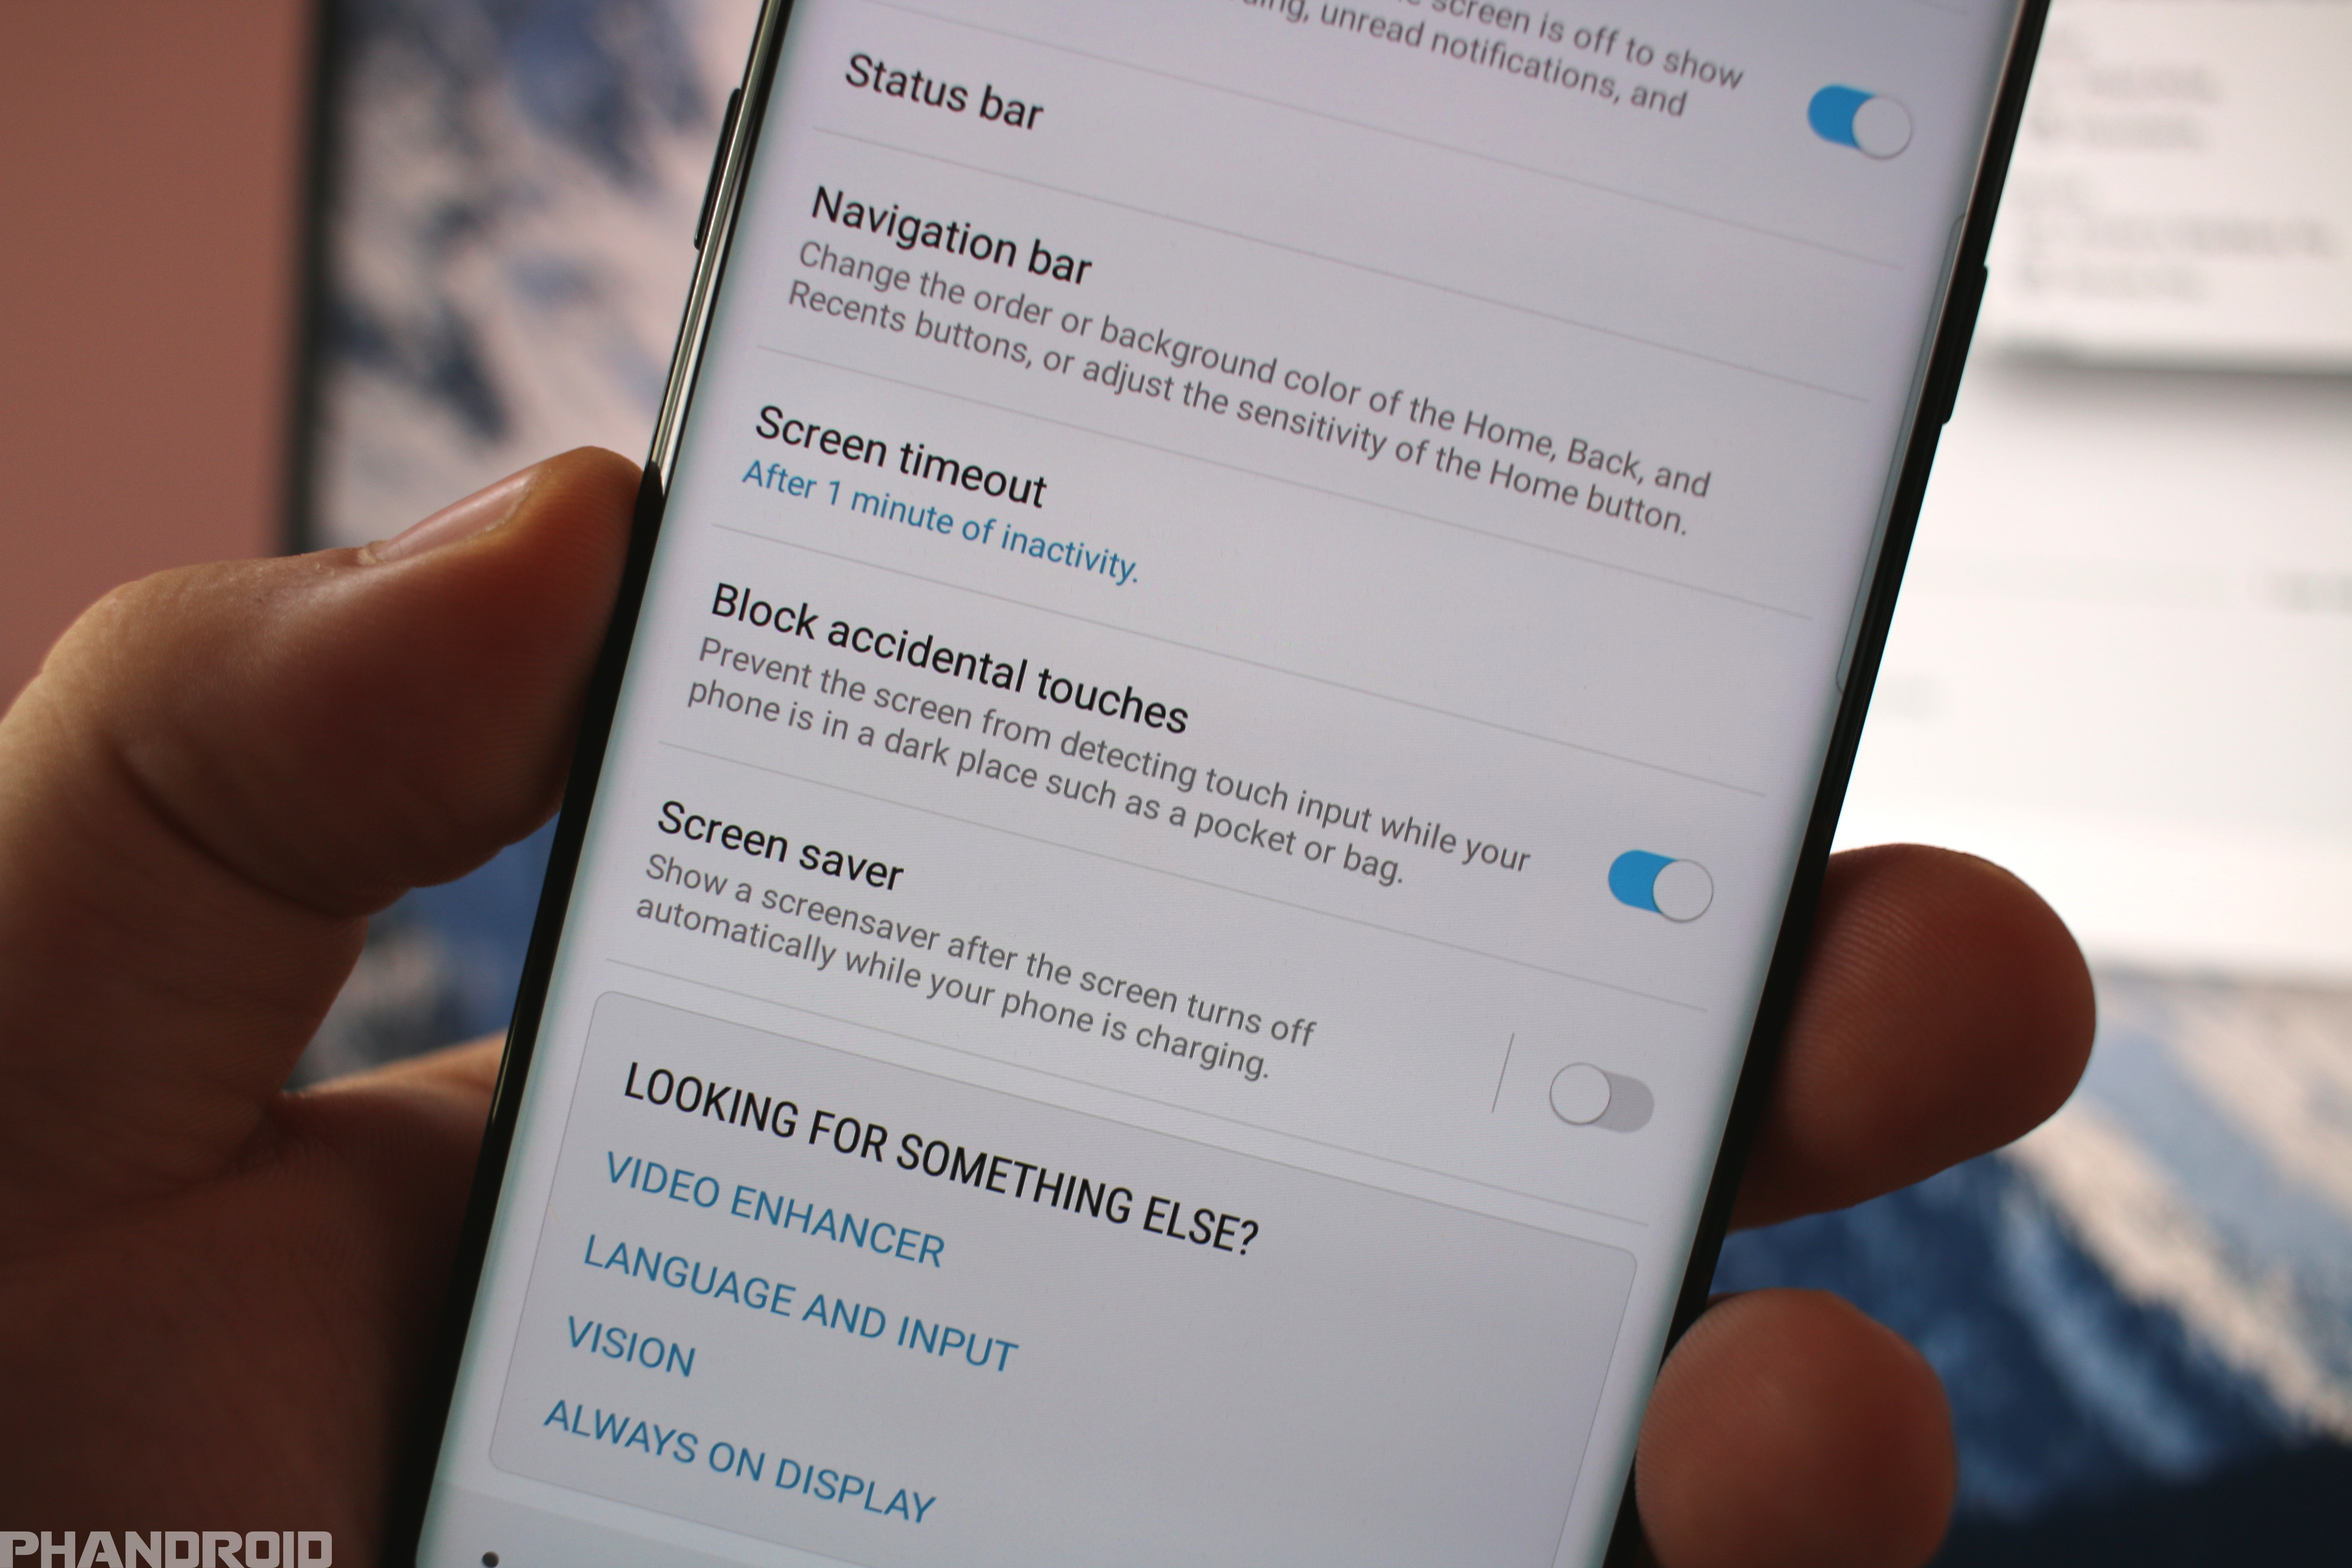
Considering the fact that the Galaxy Note 8 has a massive bezel-less 6.3-inch display, there is a chance that you will accidentally touch the display when either putting it in your pocket, or throughout regular usage. Samsung has included a feature that helps to alleviate these accidental touches within the software.
In order to activate this feature, follow these steps:
- Open Settings
- Select Display
- Swipe down and toggle Block accidental touches
Once enabled, you shouldn’t have to worry about accidentally opening the camera app while your device is in your pocket, removing any unnecessary pocket shots.
Use multiple Bluetooth speakers at once
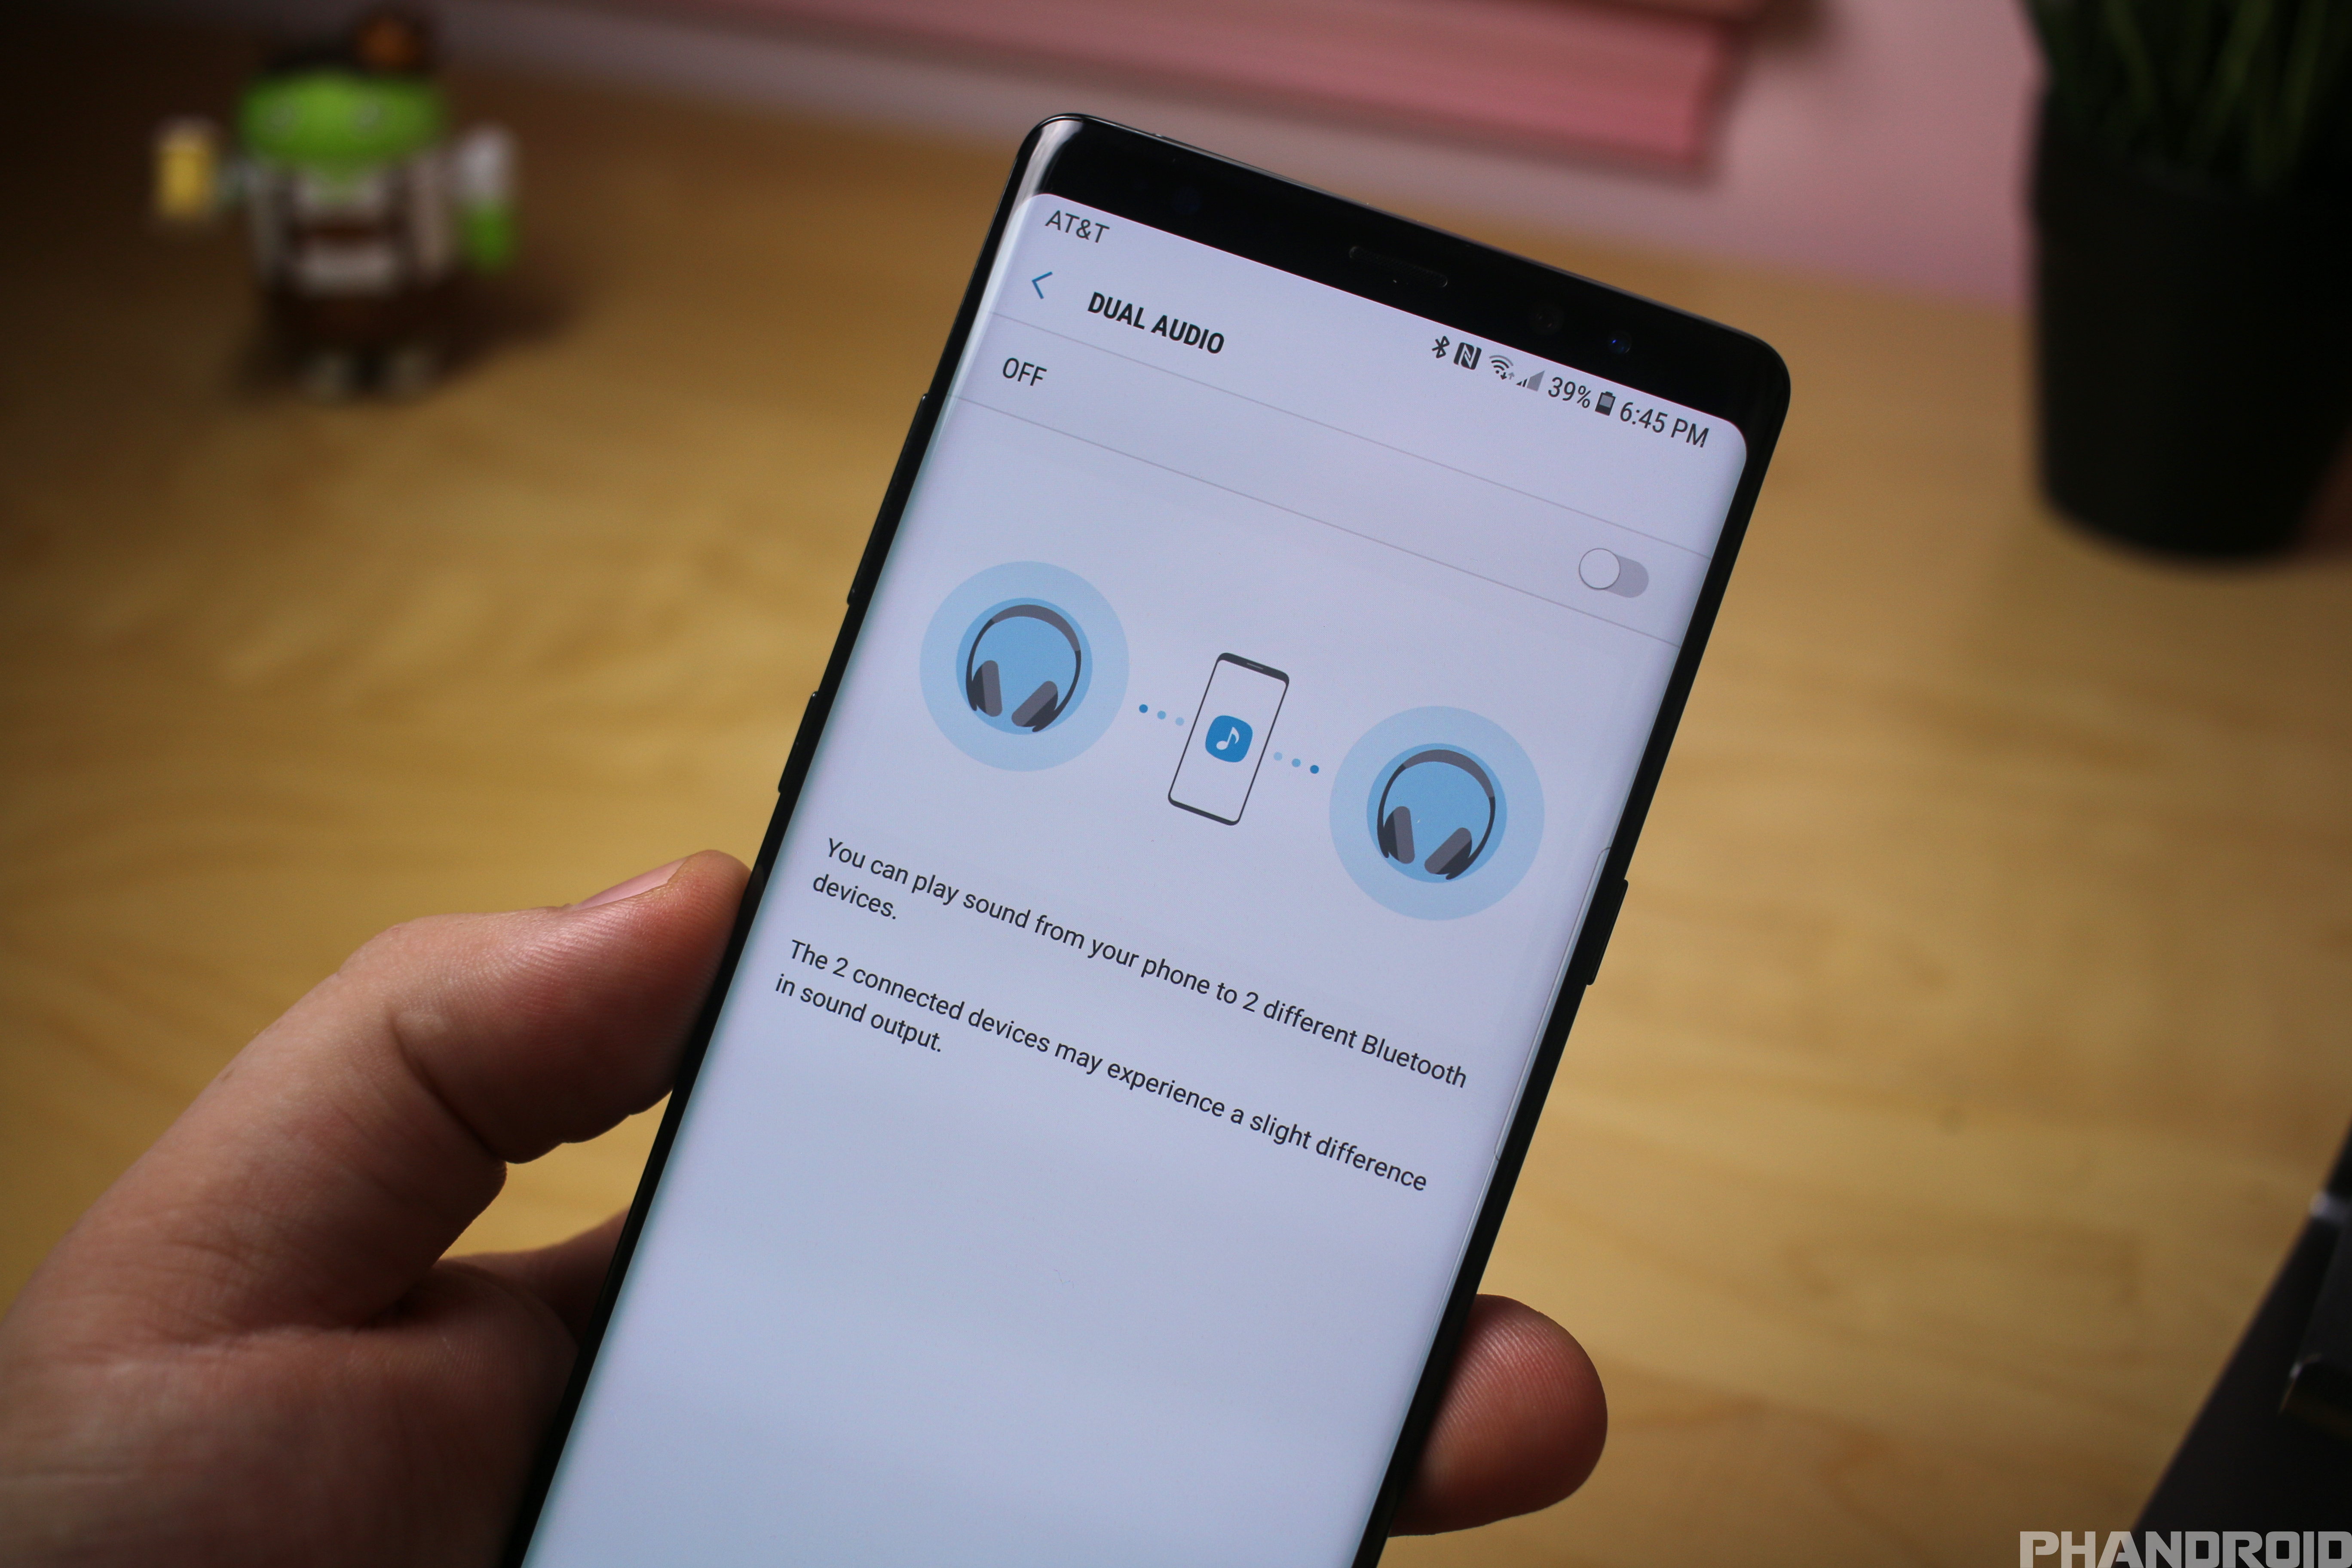
The Galaxy S8 was the first Android device to launch with Bluetooth 5.0. And now the Galaxy Note 8 also gets to enjoy certain benefits like the ability to connect to two different Bluetooth audio devices using a feature called Dual Audio. Here’s how you turn it on:
- Go to Settings > Connections
- Make sure Bluetooth is turn on
- Tap the three-dot menu icon
- Select Dual Audio
- Toggle it on
Once enabled, you’ll be able to pair 2 Bluetooth audio devices to the Galaxy Note 8, whether it’s headphones or Bluetooth speakers. Just make sure you keep the devices within a reasonable range or the music won’t sync up properly between the devices.
Let Samsung improve your audio experience

When you’re listening to music, podcasts, or a video, the Galaxy Note 8 can automatically adapt to your surroundings so that you will receive the best sound experience possible. This feature is called “Adapt Sound” and can be activated in the Settings.
- Open Settings
- Select Sounds and Vibration
- Scroll down and select Sound quality and effects
- Select Adapt Sound
From here, you will be presented with three different presets:
- Optimized for people under 30
- Optimized for people between 30 and 60
- Optimized for people over 60
There is also an “Advanced” section which allows you to create a custom preset based on your current location. There are a few steps that you need to follow before the Note 8 will be able to properly change the sound optimizations:
- Go to a quiet place
- Put on your headphones and close all multimedia apps
- Test your hearing to find the best sound for you. Your current personalized sound data will be replaced.
Once you’ve completed those steps, tap Start and the process will begin. Throughout the testing, you will be asked to identify whether you hear various beeps in your left and right ears. There are prompts on the screen asking you Yes or No, and answering them will help the device fine tune the sound for your specific profile. Once completed, you will be asked which ear you usually use for phone calls, and then the new profile will be created.
Use the entire 18:9 display

Because of its unique 18:9 aspect ratio, the Galaxy Note 8’s display is taller than most other phones. While most Android apps scale properly and use the full display, others will put black bars along the top and bottom to accommodate.
For these apps it’s possible to force full-screen mode use up all the phone’s extra screen real estate. Here’s how:
- Go to Settings > Display
- Select Full screen apps
- Toggle the apps you want to be full screen
Back everything up with Samsung Cloud

The safest place to store your photos and videos isn’t on your device, but in the cloud. In the event your phone gets lost, stolen, or it’s finally time to upgrade to something new, it’s nice to have the peace of mind of knowing all your memories are backed up and in the cloud.
Samsung actually provides Galaxy Note 8 users with 15GB of free cloud storage, perfect for backing up and syncing your photos between multiple Samsung devices. Here’s how you set it all up:
- Open the Gallery app
- 3-dot menu
- Settings
- Samsung Cloud > ON
Now that Samsung Cloud has been turned on, you can further configure the way it syncs and backs up your photos/videos by tapping the Samsung Cloud (the words, not the toggle).
Here you’ll find options for syncing via WiFi (help save your cellular data plan), selecting specific albums you want to sync, freeing up phone storage by deleting photos that have already been backed up, and how much free cloud storage you have left.
Enable NFC for mobile payments and more

In order to use the likes of Android Pay or Samsung Pay, you’ll need to make sure that NFC is enabled on your Galaxy Note 8. When the device arrives in your hands, NFC is enabled by default, but if for any reason something happens and NFC gets disabled, there are a few ways that you can re-enable it.
The first method is extremely easy, and only requires you to:
- Swipe down to reveal the Quick Settings panel
- Swipe to the second page
- Tap “NFC”
The second method requires you to dive into the Settings app on the phone:
- Open the Settings app
- Select Connections
- Toggle the switch for NFC and payment
Use Samsung Pay for mobile payments
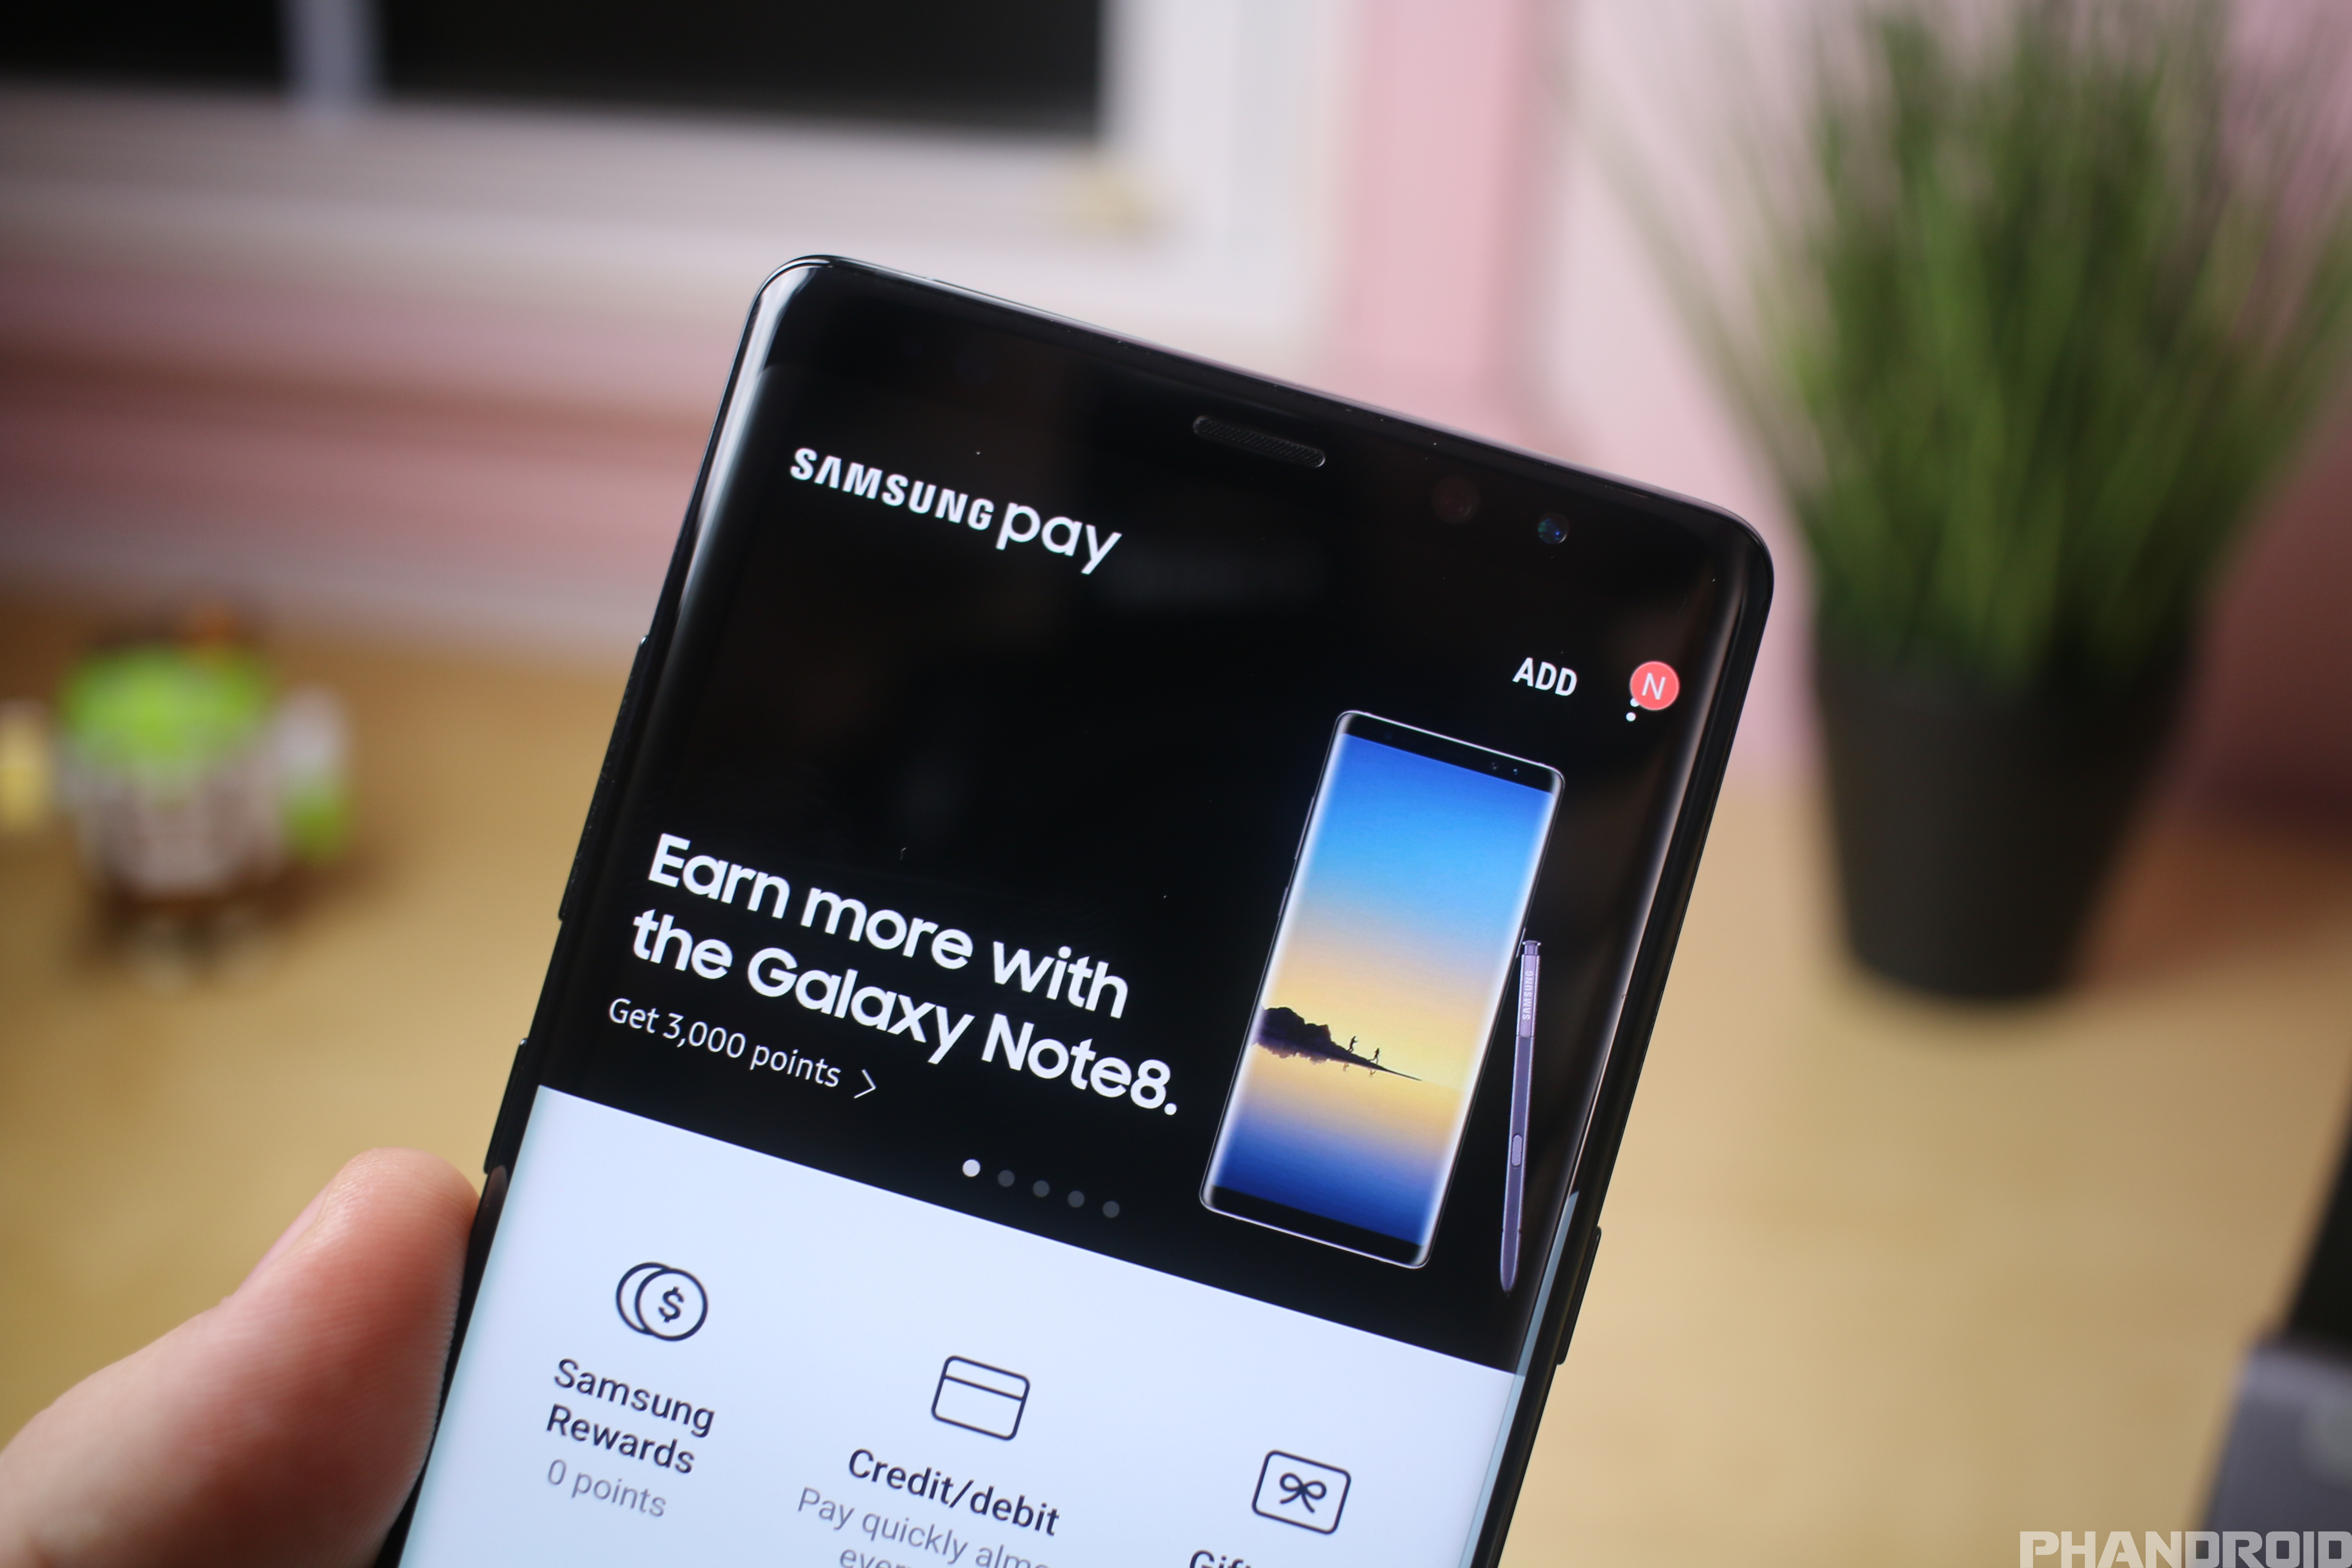
By far one of the best features available on the Galaxy Note 8 is Samsung Pay. It’s the best way to handle mobile payments as it’s the only technology that’s compatible with regular ‘ol credit card machines.
You don’t have worry about the terminal being “Samsung Pay ready.” Just tap your phone where you’d normally swipe and the funds will be taken out of the card of your choice. Here’s how to set it all up:
- Open the Samsung Pay app
- Set up an account
- Tap USE FINGERPRINT to add security, or use a PIN
- Add a supported credit/debit card
Ultimate Gaming Experience

Game Tools is a set of advanced options for use while playing games on the Galaxy Note 8. If you do a lot of mobile gaming, you will want to check out the Game Tools.
- Open a game
- If this is the first time, you’ll be asked to enable Game Tools
- The bottom right button lock and dim the screen, so you can’t accidentally touch it
- The bottom left button brings up more tools
- Full-screen mode
- No alerts during game
- Hard press button lock
- Edge touch lock
- Game Tools also allows you to record your gameplay
Turn the Note 8 up to 11

The Galaxy Note 8 has built-in “Performance modes” that allow you to optimize the performance to best fit your usage.
- Go to Settings > Device maintenance
- Select Performance mode
- Performance mode has 4 modes:
- Optimized – Balance battery and screen resolution
- Game – Makes games run more smoothly
- Entertainment – High-quality sound and enhanced images
- High performance – maximum settings for everything
- Tap one of the modes
Make sure your battery lasts all day and night

Like a lot of devices these days, the Galaxy Note 8 has its own battery saver mode to keep your device sipping power. There are actually a few modes to keep your phone juiced up and while you shouldn’t be using any of these modes all the time, they could come in handy when you know you’re going to be away from the outlet for an unusually long length of time.
- Go to Settings > Device maintenance
- Tap Battery
- Choose a battery saver mode:
- Mid – decreases brightness, limits performance, reduces screen resolution
- Max – Limits apps, decreases brightness, limits performance, reduces screen resolution
- Tap Apply
Keep the display on while you’re reading

Samsung’s “Smart Stay” feature has been around for years now, and it’s an incredibly convenient way to keep your display from going dark while you’re looking at it. Whether you’re reading a web page, book, or anything else, you can still find the feature buried inside the Settings. It’s worth noting that the feature works best in well-lit conditions.
- Go to Settings > Advanced features
- Toggle on Smart stay
Quickly switch between front and rear cameras
When you’re trying to capture images quickly, you’ll need to know how to rapidly switch between the front-facing and rear-facing camera lenses. As with the case with many other Android devices, you can quickly switch between the front and rear-facing cameras by simply swiping either up or down on the viewfinder.
Of course, if you aren’t in as much of a rush, there’s a button in the top left-hand corner of the camera app which will switch the lenses for you.
Use the entire display as a Viewfinder

What’s the point in having a beautiful 6.3-inch display if you can’t take full advantage of it when taking pictures? Well, Samsung has included the ability to turn the display into a full-screen viewfinder, and it’s rather easy to do so.
- Open the Camera app
- Tap the Strech Display icon at the top of the display
Now, if you plan on using this on a regular basis, you’ll need to press this button every time you want to shoot pictures and videos using all of the display.
Use both Galaxy Note 8 camera lenses

For the first time in a Samsung device, we now have dual-cameras. This is a trend that has been making its way to more devices and the Galaxy Note 8 is now joining the fun. The primary sensor is a wide-angle lens, but there is a telephoto secondary lens which allows you to take “Live Focus” images. This secondary lens acts a 2X optical zoom, and it’s really easy to activate this.
Simply open the Camera app and select “Live Focus” which is placed directly above the shutter button. When selected you may be prompted to stand at least 4 feet away from the subject, in order to get the optimal effect. Once your distance is corrected, you can use the slider on the bottom of the viewfinder to adjust the bokeh effect around the subject in real-time.
Once the image has been taken, you can then head into the Gallery application and adjust the bokeh effect with ease, giving you the opportunity to make the subject of your image really pop.
Spruce up those random pictures

One of the most popular features of apps like Snapchat and Instagram are the various filters that you can use to make funny videos or pictures. These can add different masks to yourself or your friends, practically ensuring a laugh from whomever you are sending the pictures to.
Well, Samsung decided to build some fun filters directly into the camera app on the Note 8, and these can be accessed by tapping the Stickers button in the camera application. From there, you’ll be able to pick some various funny filters, or even some other overlays such as “Have a Nice Day” or “Happy Anniversary” to really drive the point home and let someone know you care.
There is also the ability to download more stickers and you can do so by either tapping the “+” button in the Stickers section, or by heading over to the Galaxy Apps store.
Shoot the crispiest videos

By default, the Galaxy Note 8 Camera app shoots video in 1080p 30fps. While that may be fine for the vast majority of folks, the camera is more than capable of shooting in UHD. The quality is stunning and it’s possible to grab screenshots from these videos that rival photos taken with other devices.
To switch over to 4K video recording, just follow these steps:
- Open the Camera app
- Tap on the settings button (gear icon)
- Select Video size
- Choose UHD 3840×2160
Keep in mind that the following features can’t be used while recording in UHD, QHD, or FHD (60fps):
- HDR (rich tone)
- Video effects
- Tracking AF
Take pictures in both RAW and JPEG
It’s possible to save a compressed JPEG and RAW copy of each picture you take while in Pro mode. To enable this feature, just follow these steps:
- Open the Camera app
- Tap on the settings button (gear icon)
- Tap on Picture size
- Enable Save RAW and JPEG files
Motion Photos

The Galaxy Note 8 has the ability to capture photos with short video clips attached to them. They’re called Motion Photos and they’re Samsung’s equivalent to Live Photos on the iPhone.
If you try to share Motion Photos — whether inside messaging or social apps — they’ll only appear as a standard still photo (JPG). But if you want to extract the video file from Motion Photos and share it, here’s how:
- Enable Motion photos in your Camera app settings
- Take a Motion photo by pressing the shutter button (same as a regular photo)
- Open the Gallery app and open/view your Motion Photo
- Tap on the Play Motion Photo button to begin playing the attached video clip
- While the video clip is playing, tap anywhere on screen to pause it
- Tap on the 3-dot menu in the upper right corner
- Select “Save video“
The video will then be placed next to the photo it was extracted from and you can view/share it from inside your Gallery app.
Automatically save Photos to SD Card

While the Galaxy Note 8 comes equipped with 64GB of storage, we’ve already mentioned that there is a microSD card slot for you expand your storage up to 256GB. This makes life easy for those who take a lot of pictures and videos, as you can save that content to the microSD card, leaving your internal storage untouched. Here’s how you can change the default save location:
- Open Camera
- Tap the Gear icon in the top right-hand corner
- Scroll down and select Storage Location
- Select SD card
Ultimate Desktop Experience

The Galaxy Note 8 has the ability to transform into a full desktop interface, but you’ll need a special accessory called Samsung DeX to activate it.
Once inserted into the dock, Dex outfits the Galaxy Note 8 with full-sized USB ports to connect a keyboard and mouse, along with HMDI out to display to a monitor. Once hooked up, you will have access to all your normal apps and can review documents or check your notifications from the comfort of a desktop interface.
If it sounds like something you’d be interested in, you can find Samsung DeX via the Amazon link below where it’s currently priced at $149.99.
Write notes on lock screen

Since the Galaxy Note 8 includes its signature S Pen, there will definitely be an opportunity to jot down a quick note for future reference. Thankfully, Samsung has included the ability to write notes on the lock screen, and you can even pin the note to your display so it’s there until you’re ready for it.
In order to do so, ensure that your display is off, then simply unsheath the S Pen and then begin writing away. Samsung claims that you can take up to 100 lock screen notes, and these will be saved in the Samsung Notes application for future reference.
Keep your S Pen shortcuts a tap away
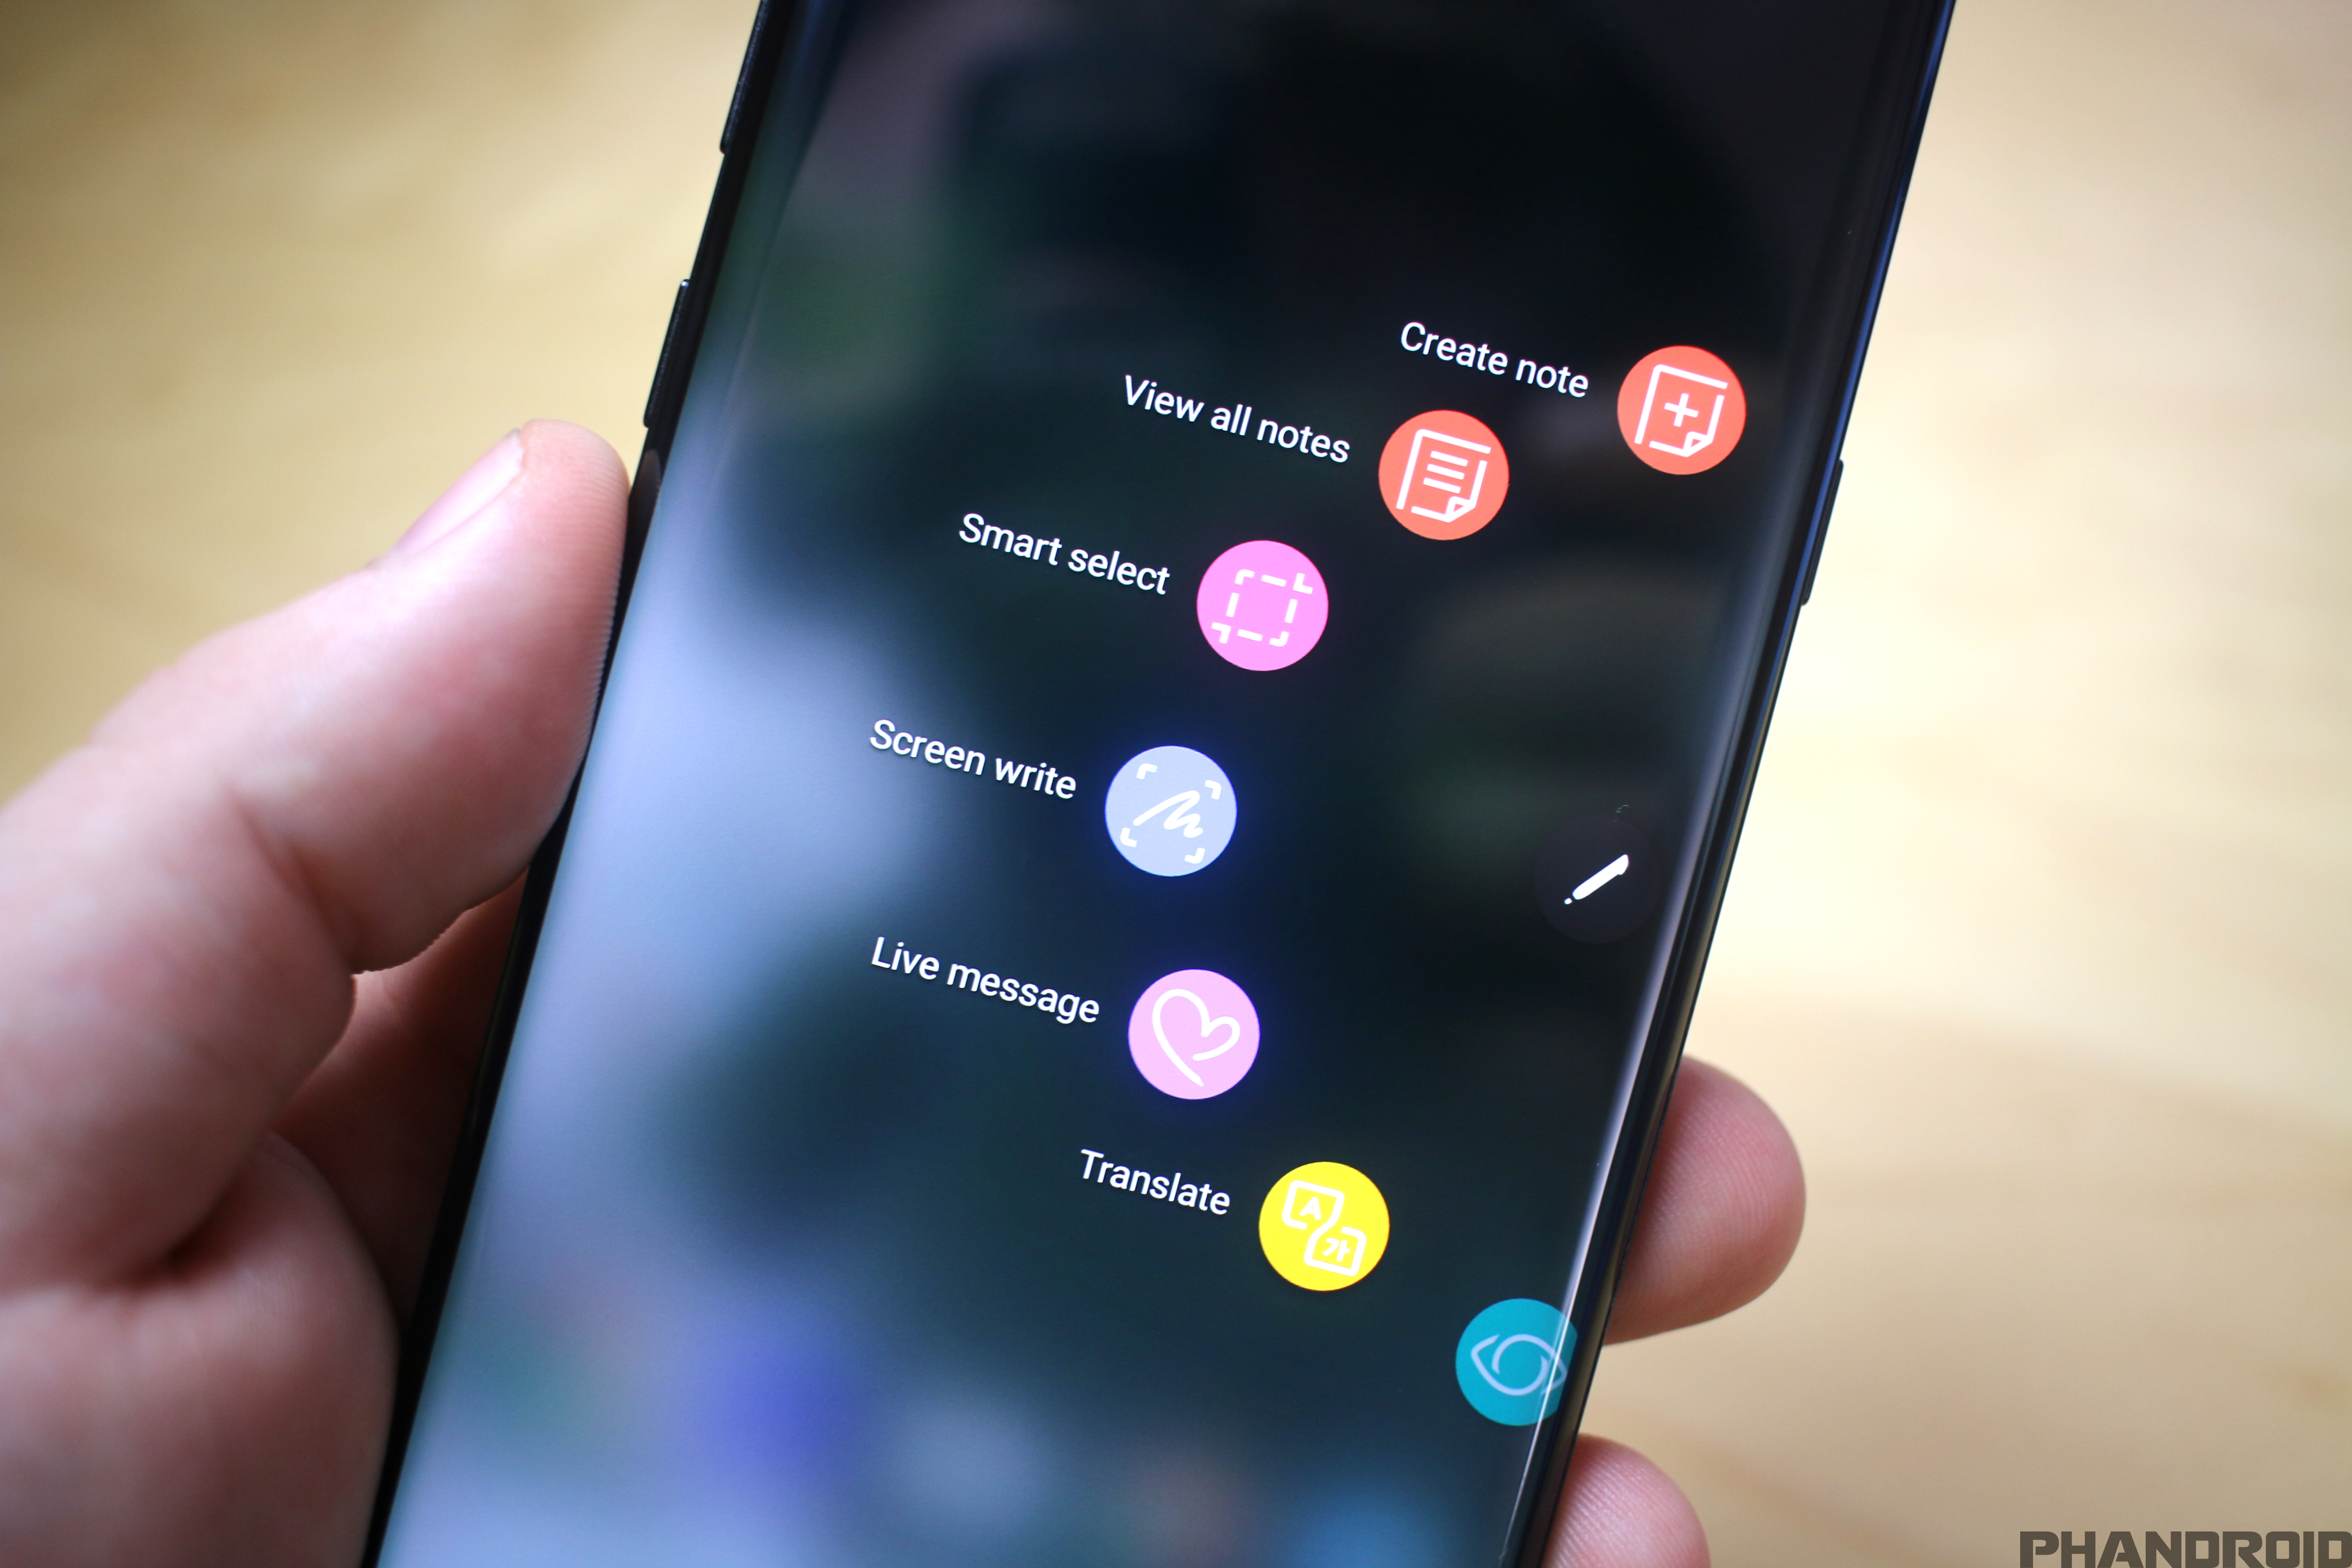
Air Command is the hub for the S Pen when you’re using your Galaxy Note 8. This control center has numerous shortcuts, including basic ones such as Create Note, Smart Select, Screen Write, Live Message and more.
This is a rotating carousel of shortcuts, and you can add more shortcuts by tapping the “+” button, and you can even add your favorite apps to Air Command if you so choose to.
Zoom in with the S Pen

For those who have a difficult time seeing things, Samsung has included a zoom option when using the S Pen. In order to activate this, take out the S Pen, open Air Command, then select “Magnify“.
Once enabled, you will see a square on your display, allowing you to easily zoom in on whatever content which is being displayed on your screen.
Get a preview without opening anything

Since the Galaxy Note 8 features an amazing camera setup, you’ll be taking loads and loads of pictures. However, when trying to go back and view these images, it can be a bit cumbersome to find the exact image you’re looking for.
With the help of the S Pen, you can easily preview any images on your gallery, before deciding whether you have found the correct one and are ready to get into the image editing process.
Make sure your S Pen is still with you

From time to time, there’s a chance that you’ll accidentally leave your S Pen behind. Now, you can get a replacement S Pen from Samsung, but it’s unlikely that you’re going to want to spend $50 on one.
This is especially true considering the steps that Samsung has taken to help ensure that your S Pen is never left behind. There’s actually an alarm that can be activated which will go off if you leave your S Pen behind. Here are the steps to activate the S Pen Alarm:
- Open Settings
- Select Advanced Features
- Select S Pen
- Toggle Alarm
Translate languages with ease
![]()
One of the coolest features introduced with the Galaxy Note 7 was the ability for the S Pen to easily translate any text on your device, which would definitely come in handy if you were traveling abroad. The Galaxy Note 8 also includes this functionality, and you can easily start translating by unsheathing your S Pen, tapping Translate in Air Command, and hovering the S Pen above the text that you want to translate.
Live Messages

One of the newest features to debut on the Galaxy Note 8 is something called Live Messages. Using the S Pen, users can draw or write out a message and send the entire animation as a GIF to a friend or loved one.
To activate Live Messages, it’s pretty straightforward. Just take the S Pen out from the phone and tap the grey pen icon that pops up.
From there select Live Messages and begin drawing on the blank area to record the animation. You only have a set amount of time and you’ll see a progress bar filling up the more you draw.
You can change the pen tips, thickness, and color by tapping the options on the upper left. You can also change the background color or even draw on top of a photo by tapping on BACKGROUND button. There you’ll be presented with various color options and the most recent photos saved to your device.
Because file sizes can also get pretty big (depending on how long it takes you to draw the message), you may want to consider changing the size from high quality (600×600) to standard quality (450×450).
Tap Done and the animation will begin processing. Once it hits 100% you can then share the animation to any app you like or tap outside the box to skip this step where the Live Message will automatically be saved to your phone and viewable inside the Gallery app as a GIF.
Keep an app easily accessible

There are so many different functionalities built into the Galaxy Note 8 and its S Pen to help make sure that you’re being as productive as possible. Another such feature is called “Glance“. This can be found in the Air Command menu, and will place whatever app you’re currently looking at in the bottom right-hand corner of the display, while you look at another application.
In order to bring up the minimized application, simply hover the S Pen over the box in the bottom of the display, and it will reappear, allowing you to continue interacting if need be. Furthermore, when you need to switch back, just move the S Pen away from the display and the app will become minimized again. To close the “Glance” of an app, just hold and drag the app to the trash can at the top of the screen.
Get rid of the worn out S Pen tips
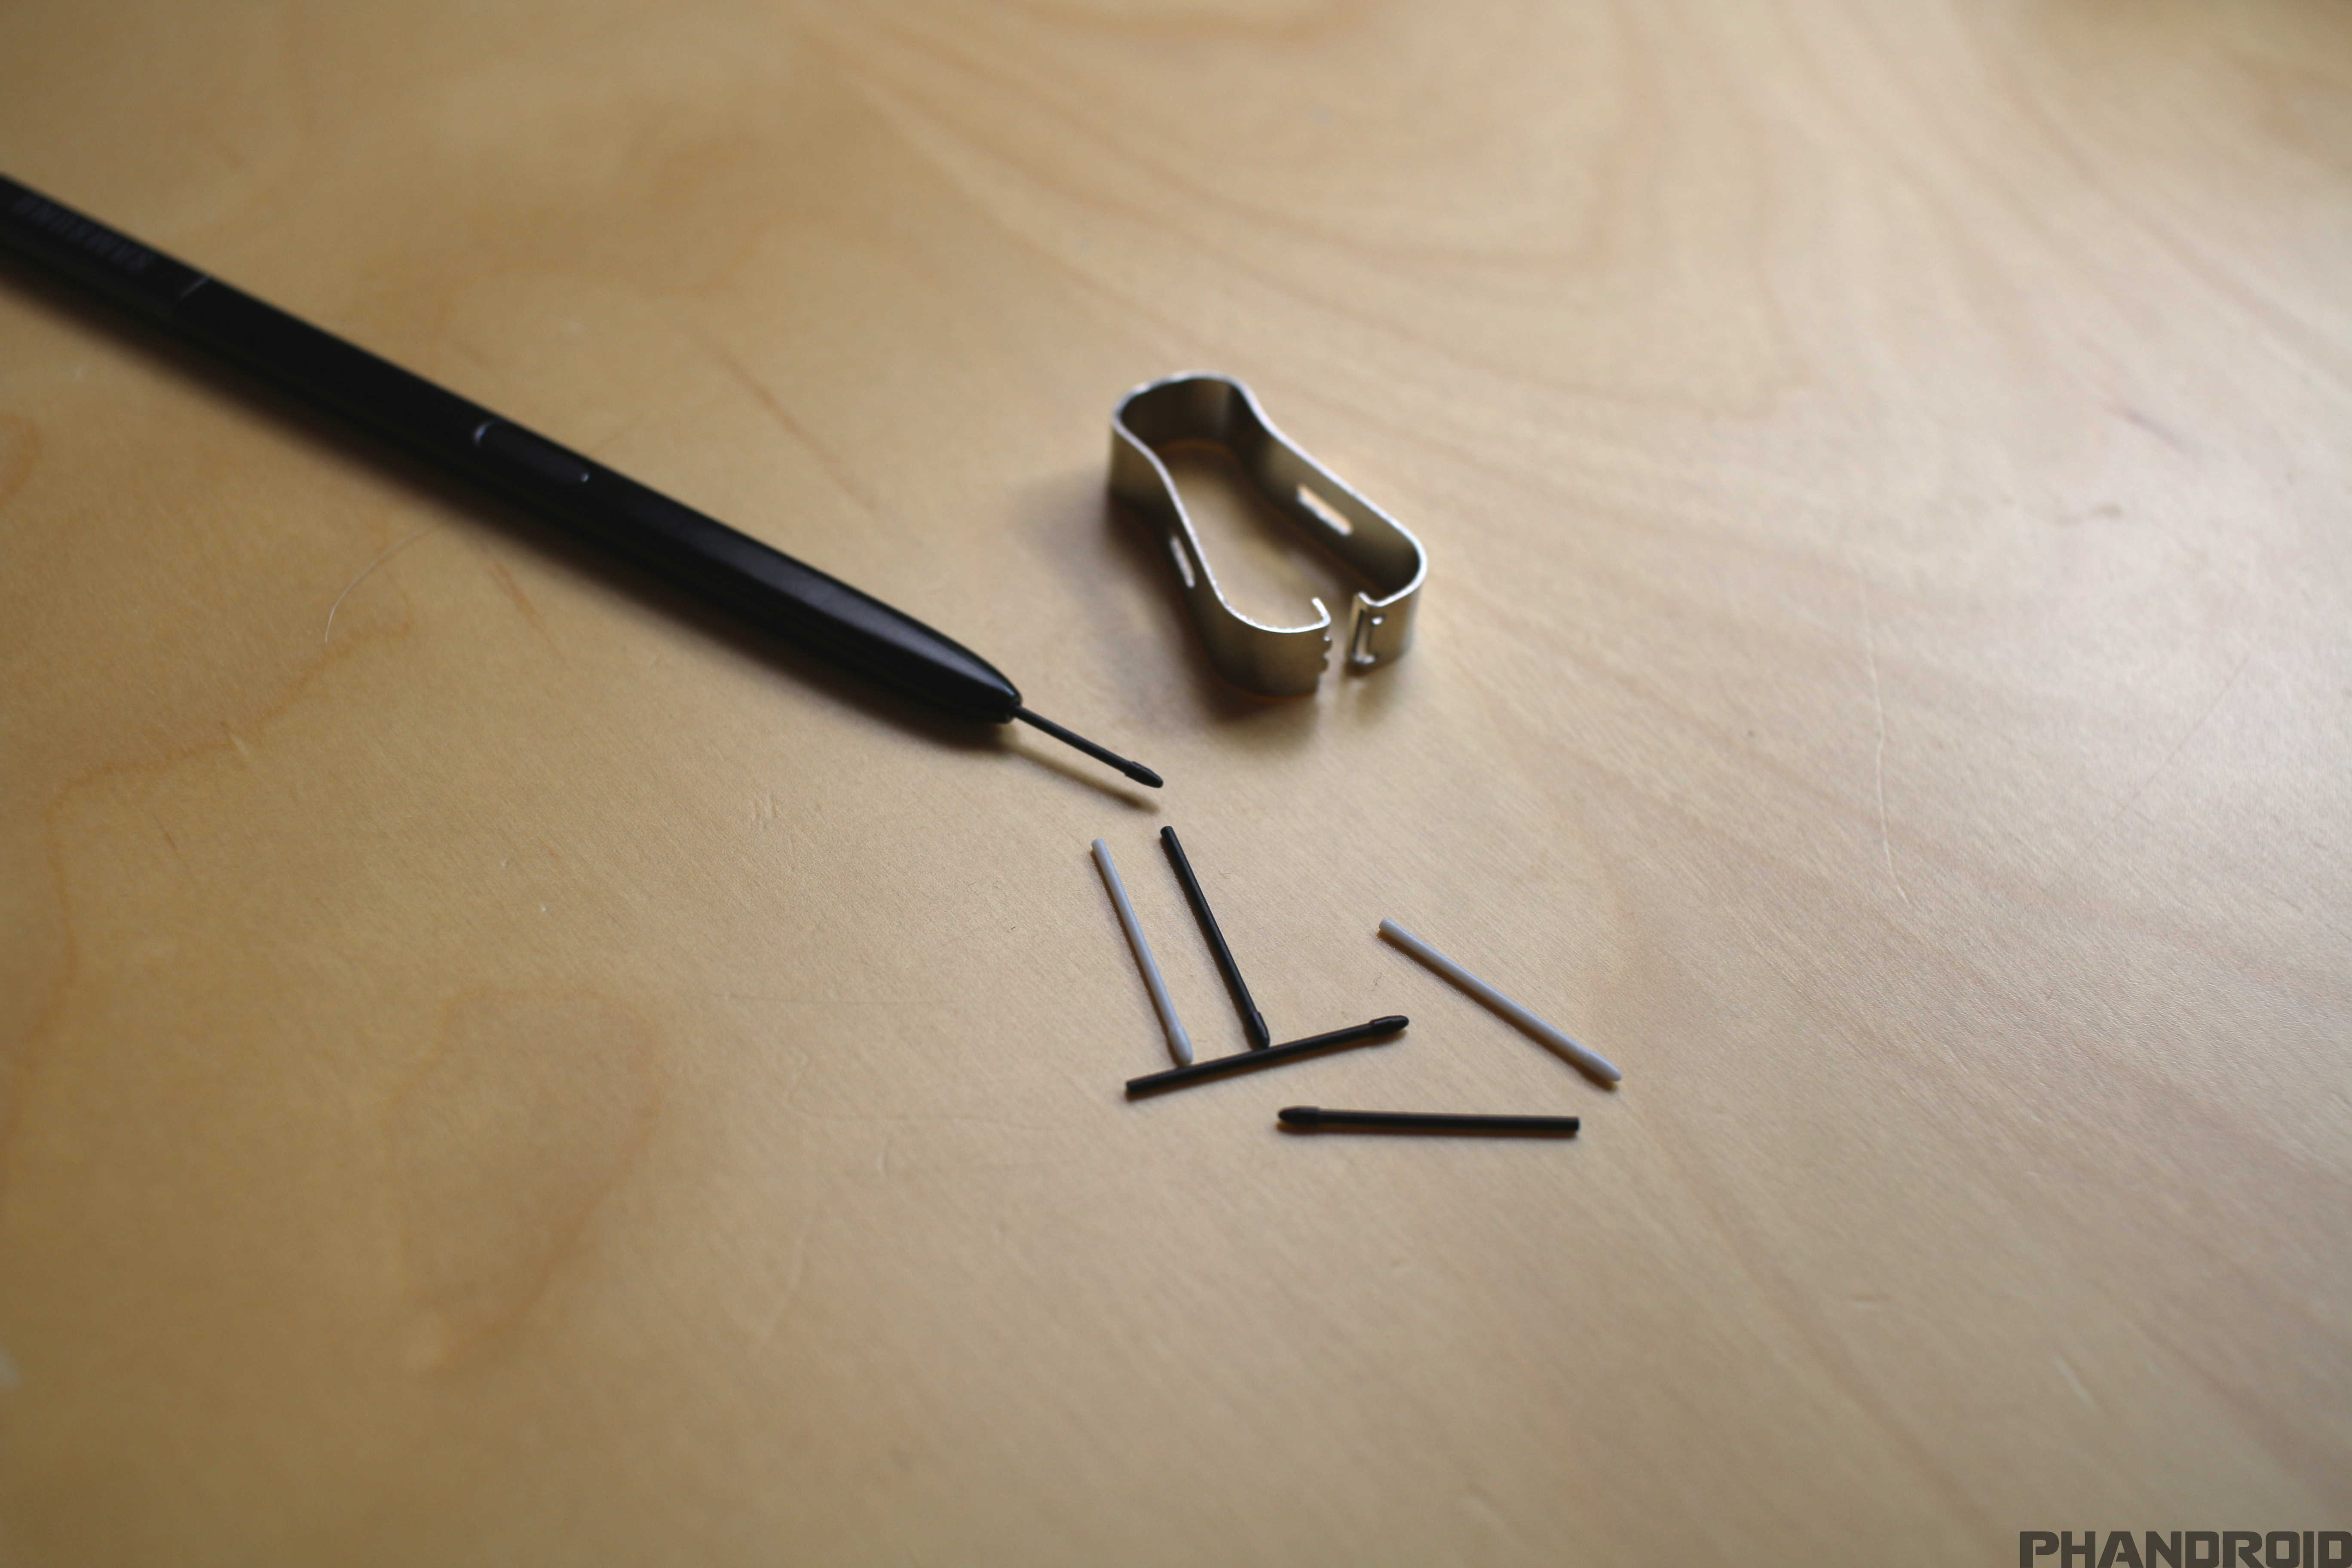
If you’re using the S Pen on a regular basis, chances are that you’ll end up wearing out the tip eventually and will need to replace the tip. In every box, Samsung includes a few replacement tips, along with the tip removal tool.
Removing the old tip is rather easy, as you only need to line up the clamp from the removal tool with the tip, and pull it out. Once the old one is out, just select which tip you want to replace it with, and insert it into the end of the S Pen.
Best apps and Games

While the Galaxy Note 8 is absolutely amazing, it’s not much without some great apps and games. We’ve compiled tons of helpful guides for finding the best apps and games in the Play Store. Before you dive in and rummage around, you’ll want to check out these lists first.
- 100 Best Android Apps of 2017
- Best Apps of the Month
- Best Games of the Month
- Weekly Top 5 Apps & Games
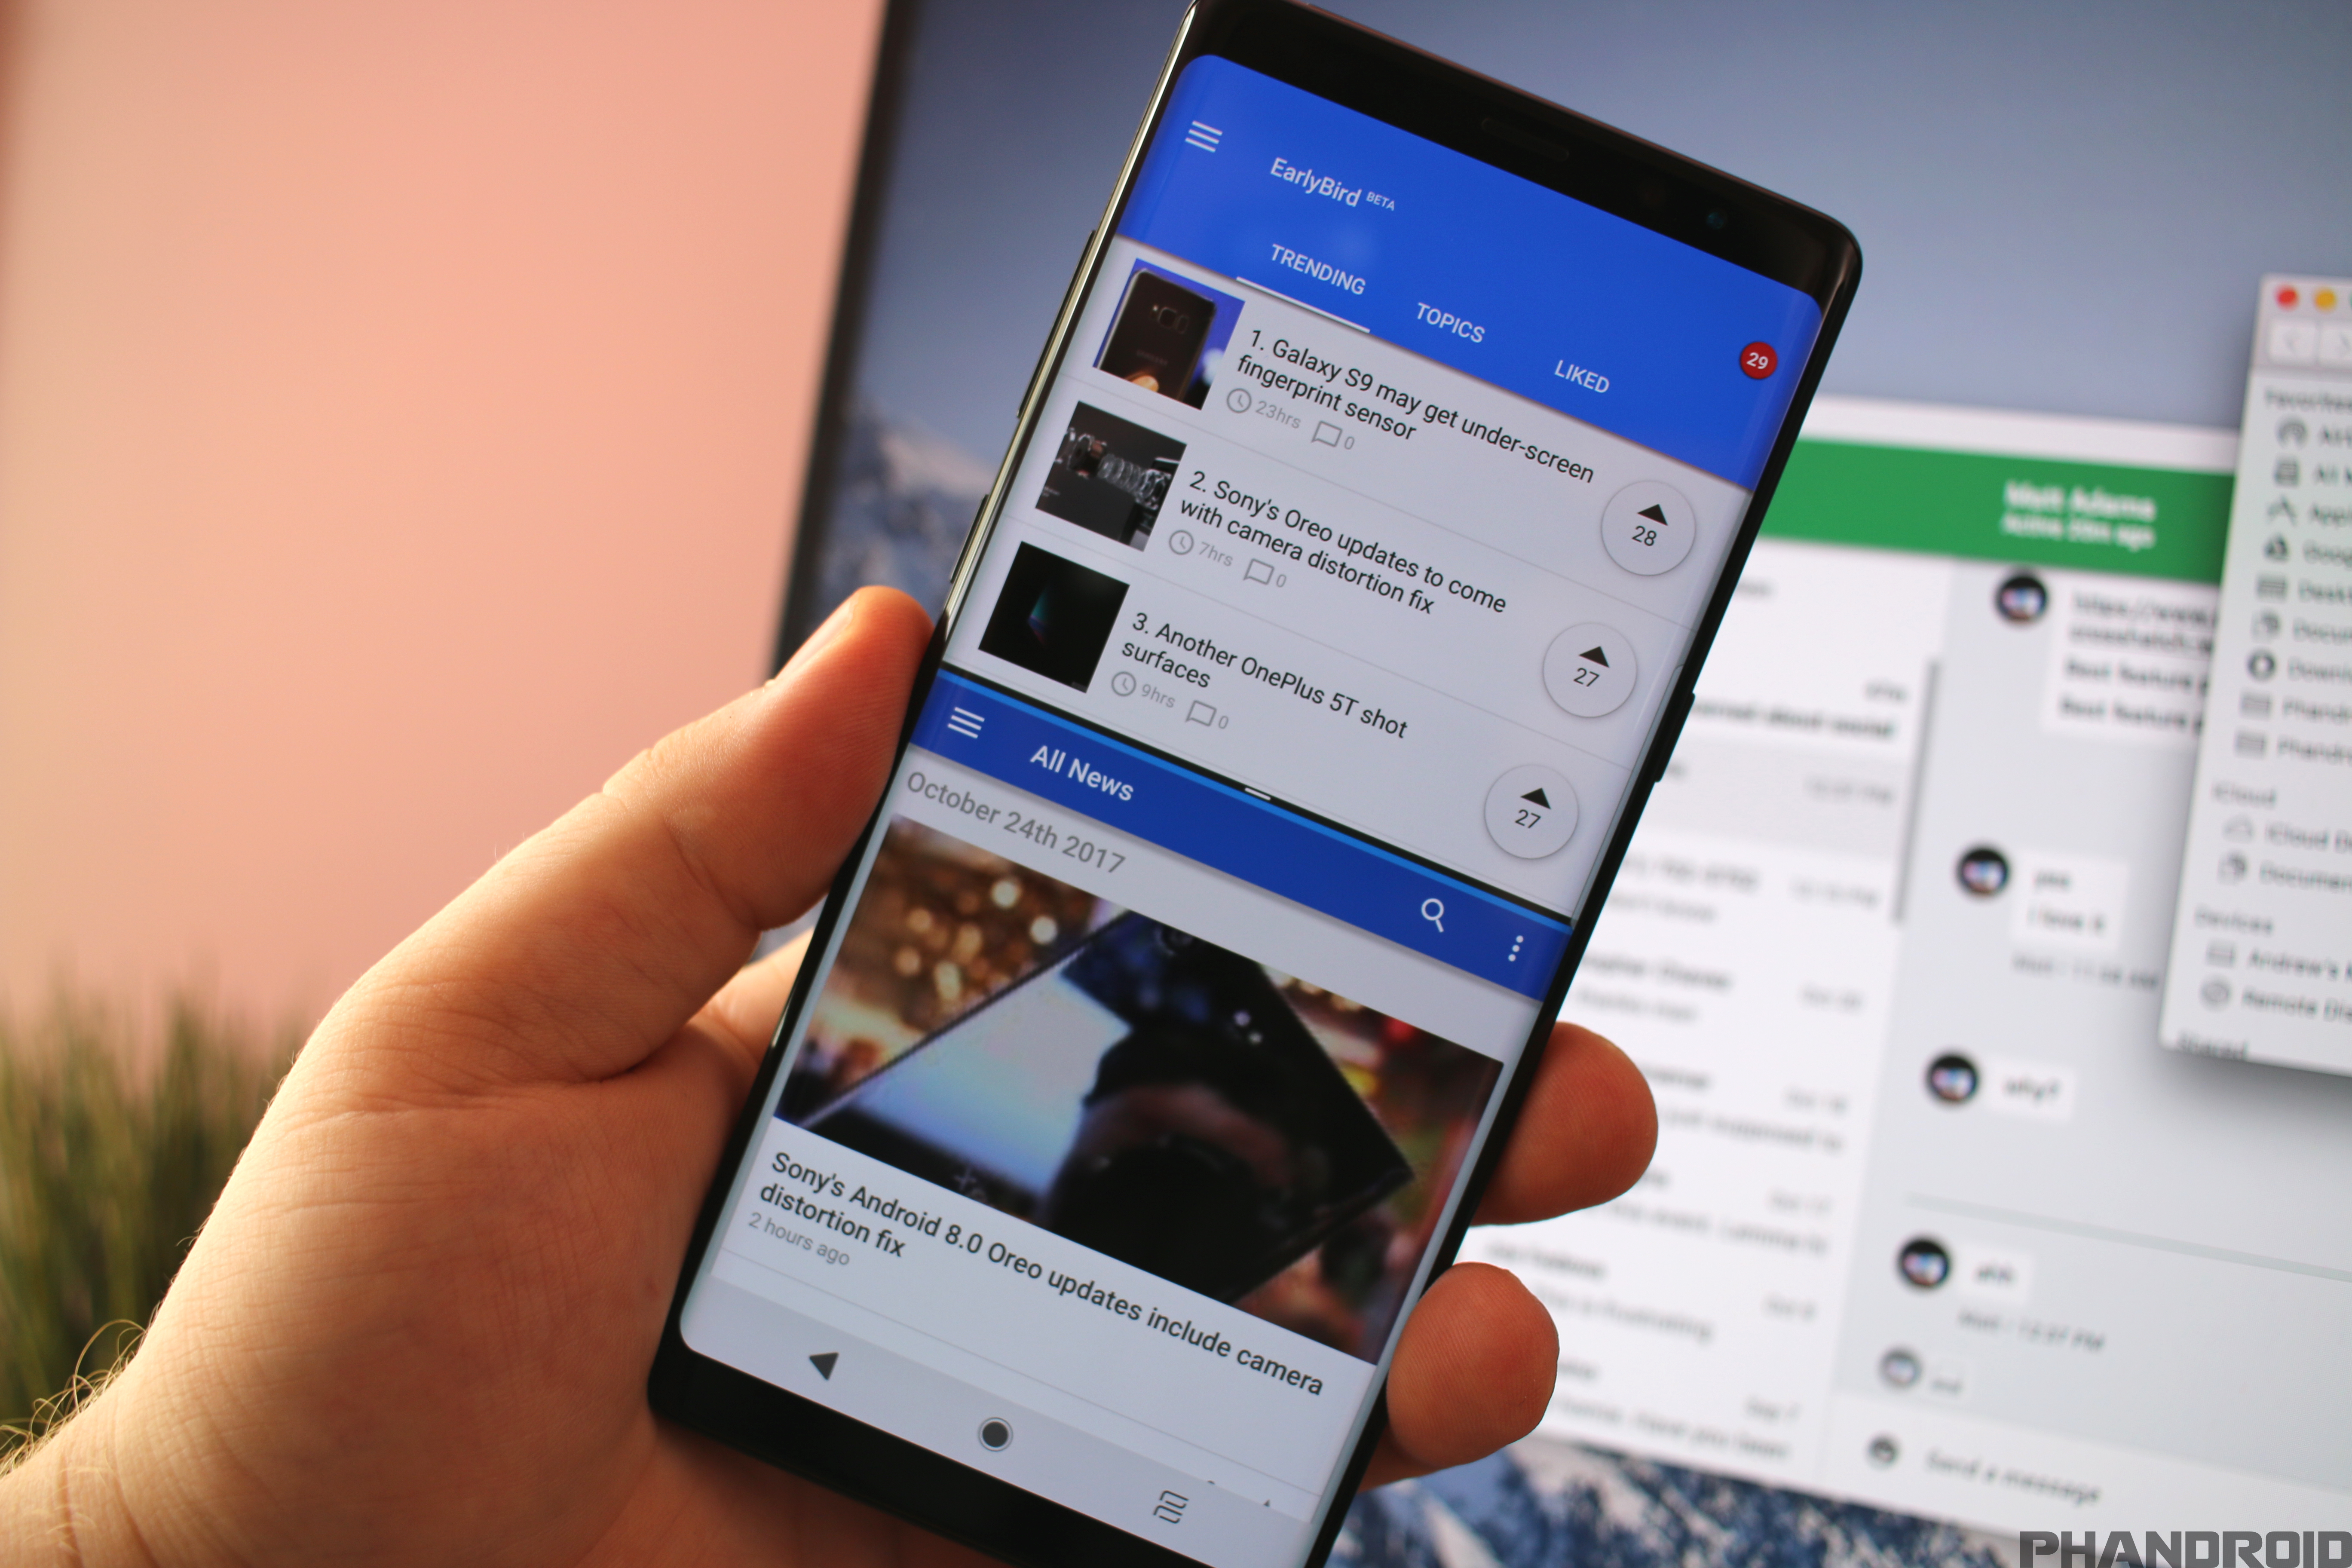
- EarlyBird – News for Android
- Best Android Apps for learning languages
- Best Android Games for 2 Players
Note 8 Forums

These tips will get your feet wet, but this is only the beginning of what the Galaxy Note 8 can do. For even more content, we’ve got the Samsung Galaxy Note 8 Forum at AndroidForums.com! All you have to do is download the Forums app and you’ll automatically be added to the correct forum. You’ll find more helpful tips and other users like you. It’s easy to ask for help and get answers. Here are a few threads to get you started:


Comments