

Android O was surprisingly announced today. Along with a plethora of new features, Google has also released factory images for the developer preview. The easier to install beta release won’t be available until sometime in May. If you’ve got a craving for some Oreo/Oatmeal Cream Pie/Orangesicle/O-whatever, you can install the factory images on the Pixel and Nexus devices.
Prerequisites
- Common understanding and experience using tools that are provided with the Android SDK such as Fastboot and ADB.
- Fastboot and ADB installed on your system and PATH variables updated accordingly.
- Understand that this will wipe all of your device data and that you will first need to backup any files, apps, etc that you do not want to lose!
- You will also obviously need a Pixel, Pixel XL, Nexus 6P, Nexus 5X, Pixel C, or Nexus Player. Do not try any images on devices they are not intended for as it will cause issues and not work!
Step 1 – Unlock your bootloader in Developer options
Please continue to the next step if you already have your bootloader unlocked. If not, or you forget whether or not it’s unlocked, I will walk you through the process.
Enable OEM unlocking (aka unlock your bootloader)
- Go into Settings -> Developer options on your device.
If you do not see Developer options listed in this list, please click on About phone and keep tapping on Build number until you see “You are now a developer”. What this means is you now have a Developer options in your main Settings list. Please go to Settings -> Developer options now. - Once you are in Developer options, look for OEM unlocking. This is a simple switch or checkbox that you need to enable. It will prompt you to Allow OEM unlocking and give you a warning message. Please click the enable to accept and continue.
Step 2 – Download your device specific image
Below are direct links to download the Android M preview images. Please make sure you download the correct one to avoid any major issues.
Step 3 – Decompress the image file
All of the necessary image files that you will need are located in this “zip” compressed file. Extract the zip file and you should see these files:
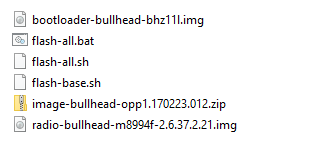
Now extract the zip file inside that folder. You should see these files inside:

Please Note
Depending on which device you are flashing, you may see slightly different files.
Step 4 – Reboot bootloader and flash
Assuming that you have fastboot and adb already set up and ready to use, just follow the commands below in order.
adb reboot bootloader
This will restart your phone into the bootloader mode. This will only work if your phone is connected and you have USB debugging turned on.
fastboot oem unlock
If your phone is already OEM Unlocked, you would not have to do this, but it wouldn’t hurt if you are unsure.
bash flash-all.sh
This will run all of the fastboot commands needed for the complete image flash. If you are using Windows, rather than a bash script you will use the flash-all.bat (batch) file. One common issue of this not working is that you do not have fastboot setup properly and is not set as an environment variable (a variable that works system wide).
For Windows users
There are reports from some Windows users that the flash-all.bat fails. It seems that it’s a bug with the fastboot.exe and how it inefficiently allocates memory. Some users say to try a different usb port or different usb cable, which they claim doing so solved their issues. If this works for you, please let us know in the comments below. Otherwise, please follow the workaround below that KingofPing has provided that will most likely solve your issues. What this does is break down each step manually that the batch file should have automatically done for you. (if you open the batch file in a text editor, you will see these same commands)
Make sure that if you have an extra zip file in your directory that you extract it and place it’s contents in your working directory.
After flash-all.bat errors out, please follow these instructions:
—Don’t “press any key” – that will close the window – just hit Ctrl-C.—
fastboot flash boot boot.img
fastboot flash cache cache.img
fastboot flash recovery recovery.img
fastboot flash system system.img
fastboot flash userdata userdata.img
That’s it!
Once the scripts finish it will do a final reboot and the only thing left is to complete the normal Android setup wizards and enjoy. If you have any issues feel free to comment and we will help you out as needed!


Comments