
The Pixel and Pixel XL are finally here. These two devices are very exciting for the Android community and Google at large. Previous Nexus devices were pretty bare-bone compared to other Android flagships, but now Google is throwing in a lot of special features. We’ll show you all the tips and tricks you should know to become a Pixel master.
How to take a screenshot on the Pixel
![]()
Let’s start with something simple. Taking a screenshot is something people don’t think about until they need to do it. The Pixel uses the same technique that you’ll find on most devices.
- Visit the screen you want to capture
- Hold down the power button and volume down button
- You’ll hear a shutter sound and the screenshot will be added to your notification bar
- From there you can Share or Delete the screenshot
Get content from your old phone
![]()
Getting a new phone is exciting, but going through the set-up process can be a pain. Thankfully, Google has built in some tools that make it easy to migrate from an Android or iOS device. The new “Quick Switch Adapter” accessory makes it easy to do if you’re coming from Android 5.0+ or iOS 8+.
- Android devices can transfer apps, app data, contacts, settings, Google accounts, music, photos, and SMS.
- iOS devices can transfer iCloud events, contacts, iMessage/SMS, music, photos, and videos.
Important note: If you are switching from an iPhone, make sure to turn off iMessage before you remove the SIM card. If you skip this step you may not get messages.
To use the adapter, you’ll need your old device and the USB cable from your old device.
- Plug the old USB cable into the adapter
- Plug the adapter into the Pixel
- Instructions will pop up on the screen
- Follow the steps to move your stuff
Use your fingerprint to unlock the phone
![]()
The Pixel has one of the best fingerprint scanners on the market right now. It’s fast and super reliable. A lot of people don’t use any lock screen security because it’s a hassle to type in passwords and draw patterns. A good fingerprint scanner is secure and hassle-free. You should definitely set it up.
- Go to Settings > Security > Pixel Imprint
- If you haven’t already set up a lock screen pattern, PIN, or password, you’ll be asked to set one up
- Tap Add fingerprint
- Choose which finger to use, touch the scanner until it vibrates, then lift your finger
- Repeatedly touch the scanner until the fingerprint has been successfully recorded
- After you’ve successfully recorded your fingerprint, tap Add Another or Done
Swipe the fingerprint sensor for notifications
![]()
Android 7.1 Nougat adds some extra features for the fingerprint sensor. It can do more than just scan your finger and unlock the phone. You can also use it to open the notification shade and Quick Settings.
- Go to Settings > Moves to enable
- Swipe down across the fingerprint sensor to pull down the shade
- Swipe down again to show the Quick Settings
- Swipe up to close the shade
Use your fingerprint to buy apps and games
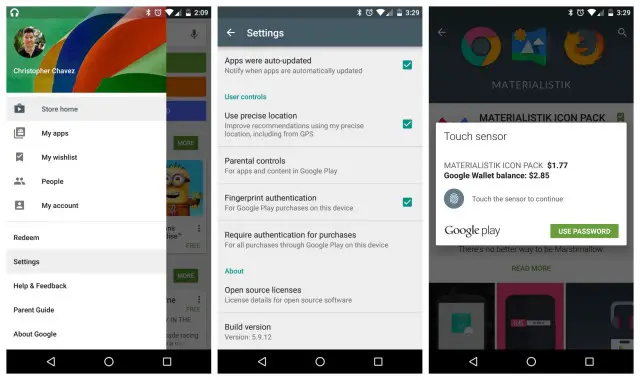
Entering passwords can be annoying. The Play Store asks for your password every time you buy an app or game (which is a good thing). Thankfully, you can use your finger as the password. Instead of typing in a long string of characters, you can simply touch the fingerprint sensor.
- Open the Google Play app
- Slide out the navigation drawer and select Settings
- Scroll down and check the box for Fingerprint authentication
The first time you make a purchase on the Play Store it will still ask for your password, but everything after that can be bought using your fingerprint. You can also skip all that and simply select the option to “Use fingerprint for future purchases” when buying something.
Use smart lock to bypass the lock screen in trusted situations
![]()
Even with a fast and reliable fingerprint scanner, you might feel like you’re wasting time, especially when you’re in a trusted situation. Why should you have to worry about lock screen security in your own home? Smart Lock allows you to lock the Pixel only when the situation requires it. Go to Settings > Security > Smart Lock (enter password/PIN/pattern). From there you’ll have a few options:
- On-body detection – device will stay unlocked while it’s on you.
- Trusted places – keep your phone unlocked when you arrive in specific places (home, work, etc.).
- Trusted devices – keep your phone unlocked when connected to specific devices (speaker, car, smartwatch) via Bluetooth.
- Trusted face – phone will automatically unlock when it recognizes your face after turning the screen on.
- Trusted voice – unlock the phone using your voice.
Be prepared for a lost or stolen phone
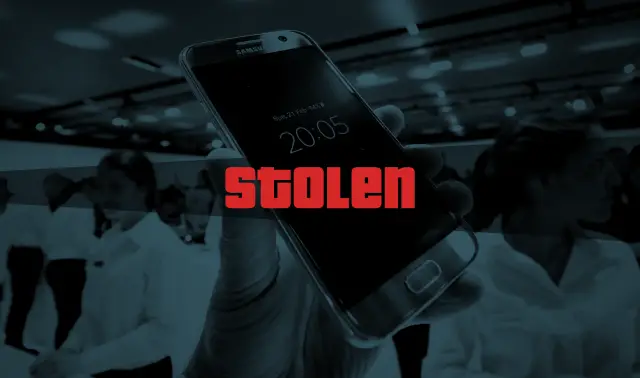
There’s nothing worse than your shiny, new, expensive phone getting lost or stolen. In the early days of smartphones, there wasn’t a lot you could do if your phone went missing. Thankfully, Google now includes something called Android Device Manager on every device. There’s no setup required, but you should know how to use it if your phone has been misplaced.
- Go to google.com/android/devicemanager
- Select your phone from the drop-down menu
- You’ll see the device on a map and a few options for finding it or erasing the contents
Read More: How to find a lost or stolen phone
Set up emergency info to show on the lock screen
![]()
We all have emergency contacts in our phones. In theory, these are the contacts that someone can call if you’re in trouble. The problem is most people use some form of lock screen security, and even if they don’t, it might not be easy for someone to navigate an unfamiliar phone. Android tries to solve this problem.
First, you can add emergency information about yourself in Settings > Users > Emergency information. Things like name, address, date of birth, blood type, allergies, etc. This is also where you can add contacts to be called in an emergency. Now, there will be an “Emergency” button on the lock screen. The button will open a phone dialer and allow the person to see your emergency info.
Introduce yourself to Google Assistant
![]()
Arguably the most important feature on the Pixel phones is Google Assistant. This is basically an upgraded version of Google Now with a lot more artificial intelligence and personality. Assistant has replaced Google Now on Tap as the default function when you long-press the home button. It’s a pretty powerful tool and something you will definitely want to use.
- There are two ways to access Assistant: long-press the home button or say “OK Google.”
- If you didn’t do the voice training during setup, you will be asked to do it the first time you use Assistant
Google Assistant uses a chat interface to promote conversation. It’s like talking to a person who has Google’s wealth of knowledge. To get started, try asking “what can you do?” Assistant will recite a few examples and display a scrollable list of categories like “sports” and “answers.” Tap any of these categories to hear examples of commands.
Do a quick search from the home screen
![]()
Another new feature of the home screen is the “G” tab in the top left corner. This tab has replaced the long-standing Google search bar, but it performs the exact same function. Tapping the “G” icon will jump straight to a Google search. You can also swipe right to reveal the full Google app and suggestions for you.
The date and weather is displayed on the opposite side of the screen. Tap the weather icon to open the Google weather web app and see the forecast for your current location. The “G” tab and weather/date are only present on the main home screen page, but they cannot be removed completely.
Take advantage of free unlimited cloud storage
![]()
If your phone is gone forever, you can easily recover your photos and videos. The easiest way to backup your photos and videos is to use a cloud storage app such as Google Drive. Coincidentally, the Pixel comes with unlimited cloud storage for photos and videos. It will automatically backup all of your photos and videos for you. On top of that, it will automatically clear photos or videos that have already been backed up when your phone is full.
- To configure this setting, go to Settings > Storage > Manage storage
- Choose how long to keep full quality original photos and videos on the device
Disable the LED notification light
![]()
The Pixel has a notification LED tucked inside the speaker grill on the top of the phone. Some people really like notification lights, but other people don’t. The good news is you can simply turn it off if it’s not your cup of tea.
- Go to Settings > Notifications
- Tap the gear icon in the corner
- Toggle off Pulse notification light
Enable battery saver mode to squeeze out more life
![]()
As with most Android devices these days, the Pixel comes with a built-in battery saver feature. It will trigger automatically when your phone drops down to 15%, but it can be manually enabled by navigating to Settings > Battery > Battery saver and toggling the switch at the top of the screen.
Adjust the automatic setting by tapping Turn on automatically and selecting Never, 5%, or 15%. You’ll know Battery saver is on when the status bar and navigation bar turn orange.
Read More: 16 tips to improve battery life on your Android phone
Use the included power adapter whenever possible
![]()
Although the Pixel doesn’t technically support Qualcomm’s Quick Charge technology, it does have its own fast charging capabilities. Google says you can get 7 hours of usage with just a 15-minute charge, but that’s only with the included wall charger, not some janky wall charger you found in the bargain bin.
The USB Type-C accessory landscape is sort of like the wild west right now. You have to be careful with the charging cables you use. Thankfully, an engineer at Google has compiled a list of recommended USB Type-C cables and chargers. Here are a few that you can buy and feel confident in your purchase.
- J5Create USB Type-C Cable – $24.95
- Google’s USB-C Cable – $25
- Blacksquid USB Type-C Cable – $12.95
- Cable Matters USB-C Cable – $21.99
- Plugable USB-C Cable – $15.95
How to find the app drawer
![]()
Google made the decision to get rid of the classic app drawer icon on the home screen. The app drawer is still there, but you’ll need to use a gesture to open it. The small arrow above the dock is the clue. Simply swipe up from the dock area to reveal the app drawer. It’s like pulling the drawer open from below.
Long-press on apps for shortcuts
![]()
Google has made app icons much more useful in Android 7.1 Nougat. Instead of simply being a way to open the app, icons can now contain “launcher shortcuts.” You can access these shortcuts by long-pressing on an app icon. Most Google apps already support these shortcuts. Here are a couple of examples to try out:
- Camera: Tale a selfie, Take a video
- Calendar: New event, New reminder
- Messenger: Recent conversations
Find yourself using a specific shortcut a lot? You can long press on a shortcut and drag it to the home screen. For example, you could add “New event” to the home screen and easily add events to your calendar.
Rotate wallpapers daily
![]()
The Pixel phones come with a lot of pre-loaded wallpapers that are organized into “collections.” These collections contain beautiful, newly-designed wallpapers. You might have a hard time choosing just one. A new feature allows you to choose a collection and rotate through the wallpapers daily.
- Long-press the home screen
- Tap Wallpapers
- Choose a collection
- Tap Daily wallpaper to turn on
Enable sRGB mode to tone down unnatural colors
![]()
The Pixel phones have AMOLED displays, which are notorious for having vibrant, saturated colors. A lot of people really like the way colors look on AMOLED displays, but some people don’t. If you prefer colors that are more muted and true-to-life, you should switch the sRGB picture mode.
- Go to Settings > Developer options
- Find Picture color mode and toggle it ON
Change the display size
![]()
You’re thinking “how is it possible to change the size of the screen?” Stick with me. In Settings > Display you’ll find Display size. Adjusting this will allow you to trick your phone into thinking the display is bigger or smaller. You can adjust the size from small to largest for drastically different looks.
This works by adjusting the display DPI (dots per inch). The largest setting mimics a 320dp display, which makes everything look a lot bigger. It’s the same reason why you can fit more icons on the home screen when you have a 2560×1440 display. There are more pixels to work with, so more things can be shown at once.
Crank up animations to speed up your phone
![]()
Every Android device comes with a bunch of secret settings. These settings are primarily for developers, but there’s one thing that is useful for everyone. If you’ve ever felt like animations are too slow and apps don’t move as fast as you’d like, this simple trick could speed up the Pixel dramatically.
- Go to Settings > About phone
- Tap on Build number until a message says you are now a developer
- Go to Settings > Developer options
- Tweak the animation scale for Window, Transition, and Animator duration. (We recommend .5x)
Enable the secret System UI Tuner
![]()
We already told you about the secret Developer Options menu, but that’s not the only place to find secret settings. There’s also something called the “System UI Tuner.” When unlocked, the System UI Tuner gives you the ability to tweak the status bar, do not disturb options, and notifications controls.
- Swipe down from the top of the screen twice to open the Quick Settings
- Long-press on the Settings gear icon until it spins and vibrates
- If successful, you will see a tiny wrench next to the gear
- Now there should be System UI Tuner listed in the Settings
Status bar – Show or hide common icons in the status bar, such as Bluetooth, WiFi, and more. If you have Bluetooth on all the time you might not want it taking up space in the status bar. You can even change how the time looks.
Do not disturb – Choose whether you want to see the Do not Disturb toggle when adjusting the volume.
Other – Enable a gesture for Split Screen mode. See more information about app notification level.
Customize the Quick Settings Tiles
![]()
Google finally added the ability to customize the Quick Settings tiles. You’ll see a new EDIT button in the bottom right corner when the Quick Settings panel is open. Tap this button to see all of the available tiles, which can now be made by developers. Simply drag and drop the tiles at your will. The Quick Settings can overflow onto a second panel if you have a lot.
Use multiple apps at once with Split Screen mode
![]()
One of the biggest additions to Android Nougat is Split Screen mode. Android devices from Samsung and LG have had this feature, but it’s never been in stock Android. Now, you can put two apps on the screen at once in a side-by-side view. There are two ways to jump into Split Screen mode.
- Open the first app you want to use in Split Screen
- Long press the Recent apps button
- The app will move to the top half of the screen
- Select from the Recent apps for the bottom half
or
- Open the Recent apps window
- Long-press on the title bar of the app you want to use in Split Screen
- Drag it to the top of the screen
- Select an app for the bottom half
Once you’re in Split Screen mode, you can drag the divider to resize the windows. Drag the divider all the way up or down to go back to full-screen mode.
Force all apps to use Split Screen mode
![]()
Split Screen mode is pretty awesome, but not all apps are compatible with it. You’ll see a message that says “App doesn’t support split screen.” We can go back into the secret Developer Options and make it so every app has to play nice with Split Screen mode.
- Go to Settings > Developer options
- Scroll all the way down to Force activities to be resizable
- Toggle it on and reboot your phone
You will still see a warning message that says “App may not work with split screen,” but most apps work completely fine.
Switch between recent apps with a double press
![]()
Another benefit of the Split Screen mode is the ability to quickly switch apps. You can switch to the most recently used app with only the Recent apps button. Tap the button once to see the list of recent apps. Tap it a second time to open the previously used app. Do a quick double-tap to instantly launch the previously used app. You can keep cycling through the current and previous app by double-tapping. This shortcut makes multitasking much easier.
Send GIFs from the keyboard
![]()
The default Google Keyboard has the ability to send GIFs in supporting apps. Google’s Messenger, Gmail, Docs, Allo, and Hangouts support this feature. Several other 3rd-party messaging apps will support GIF input soon. This makes it super easy to share your favorite GIFs without leaving the current app.
- Open a supporting app
- Start composing a message
- Press the emoji button
- Press the GIF button
- Browse categories or search for a specific GIF
- Select the GIF to use
Night Light makes the screen easier on your eyes
![]()
One of the negative effects of smartphones is the harsh, bright displays. This becomes very apparent when you’re in a dimly lit room. The blue light from displays can interrupt our natural circadian rhythms and make it hard to fall asleep. The Pixel phones have AMOLED displays, so the blue light isn’t as harsh as LCD, but it’s still noticeable. Night Light is a new feature that tints the display so it’s easier on your eyes.
- Go to Settings > Display > Night Light
- You can select Sunset to sunrise or create your own custom schedule
- Night Light can also be toggled on or off from the Quick Settings tile
- Open Quick Settings, tap the pencil icon, drag Night Light to the Quick Settings panel
Disable notifications on a schedule with Do Not Disturb
![]()
One of the best features to come to Android in the last few years is Do Not Disturb mode. Everyone has certain times when they don’t want to be disturbed by phone notifications. Do Not Disturb mode allows you to create a weekly schedule for these situations. The common example is to mute the phone every night. Here’s how to do it:
- Go to Settings > Sound
- Tap Do not disturb
- Tap Automatic rules
- Tap Add Rule
- Choose an event or time rule
- Name the rule
- Select the days, start time, and end time
- Tap Do not disturb to choose the notifications that can get through
Data Saver mode can…save data
![]()
Data Saver mode will allow users with limited data plans to get the most out of their device. When enabled in the Settings, the system will block background apps from using data and signal foreground apps to use less data. You can choose specific apps to always be able to use data in the background.
- Go to Settings > Data usage
- Tap Data saver
- Toggle the switch on
- Tap Unrestricted data access and choose apps from the list
Record videos in the highest quality possible
![]()
Are you one of those people that needs every video to be as “crispy” as possible? The Pixel can give you the crispiest videos by recording in 4K. It’s as simple as tapping a button. Unfortunately, finding something that can play 4K videos is not as easy (or cheap).
- Open the Camera
- Swipe from the left to open the menu
- Tap Settings
- Under Video, select Back camera video resolution
- Switch to UHD 4K
Use HDR+ AUTO for best results
![]()
The Pixel phones were given the highest score ever by DXO, beating the iPhone 7 and Samsung Galaxy S7. By default, the camera is in HDR+ AUTO mode. You might feel tempted to turn this off, but Google recommends leaving it on. This is the mode that DXO used in their testing. There’s almost zero shutter lag and the results look stunning.
For even better image quality, you can try HDR+ ON. There will be more shutter lag in this mode, but the results will be even better. For most situations, you’ll want to stay in AUTO mode, but HDR+ ON can be nice when you really want an exceptional photo. Toggle the HDR modes in the top corner of the camera screen.
Use Pro camera controls for even better results
![]()
The Google Camera doesn’t include different “modes” like you find on a lot of Android devices. Instead, there are Pro controls built right into the main interface. You just have to know how to use them.
- Focus: tap a region in the viewfinder to set focus there.
- Focus lock: long press on a region of the viewfinder to lock the focus on that setting. Tap again on the
viewfinder to release the lock. - Exposure Compensation: tap the viewfinder (especially on your subject) and then drag up or down
anywhere on the viewfinder. - White balance: Tap the color temperature icon at the top of the viewfinder and choose a preset. Warmer
tones are on the left, and cooler ones on the right.
Get the perfect shot with gestures
![]()
Timing is very important when it comes to getting the perfect shot. Google has included two gestures that will make it easier to open the camera quickly and take a photo.
- Press the power button twice to jump straight to the camera app.
- With the camera open, double twist the phone to switch between front and back cameras.
Give guests limited access to apps with Screen Pinning
![]()
A smartphone is full of personal information and sensitive content. This can make it difficult to let people use your phone without your supervision. Screen pinning allows you to lock the Pixel to use just one app. The user won’t be able to navigate out of the app you choose.
- Go to Settings > Security
- Scroll down to Screen pinning
- Toggle it on and toggle on Ask for unlock pattern before unpinning
To use:
- Open the Recent apps
- Pull up the most recent app and tap the pushpin icon in the bottom right corner of the preview
- To unpin the app, touch and hold the Back button
Download the best apps and games
![]()
As great as the Pixel is, it would be pretty boring without a bunch of great apps and games. Here at Phandroid, we are constantly trying to showcase the best apps and games. We’ve published numerous lists for a wide variety of apps and games. Before you dive into the Play Store and blindly look around, check out these lists.
Start here: 100 Best Android Apps of 2016
- EarlyBird – News for Android
- Weekly top 5 apps and games
- Best Android apps for college students
- 10 Best Android Dating Apps
- Best Android Apps for learning languages
- Best Android Apps for Kids
- Best Android Games for 2 Players
- Phan Favs – best apps selected by readers
Set up Android Pay to make mobile payments
![]()
Whether you hate pulling out your wallet and swiping your credit card, or you simply want a backup method of paying for things should you leave your wallet at home, Android Pay makes it easy to make purchases using nothing but your smartphone. The Pixel is capable of using Android Pay, but you have to set it up first.
- Open the Android Pay app on your phone
- Touch the + sign in the bottom-right corner
- Touch Add a credit or debit card
- If you already have linked cards, choose one or touch Add another card
- Use the camera to capture your card info or enter it manually
Keep in mind that Android Pay also works anywhere tap-to-pay or Apple Pay is accepted. You can find a full list of Android Pay supported banks here.
Read More: How to use Android Pay right now
Take control of app permissions
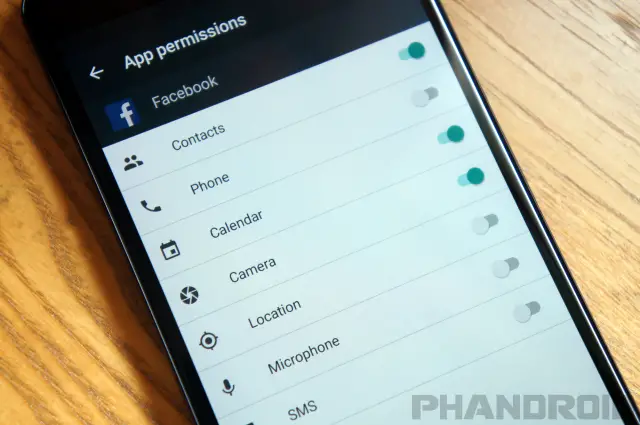
App permissions can be very annoying. Why does Twitter need to know my location? Why does Facebook need to access my microphone? If these are questions you’ve asked, you need to use Nougat’s powerful permissions. The nice thing is that apps are required to ask permission before performing a task. If Twitter wants to use your location it will pop-up and ask you.
It’s also possible to choose which permission you’d like to deny in bulk. The App Info page in the Settings has a section for permissions. You can simply unselect the things you don’t want an app to have permission to do. Go to Settings > Apps > select an app > Permissions.
Read More: How to enable or disable app permissions
How to factory reset the Pixel
![]()
A factory reset will erase everything from your Pixel and take it back to factory settings. You may want to do this if your phone is running poorly or you are selling the phone to someone else. Make sure to backup all important data before proceeding. Once again, this will erase everything.
- Go to Settings > Backup & reset
- Select Factory data reset
- Tap RESET PHONE
Join the Pixel & Pixel XL communities at AndroidForums.com!

Now that you know everything about the Pixel and Pixel XL, you can explore Android Forums. It’s the best place to get help, tips, tricks, support, suggestions, and share your insight with other users. You can share your experiences, find accessories, and much more. There are separate forums for the Pixel and Pixel XL.


Comments