
Prerequisites
- Common understanding and experience using tools that are provided with the Android SDK such as Fastboot and ADB.
- Fastboot and ADB installed on your system and PATH variables updated accordingly.
- Understand that this will wipe all of your device data and that you will first need to backup any files, apps, etc that you do not want to lose!
- You will also obviously need a Nexus 5, Nexus 6, Nexus 9 or Nexus Player. Do not try any images on devices they are not intended for as it will cause issues and not work!
Step 1 – Unlock your bootloader in Developer options
Please continue to the next step if you already have your bootloader unlocked. If not, or you forget whether or not it’s unlocked, I will walk you through the process.
Enable OEM unlocking (aka unlock your bootloader)
- Go into Settings -> Developer options on your device.
If you do not see Developer options listed in this list, please click on About phone and keep tapping on Build number until you see “You are now a developer”. What this means is you now have a Developer options in your main Settings list. Please go to Settings -> Developer options now. - Once you are in Developer options, look for OEM unlocking. This is a simple switch or checkbox that you need to enable. It will prompt you to Allow OEM unlocking and give you a warning message. Please click the enable to accept and continue.
Step 2 – Download your Nexus specific image
Below are direct links to download the Android M preview images. Please make sure you download the correct one to avoid any major issues.
- Nexus 5 (GSM/LTE)
- Nexus 6
- Nexus 9
- Nexus Player
Step 3 – Decompress the image file
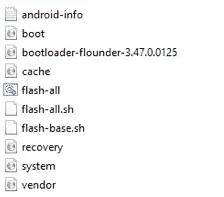
All of the necessary image files that you will need are located in this “tgz” compressed file.
Windows Users
You will need to install a third-party tool to extract this gzip tar file and we recommend 7-zip. It’s free and works great but does NOT treat .tar.gz extract as one atomic operation. You will first extract the main .tgz file and the result will be a .tar file. Use 7-zip again to extract one more level and you will now see actual files.
If you already setup 7z as a system path variable, you can use one command in command prompt (aka cmd.exe) for this (obviously update the path and names as needed):
7z e volantis-MPZ44Q-preview-d15ad483.tgz && 7z x volantis-MPZ44Q-preview-d15ad483.tar
Mac and Linux Users
Using tar which is built in to OS X, open the terminal and you can extract using one command:
tar -zxvf volantis-MPZ44Q-preview-d15ad483.tar.gz
Below is what you should see once you have files extracted.
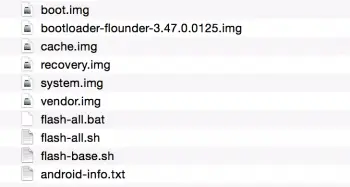
Please Note
Depending on which device you are flashing, you may see slightly different files. For example, the Nexus 6 (shamu) will contain a zip file and an extra radio file. The batch script will also have a few differences from lets say, the Nexus 9 (volantis). On Windows if you are flashing the Nexus 6… please pay extra attention to the Update for Windows users below.
Step 4 – Reboot bootloader and flash
Assuming that you have fastboot and adb already set up and ready to use, just follow the commands below in order.
adb reboot bootloader
This will restart your phone into the bootloader mode. This will only work if your phone is connected and you have USB debugging turned on.
fastboot oem unlock
If your phone is already OEM Unlocked, you would not have to do this, but it wouldn’t hurt if you are unsure.
bash flash-all.sh
This will run all of the fastboot commands needed for the complete image flash. If you are using Windows, rather than a bash script you will use the flash-all.bat (batch) file. One common issue of this not working is that you do not have fastboot setup properly and is not set as an environment variable (a variable that works system wide).
Update for Windows users
There are reports from some Windows users that the flash-all.bat fails. It seems that it’s a bug with the fastboot.exe and how it inefficiently allocates memory. Some users say to try a different usb port or different usb cable, which they claim doing so solved their issues. If this works for you, please let us know in the comments below. Otherwise, please follow the workaround below that KingofPing has provided that will most likely solve your issues. What this does is break down each step manually that the batch file should have automatically done for you. (if you open the batch file in a text editor, you will see these same commands)
Make sure that if you have an extra zip file in your directory that you extract it and place it’s contents in your working directory.
After flash-all.bat errors out, please follow these instructions:
—Don’t “press any key” – that will close the window – just hit Ctrl-C.—
fastboot flash boot boot.img
fastboot flash cache cache.img
fastboot flash recovery recovery.img
fastboot flash system system.img
fastboot flash userdata userdata.img
That’s it!
Once the scripts finish it will do a final reboot and the only thing left is to complete the normal Android setup wizards and enjoy. If you have any issues feel free to comment and we will help you out as needed!
Get Involved
If you are testing on your device make sure you help the Android community out and post any bugs you find. You can share your experiences over at AndroidForums.com, or join the Dev community over on G+ to stay involved.


Congratulations!!! You now have an experimental very unstable rom. Good luck when you get lost at night in the desert with your family. Lol sorry I couldn’t help myself. Forgive me.
haha you are on the right track in a way. Downloaded it on day 1 and received 3 reboots, and battery life was AWFUL. I went down 30% in 30 minutes. Other than that, seems as stable as you would imagine. I am, however, back on 5.1.1 on my Nexus 6. I could not get past the bad battery life I was getting. I loved just about everything M had to offer in the 2 days I had it installed tho. Maybe i’ll wait for the next dev update with hopes they fix the battery life.
Stable as heck on my N6.
Haven’t rooted it yet or anything though – and did factory-reset right after first boot as well.
*crosses fingers*
So far, so good…
I think it was great! are you seeing the same drop in battery??? i have not heard anyone else with the N6 flash M. I played for 30 minutes and it just dropped 1% of a minute. Every time I turned the screen on, I just watched the battery drop. I did not fact reset it tho. Maybe that is the root of my issues.
Initially in ate battery like nobody’s business. Once I had everythig set up and my own usage dropped back to normal, things seem fine. Last all day, just like it did before.
(Haven’t noticed any boost from “doze”, but then it doesn’t sit still all day, either.)
I’m had it flashed for 2 days, I did notice 1% dropped over over night after I left it unplugged. maybe doze is that great??? maybe i’ll flash it again tonight and try to get usage under control and hope for the best.
Factory reset after first boot. Not sure if it will help, but it’s what I did, so it may. :) Good luck.
According to instructions on XDA, you’re supposed to reboot to recovery after flashing. Then do the factory reset before initial boot.
What I did on mine. Working flawlessly ever since.
Yeah – that’d be better. Would cut out the initial boot before starting the reset from settings. I always imagined it did some set up of some of the userdata folders/files on that first boot that needed to be there when you factory reset. My imagination has been known to be wrong, though. ;-)
This is not going to work for many Windows users. Flash-all.bat has been problematic for many users (on any nexus device) since Lollipop. (Explanation here: http://www.androidpolice.com/2014/11/12/running-into-the-dreaded-missing-system-img-error-flashing-android-5-0-factory-images-heres-how-to-get-around-it/)
If your install fails (“missing: system.img”), follow the instructions below.
Working instructions:
—
Using 7zip:
right click the downloaded .tgz and choose “extract here”
right click the extracted .tar and choose “extract here”
right click the extracted .zip file and choose “extract here”
ctrl-right-click on the folder name you are in and choose “open command window here”.
plug in nexus 5, 6, or 9.
adb devices (make sure device is present)
adb reboot bootloader (should reboot device into bootloader mode)
fastboot devices (make sure device is present)
flash-all (will flash bootloader and radio and then error out)
—Don’t “press any key” – that will close the window – just hit Ctrl-C.—
fastboot flash boot boot.img
fastboot flash cache cache.img
fastboot flash recovery recovery.img
fastboot flash system system.img
fastboot flash userdata userdata.img
Follow these instructions and you should be able to press the power-button on your device to have it boot into Android “M”. This boot will take a while.
(Feel free to copy/paste this into the article…)
Flash-all.bat has always worked for me. Since long before lollipop and now M on my N5
There are some “fixed” images out there. The one’s direct from Google are widely reported as non-working (they’ll error out after flashing the bootloader and radio).
Based on personal experience with my Nexus 6 and from reports on XDA and elsewhere. (I haven’t flashed it to my 5 yet, it is possible it’s a Nexus 6-only issue, but I swear I’ve seen it reported on that device as well….)
(Added a bit about the N6 just in case.)
So may be. Me I only download images from Googles developer site. Always worked
Added a link to an explanation of the error (which apparently affects all Nexus models, but not all Nexus devices) to my OP. Thanks for the input. :)
Your link is 404. Take the spurious ) off the end of the URL.
Fixed – it added the end-parand to the link. Just removed the parenthesis.
flash all works fine on everything prior to lollipop. I’ve never had it work once on the Nexus 6 though.
Can confirm. Lollipop factory images have this issue on the Nexus 6 and Nexus 9, on Windows at least, and I had the issue last week on Android M too. I just extracted as you mentioned and flashed manually, old school. All is well.
As for soft brick, LOL, you can’t soft brick your phone with the method posted in the article.
Well, you’d end up flashing the bootloader and radio-only.
Haven’t verified if it results in bootloops personally, but it certainly isn’t a preferred outcome. ;-) Changed the wording, regardless. I
may have beenwas a bit over-zealous.I had this issue only when I had a custom recovery installed. After flashing back to stock recovery, I was able to use flash-all.bat no problem. YMMV.
Thanks for the info. I have updated the article with the necessary workaround for Windows users that are experiencing the same issues. Thanks again!
Thanks for the credit :thumbsup:
Just an FYI though; flash-all.bat only has commands to flash the bootloader and radio – it then executes a script to complete the rest, so the fastboot commands for manual flashing are not actually in the batch file.
The commands are all in the bat file… it just waits until the bootloader restarts. I was just explaining that the commands below are in the file… that’s all.
From the (lollipop) batch file:
fastboot flash bootloader bootloader-shamu-moto-apq8084-71.05.img
fastboot reboot-bootloader
ping -n 5 127.0.0.1 >nul
fastboot flash radio radio-shamu-d4.0-9625-02.55.03a.img
fastboot reboot-bootloader
ping -n 5 127.0.0.1 >nul
fastboot -w update image-shamu-lrx21o.zip
This is it, minus the Echo commands and comments.
That last line should execute the boot, cache, recovery etc…all without the commands listed for flashing them. No big deal – doesn’t affect the instructions or method above in the least – just more informational than anything.
Sigh, we are both right.. lol. Provided updates in the article to explain. ;) Thanks for the info though!
It wouldn’t be any fun if we were all right all the time. :P
If anyone has any other issues, please comment and I personally will be glad to help! Like the warning does say, this is not for normal consumers. …but if you are like me, it’s a must even if very little changed and features are not quite complete. ;)
Can I install the Android M developer preview if I bought my Nexus 6 from verizon ?
I don’t know anything about flashing a phone but I do know the tar command and c is for compress and x is for extract. I think the command you want is tar xzvf filename.tar.gz.
Heh…he either fixed it, or your were looking at the 7z command line. :)
Ha.. I had the command to compress earlier :/ I did update it after I read back through and it’s correct now. But yes, you are correct! Order does not matter if anyone is wondering.
The different USB port method is a myth, haven’t tested cable though. @KingofPing:disqus’s method worked flawlessly. Thanks!
Thanks for the info. After investigating the issue a little more I am pretty sure it’s the fastboot.exe bug with flashing the images using the compressed zip file. It seems the users that I talked to that did not have this issue were flashing the Nexus 9, which does not contain that extra level zip.
Running this for Nexus 9 on my mac. Everything goes well (even says “finished”):
(bootloader) start image[pt] unzipping & flashing…
(bootloader) …… Successful
OKAY [ 5.399s]
finished. total time: 5.737s
Then a bunch of USB errors:
rebooting into bootloader…
OKAY [ 0.029s]
finished. total time: 0.029s
target reported max download size of 518205818 bytes
sending ‘boot’ (8342 KB)…
OKAY [ 0.815s]
writing ‘boot’…
(bootloader) Device State : Unlocked
OKAY [ 0.817s]
finished. total time: 1.632s
ERROR: could not clear input pipe; result e00002ed, ignoring…
ERROR: could not clear output pipe; result e00002ed, ignoring….
ERROR: usb_write failed with status e00002ed
ERROR: usb_write failed with status e000404f
sending ‘cache’ (6248 KB)…
ERROR: usb_write failed with status e000404f
FAILED (command write failed (No such file or directory))
finished. total time: 0.000s
ERROR: could not clear input pipe; result e00002ed, ignoring…
ERROR: could not clear output pipe; result e00002ed, ignoring….
ERROR: usb_write failed with status e00002ed
ERROR: usb_write failed with status e000404f
sending ‘recovery’ (9092 KB)…
ERROR: usb_write failed with status e000404f
FAILED (command write failed (No such file or directory))
finished. total time: 0.000s
ERROR: could not clear input pipe; result e00002ed, ignoring…
ERROR: could not clear output pipe; result e00002ed, ignoring….
ERROR: usb_write failed with status e00002ed
ERROR: usb_write failed with status e000404f
fastboot(10237,0xa0bc01d4) malloc: *** mach_vm_map(size=2130829312) failed (error code=3)
*** error: can’t allocate region
*** set a breakpoint in malloc_error_break to debug
error: cannot load ‘system.img’
ERROR: could not clear input pipe; result e00002ed, ignoring…
ERROR: could not clear output pipe; result e00002ed, ignoring….
ERROR: usb_write failed with status e00002ed
ERROR: usb_write failed with status e000404f
sending ‘vendor’ (147127 KB)…
ERROR: usb_write failed with status e000404f
FAILED (command write failed (No such file or directory))
finished. total time: 0.008s
ERROR: could not clear input pipe; result e00002ed, ignoring…
ERROR: could not clear output pipe; result e00002ed, ignoring….
rebooting…
ERROR: usb_write failed with status e00002ed
Any ideas?
Can I install this if I bought my nexus 6 from verizon ?